Hello…are there anybody out there in the whole world wide web? Well, I don’t blame you. The last time I’ve posted anything was many moons ago, but I won’t bore you with all the mundane things that I’ve been doing. There is one more challenge I’d like to take on and it does take quite a bit of time to resolve it. For now, I need to solve some electronic issues first. During the development of the different RV models, one of the things that I did not want to tackle with was the slide-out’s motor control. For the last couple builds, I bought a simple slide-out motor control from a well known manufacture then mount them into the frame as instructed. Power was provided by a DPDT switch. Pretty simple: +12 VDC, Extend or -12 VDC, Retracted.
The system worked as advertised. However, I wanted to provide a little more sophistication to the design, hence, the following project. The time is right to start this project.
So if you are not familiar with a thing called Arduino. It’s a simple single board computer. A lot of high school kids use it to build robots. That’s right… them fighting robots that sometimes you watch in the learning television channel. Electronic is my chosen profession so that why I’ve left this project last.
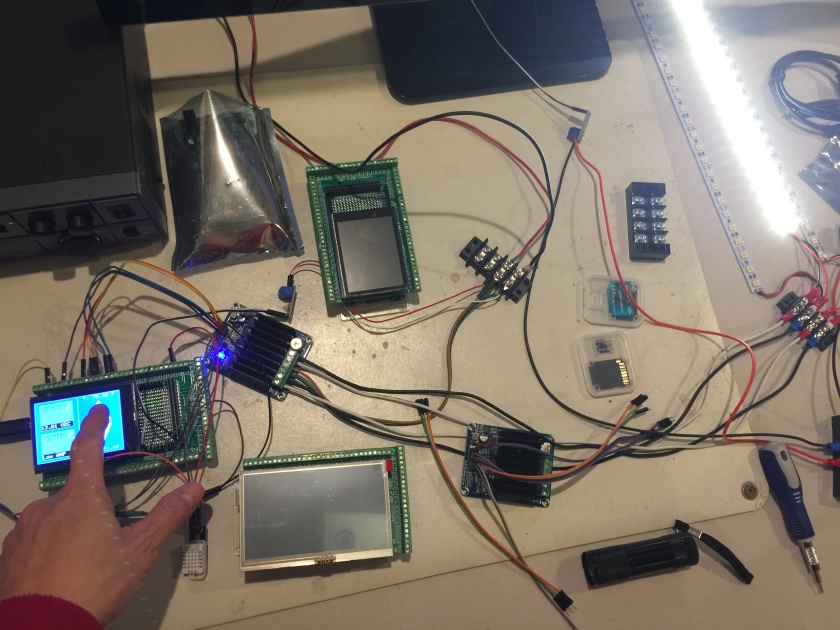
Off I went to order a bunch of electronic components. Let’s see… a couple Arduino cards, a couple MegaMoto motor current drivers, a few BTS7960 motor drivers, a couple 2.8″ TFT Touchscreen display, one 4.3 TFT Touchscreen display, and lastly a few gigantic linear actuators rated at 900 – 1,000 lbs!
In one evening as I was busy preparing for the project, my wife walked by and noticed the gigantic mess that I am making in the room:
“Wha’cha doin’?” She asked casually with her usual perky voice.
“Umm..Well, making an ah dweenno…controller”. I mumbled on.
“You are making an “I dunno know” controller? What it’s for? Making a mess out of your electronic things won’t make you look any smarter, you know.” I can always count on her to diss out a tease.
I was going to make a snarky come back but I was really tired and should really hold my tongue and keep the peace.
“Well, after you’ve figured out what it is that you want to do then go downstairs for diner.”
Whew, that was close. Diner would be good about now. Ok, I will be back after diner…don’t you go any where.
Ok, stomach is full. Let’s get on with the project.
Project One: Checkout the MegaMoto Motor Drivers
Materials:
One Arduino Mega
Two MegaMoto Motor Drivers
Two SPST switches: One for Extend and One for Retract command
Four 12 VDC LED light sets as substitute for the 12 VDC motors that are in order but not yet delivered.
Operational Description:
If Extend button is pressed (Grounded), then Extend command is initiated i.e. both MegaMoto drivers are set to provide +12 VDC to the two motors.
If Retract button is pressed (Grounded), then Retract command is initiated i.e. both MegaMoto drivers are set to provide -12 VDC to the two motors.
Else, shutoff both MegaMoto boards.
How does it work?
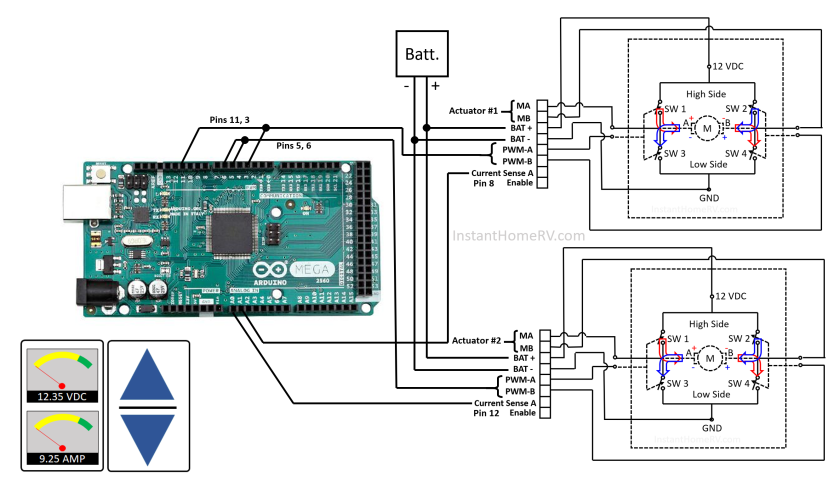
Well what I wanted to do is to use the Arduino processor to control two MegaMoto high-current drivers. Each will drive a 900-1000 lbs. capacity actuator. The actuators have a Hall effect feedback in the form of two digital wave-forms. The plan is to use one of the Arduino interrupt to intercept and count the wave-forms from each actuator. They both should be incremented in tandem. If one is off from the other then the processor will shut-off power from both actuators. This is to ensure that both actuators will move in synchronize. If one is broken electronically or stuck mechanically, the Arduino processor will shut off power in order to prevent what is known as “binding” in the sliding tracks of the slide-out. Pretty simple indeed. Additionally, the Arduino will provide a touch screen user menu with extend/retract commands, status feedback such as 12 VDC supply and distance movement. This design will be the main components to drive both slide-outs in the RV design.
Specifications:
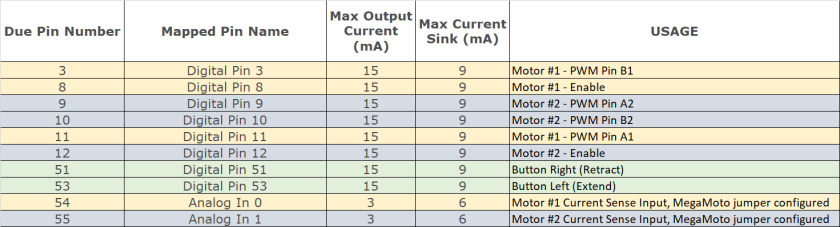
Arduino Due I/O Pin Assignment:
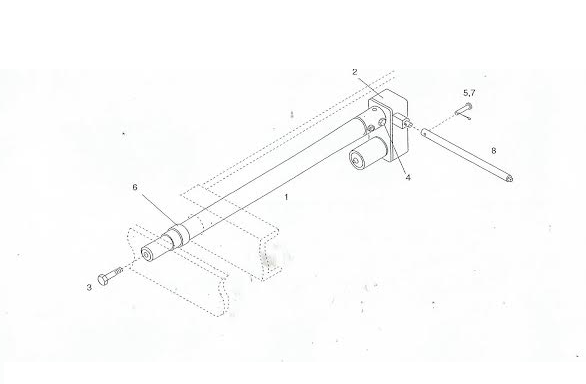
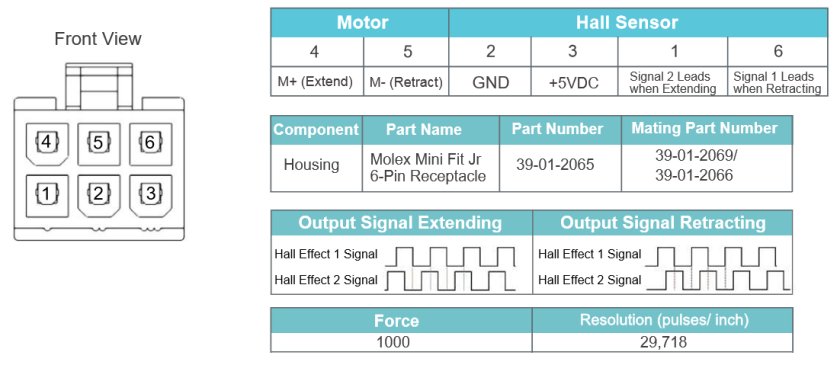
The Hall Effect Actuator I/O
The MegaMoto High-Current Motor Drivers
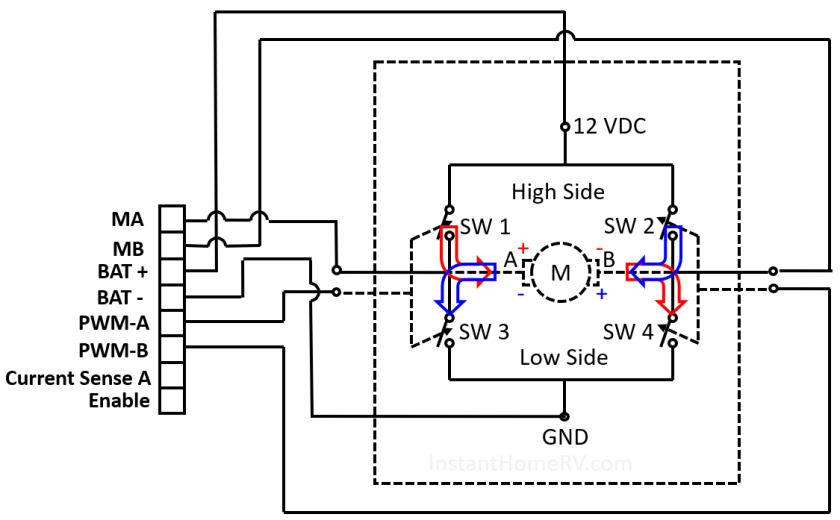
The MegaMoto is an implementation of Infineon H-Bridge Bi-directional Motor Control in a full bridge configuration:
Ok, if that’s too much then following is a much simpler explanation of a full-bridge motor controller:
So the full bridge motor controller goes like this for the geekiness in you. Switches SW-1 and SW-3 are always opposite to each other. If SW-1 is open then SW-3 is closed, vice versa. Similarly, SW-2 and SW-4 are opposite to each other. Both sets are controlled by the MA and MB enable lines. The logic diagram is as follow:
MA
MB
M+
M-
Function
0
0
GND
GND
Motor Braking
1
0
12 VDC
GND
Motor Forward
0
1
GND
12 VDC
Motor Reverse
1
1
12 VDC
12 VDC
Motor Braking
So our wiring diagram becomes like this. Each full bridge will drive one actuator motor and monitoring the positional feedback (Hall Effect feedback, more on this later):
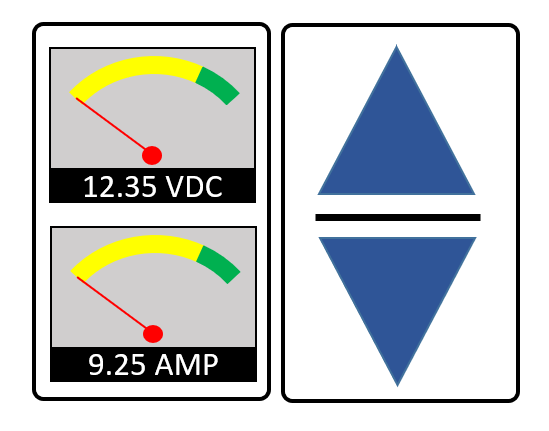
So now the only missing piece is the Human Machine Interface. So, this nifty little display concept will do the job just fine. The Up Arrow is for extend the slide-out command , the Down Arrow is for the retract the slide-out command. The two analog gauges shows the voltage and current of the slide-out actuators. Since there are two actuators per slide-out, the voltage is common for both, however, the current is different for each actuator, so the current gauge will alternate between actuator # and actuator #2 using different color text.
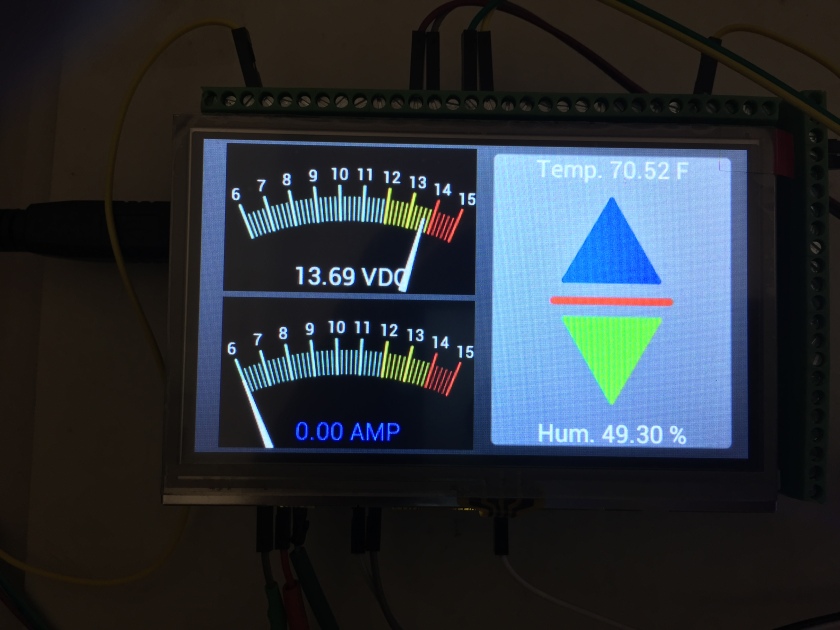
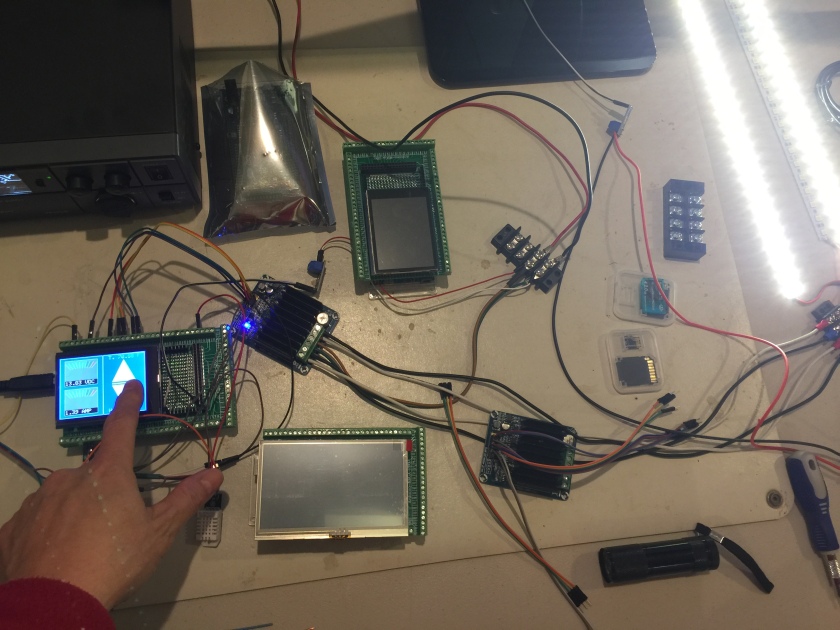
It’s been a long time I haven’t coded graphics so let see how it will turn out. I haven’t decided which display I will select for final design so I coded the programs for both displays. You can see the results from both later.
Ok, here’s the initial snapshot.
I also added in the humidity and temperature sensors. The temperature seemed to be accurate but the humidity was a disappointment. At least, the HMI looks decent.
Here’s the same HMI with a much larger 4.3″ display. The codes are a bit more complex since this display comes with its own graphics engine. The menu display the common 12 VDC supply voltage of the actuator motors and the current gauge display the current drawn from each motor. The current gauge switches between the motor #1 and #2 every few seconds.
Since I don’t have the actuators ready yet. I wired the output of the H-Bridge to drive the LED lights. The light sets make a good test vehicle. These are 12 VDC LED and the touch buttons seems to work as intended.
Do I hear the UPS man at the door? May be that’s my actuator delivery. I can’t wait to test them out.
See you in a little while…or whenever I have a little bit of time to continue this project.
I believe there is a certain age when a person will recognize the virtue of patience. It’s been almost three years since I first cutting the steel and attempted to fabricate my first design. Although I had an idea what I wanted to create but I was never sure what the final products may look like. I just knew that the design must serve a purpose and it must serve that purpose exceptionally well, thus, becoming the inspiration for my relentless pursuit of perfection. As you can see that I am heavily influenced by the Eastern philosophy with my work ethic, I am never hurry with my works. Three years and four patent applications later (two granted, two still pending and there are a few more to come), and I still feel like I am at the beginning of my journey. A few of my readers have asked: How come I don’t see the exterior designs? Well, I wanted to solve the utility of the design first. The design firstly has to be functional and serve the purpose exceptionally well. To do so, I had to solve some of the most challenging living space designs for an extremely small body. Once that was done, the exterior design can get started. I believe that the exterior designs are to complement the utility of the end products. It’s not enough that a product works well. It has to look exceptionally good as well.
It’s not enough that a product works well. It has to look exceptionally good as well.
Video On Demand Review
Now, before I can introduce you to the Soloist II’s exterior design, let me introduce you to a brief video review. There’s a Video On Demand program from NHK World-Japan titled:
“In this episode, we explore central and western parts of Japan, starting in the Kansai region. Kansai, which includes the ancient cities of Nara and Kyoto, is the cradle of Japanese culture and religion. As well as enjoying stunning scenes from the air in the heartland of Japan, we meet a sword maker, a plant hunter, a traditional entertainer and a pair of paper makers. Whatever their chosen path in life, they seek to uphold knowledge and wisdom passed down through the years.
Available until August 25, 2019″
It’s a beautiful program. Around the 3:57 minute marker, you will meet a sword maker. My present sentiment is exactly like the apprentice still learning how to cut charcoal in the video. Talk about infinite patience. It takes about three years to master cutting …charcoal!
I highly recommend you to visit the video program above. Since it is only available for a limited time. I am putting together some screen shots here hoping to entice you to visit the program (Please remember that the credits belongs to NHK-World Japan and I am not being paid for this referral service!).
This slideshow requires JavaScript.
The Three-Year Mile Marker
Ok, so consider this is equivalent to three years of cutting charcoal and I have no master to guide me.
Now before you ask what’s so different from the many dual slide-out trailers out there, consider how tiny this trailer is:
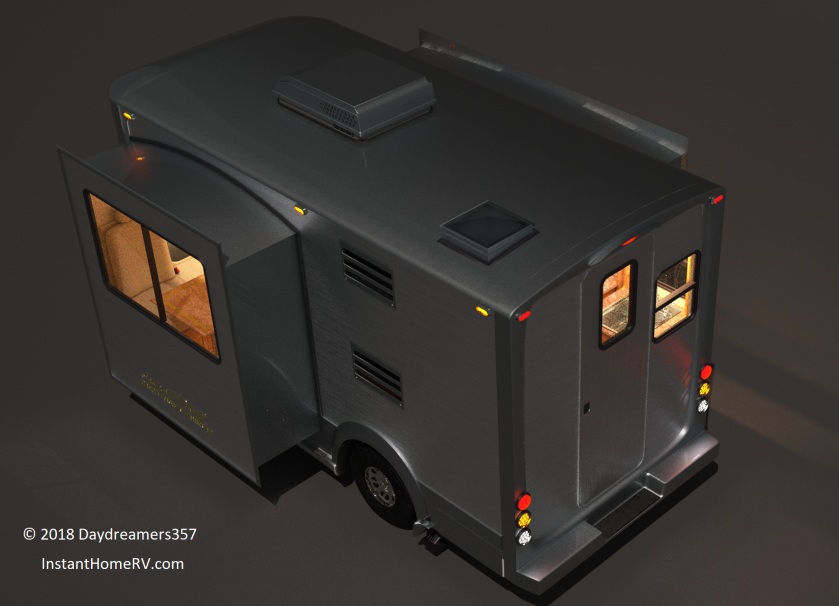
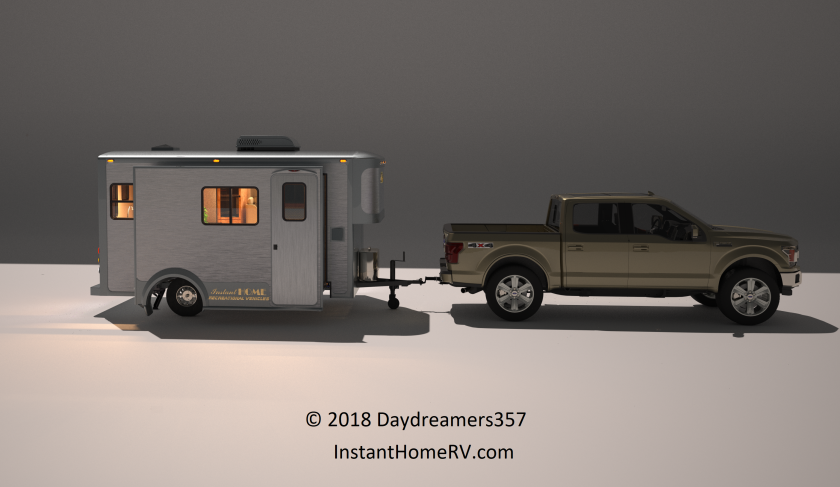
Just to put things into a proper perspective. Take a look at the following combo. The truck is a Ford F-150XLT model. The Solloist II is the cutting edge of form and function at the most extreme compactness.
Watch the next post for the most innovative interior design.
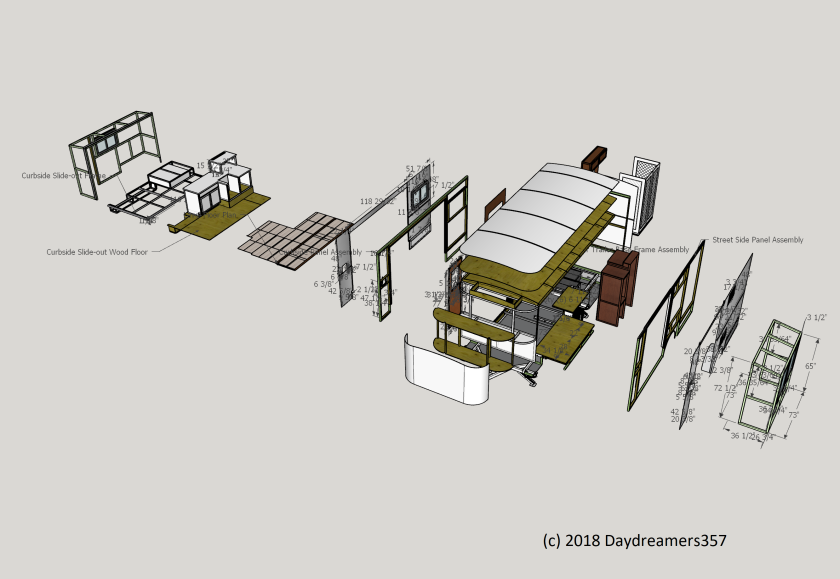
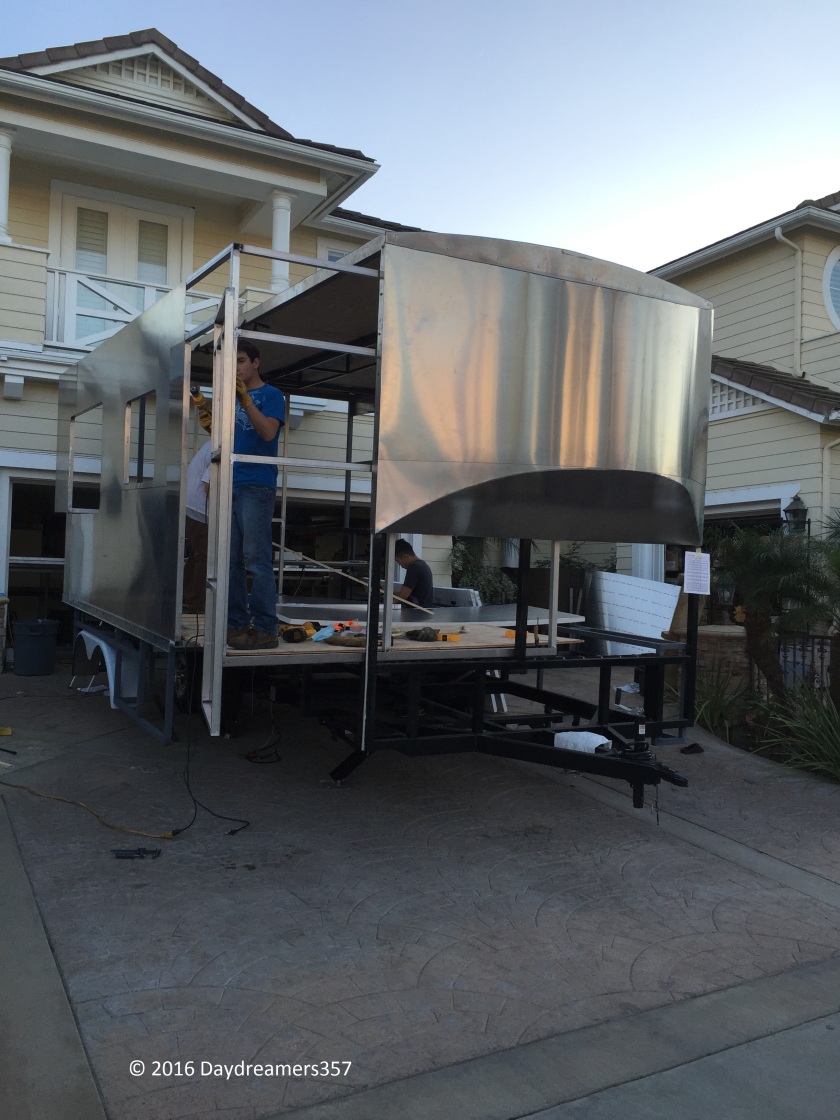
February 24th, 2018 marks the two year anniversary of the Sonoran project. The slide-out design that I have built in the Sonoran project was actually intended as the proof-of-concept design for a much bigger idea. I’ve used that design on two such models as you have seen, with the last design named the Soloist. On such an occasion, I’ve decided that it’s time to truly show the versatility of such design. I’ve decided to start creating a couple motorized RVs based on the Mercedes Sprinter chassis. I’ve been contemplating this design for many years. This project is literally 2 plus years in the making. I started to seriously considering designing motorized RVs in the 2016 when I was debating about the design of the Sonoran project as either a tow-able model or a motorized version. I chose to create a tow-able model with the Sonoran project instead of the motorized model because I wasn’t so sure that I could make an optimal design in the first attempt. I wanted to create a new class of RVs that are so lightweight and compact that you can park the RV in your driveway just like a minivan or a full-size truck yet the RV must be roomy enough so that you and your loved ones can relax in comfort after a long day of adventure. There is no room for error when designing a motorized RV on an expensive cut away van chassis. The path taken was a long and rigorous process. I needed to prove the concept first, then optimize the weight to minmize the load on the chassis. Once I am confident that every minute design details has been properly addressed, then I can confidently put the design onto a cut away van chassis. It took more than half a year to do the initial design, hence, I didn’t update this blog very often. Once the initial design is completed, I can literally cut metal and start welding them together.
This is the level of details needed to build an simple tow-able RV.
This motorized model is especially challenging because of the extremely narrow body of the cut away van chassis. The van was originally designed for the narrow lanes of the European back country. The narrowest section of the interior body between the rear axles is merely thirty-eight inches! Off course, there were a lot of sleepless nights. My wife had even scolded me for having forgotten to eat lunches on many occasions which probably weren’t very good for my health. But like a possessed man, I blindly pushed on.
The goal? There will be a next generation of super compact RVs created specifically for the active lifestyles of the hard working families.
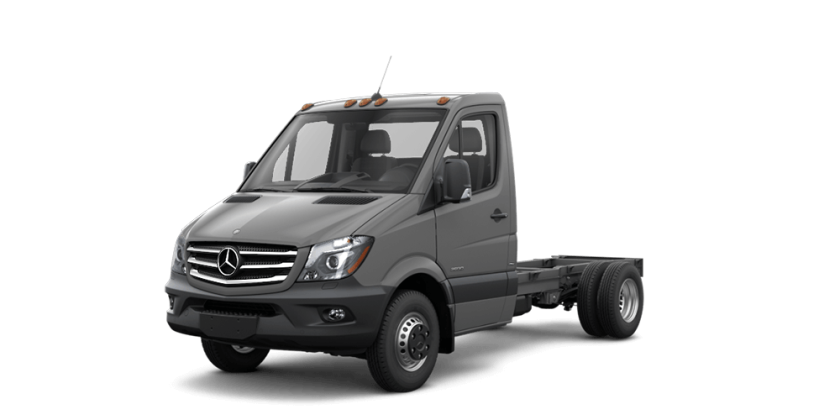
Why the Mercedes Sprinter Model?
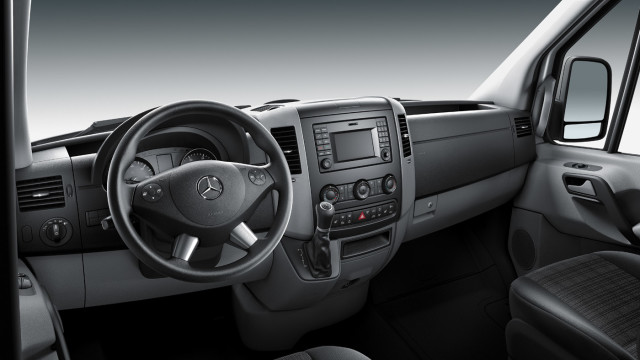
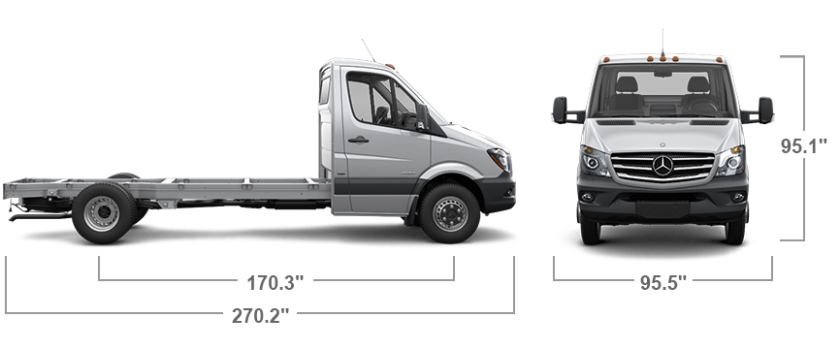
Why pick such a small chassis to build the RV? Although I’ve always love a good challenge, but that wasn’t the reason for the selection. Going back to the years of working for a company, holidays and vacation days were very precious and far too few in between. As my young family was growing up, I’ve always hated the vacation packages such as cruises and packaged vacation deals where you will be herded along with everybody else trying to maximize their vacation times. After the vacation, I’ve always felt like I’d need another vacation by myself just to recover from the vacation. Ironic isn’t it? I am not trying to diss these vacation packages. I just felt like there must be some other alternatives to instill a sense of adventure into your kids and create those very special bonding moments that only mother nature can provide. What if on a whim, you just grab your kids and jump into your RV heading to the next unknown destination of the great outdoors? So, the RV has to be small enough that you can park in your driveway everyday instead of some paid RV storage, yet when you are at the destination it will have to be big enough so that you can sleep two adults and one or may be two young kids! Comfortably that is and none of the hassle of putting up the tent! What about all-wheel drive when you are in a less developed camp site? Yes, I’ve seen a lot of those Class B van conversion RVs. Let just say they fell far short of the stated goals. What I need is to give the Soloist the driving cab of the Mercedes Sprinter van chassis. Perhaps, now you would understand why it was no coincident that the Soloist was created. I have had my eyes on the Mercedes Sprinter chassis for the longest time. The narrow body of the Sprinter poses a real challenge but I love the reliability and the drive ability of the Mercedes design. Oh my, and look at those good looking curves! No silly, not her, the Mercedes! Mercedes have really mastered their very characteristic curvy design. One quick glance of their car’s stylish silhouette and you know it’s a Mercedes. Let see if I can match their characteristic design with my own. It’s really tough to make a breadbox sexy you know, but if we are going to park the RV in front of the house, let’s make the neighbors jealous shall we?
So this is what I am starting with. Please note that the following Mercedes chassis pictures belong to Mercedes, not mine.
The specification for the chassis are:
Ok, ok, enough of the blabbering. Either put up or shut up
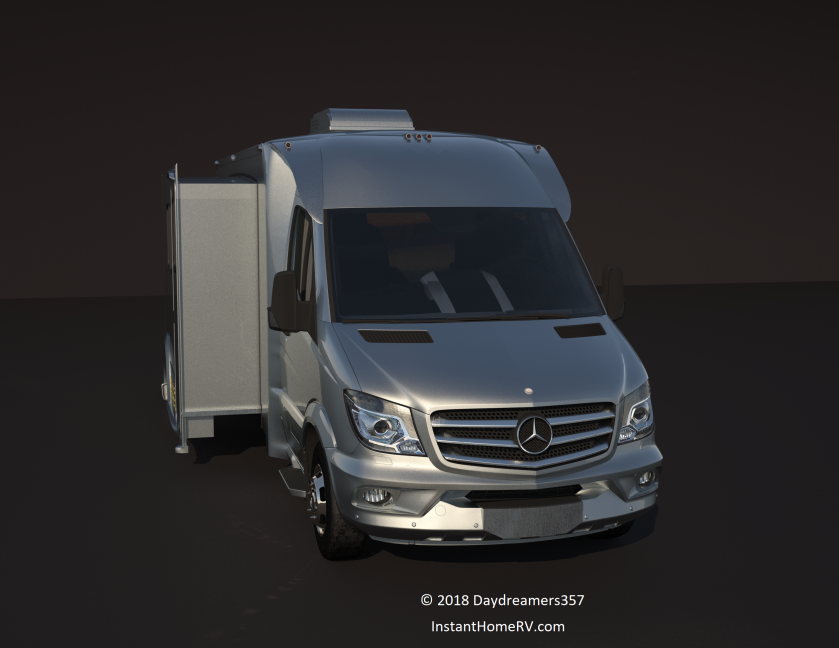
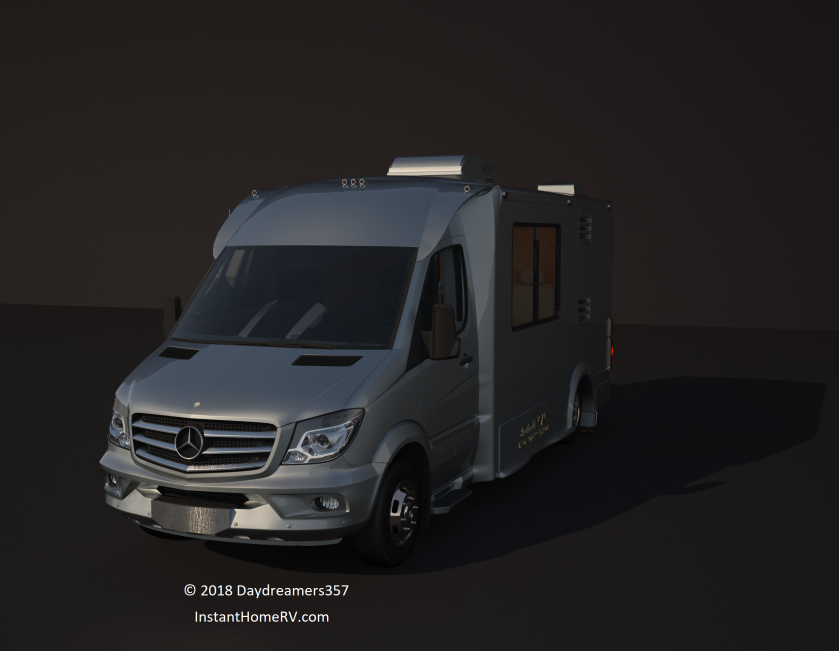
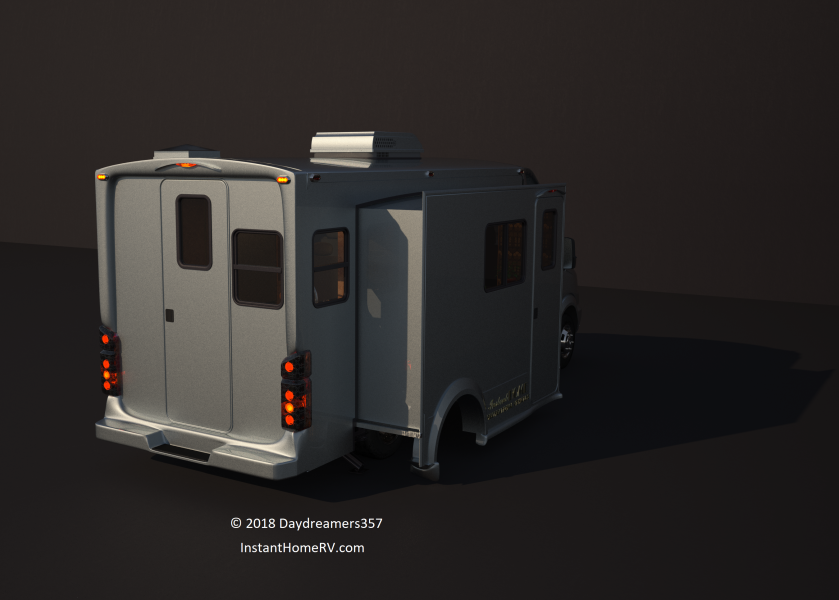
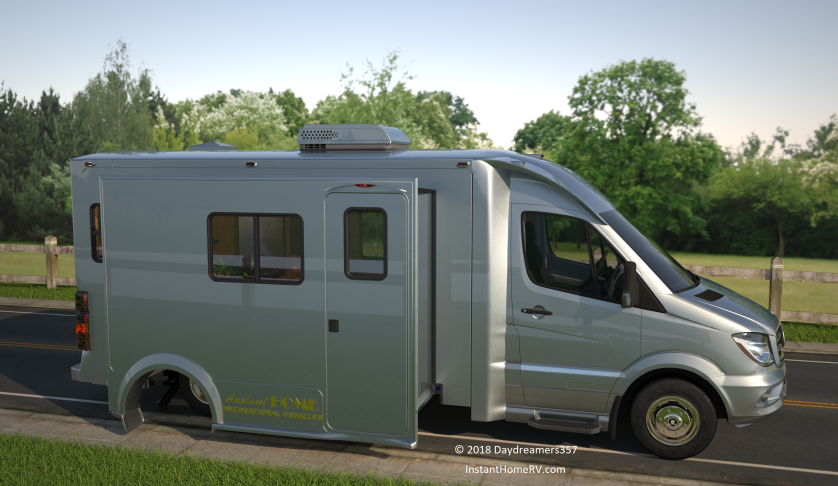
Drum rolls please, maestro…Introducing the world’s first full wall slide-out Class B RV design.
Have You Ever Seen a Full-wall Slide-out on a 23 foot RV?
There isn’t one until now! The overall dimensions and floor plan layout of the RV are as follow:
See how seamlessly the body of the Soloist design integrated into the Mercedes cut away van chassis? I did not ruin the aesthetic looks of the Mercedes design.
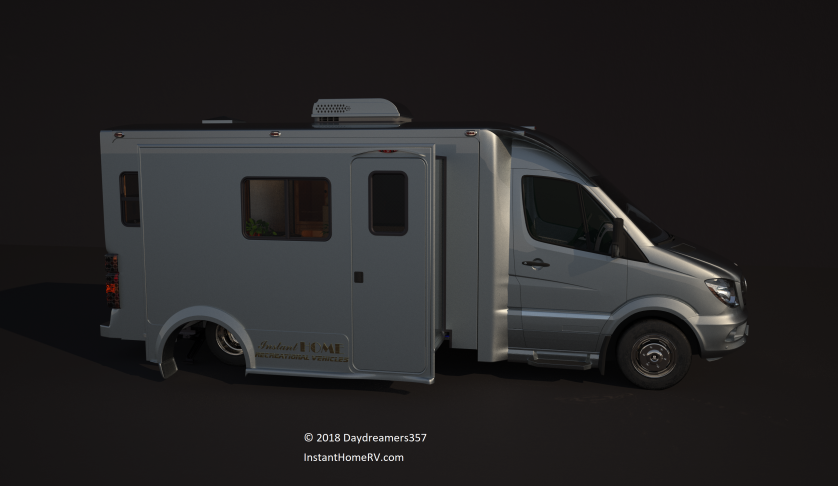
Do you remember the slide-out that was built in the Sonoran project?
Look at its reincarnation now…
The theme of the design is curvy!
Why The Grand Canyon Project?
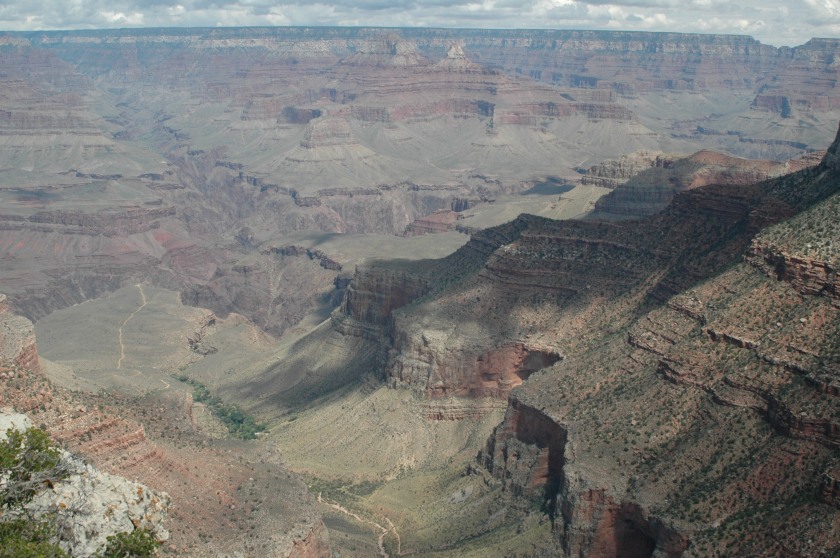
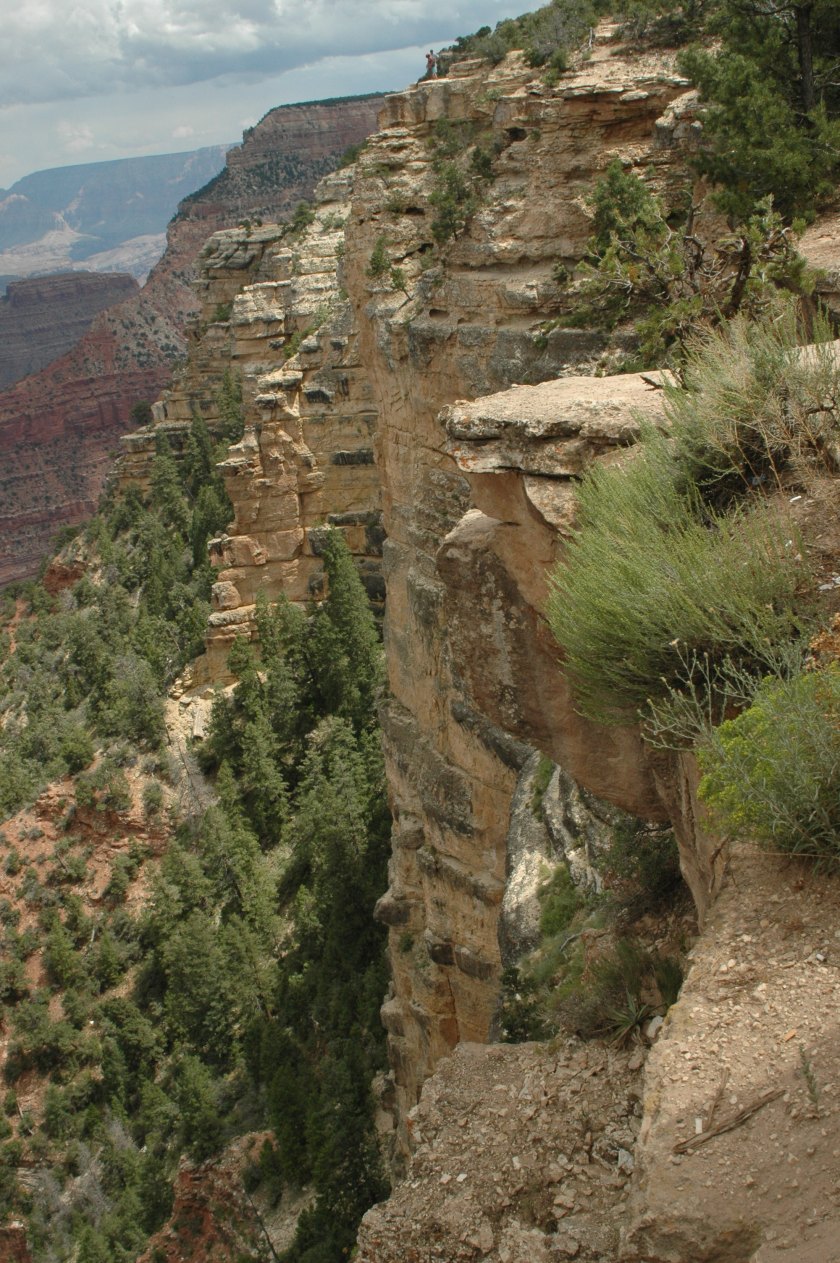
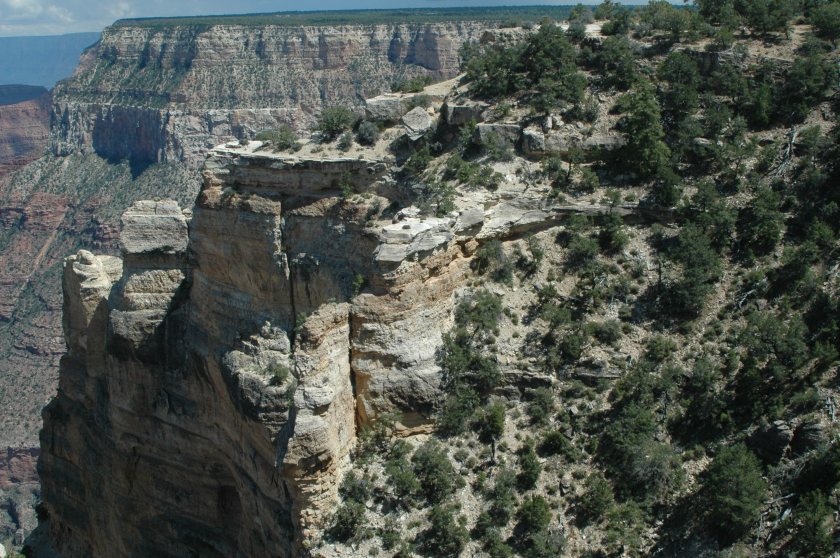
I lost count how many times I’ve visited and camped at the Grand Canyon. Most trips started with a few friends getting together on Friday night, then simply grabbing a tent, picked up some foods at the supermarket, fill up the gas tank, and off we went in the wee hours of Saturday morning. The Grand canyon is such a wonderful place that it will give you a sense of awe in the present of mother nature.
See if you can make out the brave folks at the top ledge. It’s a long way down without any safety barrier!
What a blessing to have grown up out there in the Southwest. Even at this age, I haven’t lost the lust for wandering. The place itself have gotten a lot more like a tourist trap now a day. However, because of the sheer size of the Grand Canyon, you can still find a lot of the primitive camping spots in the area. So, this project is a tribute to mother nature’s grandest. It was designed for those who crave for the spontaneity of the unplanned adventures. I hope someday my creations will inspire even the least adventurous to be out there and enjoy the best that mother nature can offer. I also hope that they will teach their children to appreciate the grandeur of the outdoors at the early age so that when they grow up, they won’t trample mother nature’s virgin lands and will only leave behind the gentle footprints of their visits.
By the way, watch for my next post for the most innovative RV interior design as I am pushing the limits of compactness in the Mercedes Sprinter design.
Over decades of working on airplane, I have developed an obsession for miniaturization. In general, as a design matures, the engineers are often asked to reduce the size and weight of the design while provide improved capabilities. These directives are just the natural progression of the design cycle. They provide a new set of challenges to improve the design over time. Well, the Yellowstone project was quite a challenge by itself, then the Sonoran project took the design much further in term of compactness, but can I push the boundary a little bit more while still retain all the critical functionalities?
Now, let’s not get ahead of ourselves yet. Over the year, I have followed a number of bloggers who have generously laid out their lifestyles in their blogs. I have been following these bloggers for years. I am thankful for their experiences and their daily journals that allow me to acquire the inspiration for my designs. Here’s the short list of the links to their sites. This is not a complete list but they are the ones that I’ve read every single post. The list is not in any particular order of important or preference:
The one characteristic among these bloggers is their minimalist lifestyle and their choices for RV as a full time residence for which I’ve found extremely fascinating.
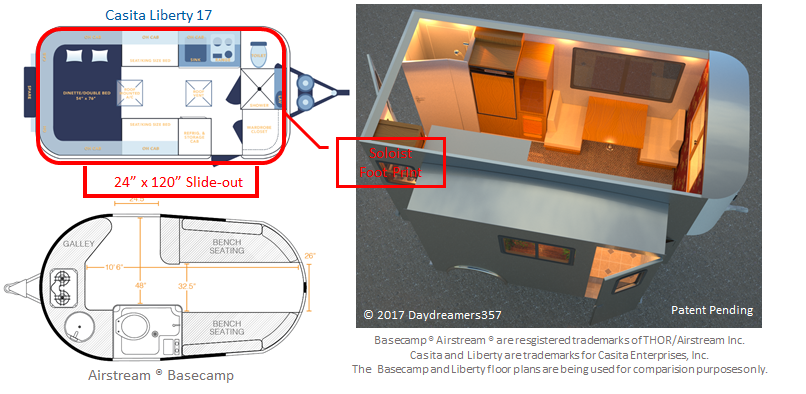
So, I was wondering how much smaller can I make the RV and still retain the “Home Comfort”? To answer this question, I started to look at the specification from some of the smallest RVs (i.e. Casita, R-pod, Escape, Airstream Basecamp, etc.) and came up with my own general specification:
FEATURE DESCRIPTION
MEASUREMENT
Overall Length
16’4″
Overall Height
9′
Box Length
13′
Box Width
7′
Interior Height
6’4″
Overall Width
7′
GVWR
3,500 lbs.
Axle Capacity
3,500 lbs.
Refrigerator
5.5 CF
Black/Grey Water Capacity
39 GAL Combo
Fresh Water Capacity
20 GAL.
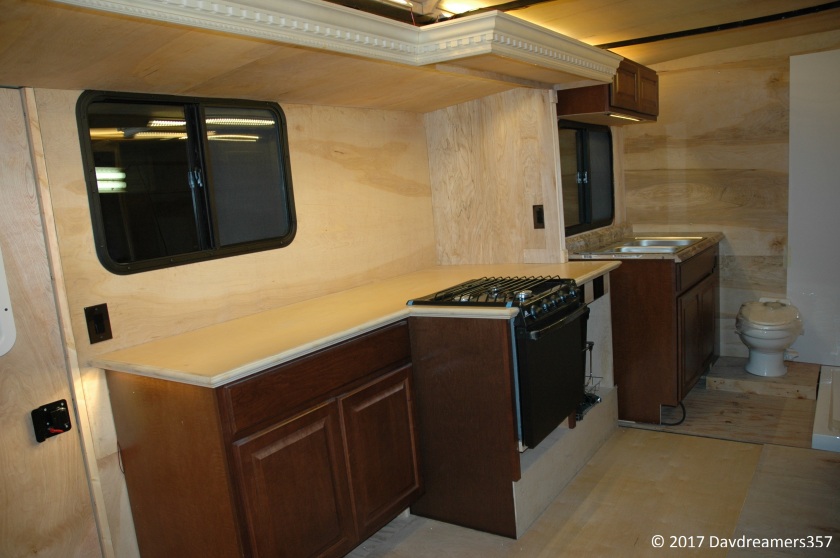
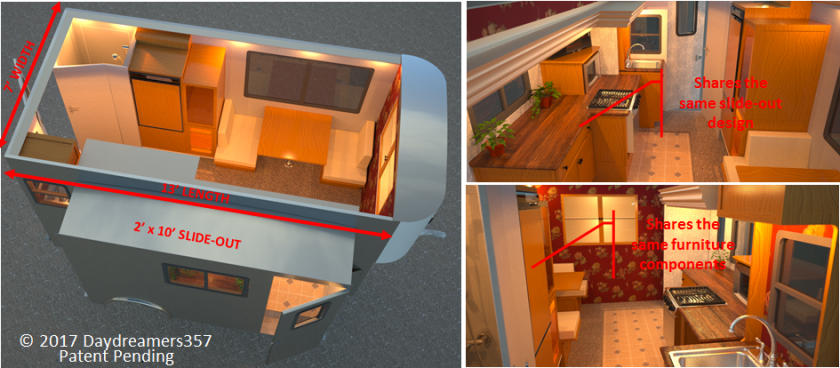
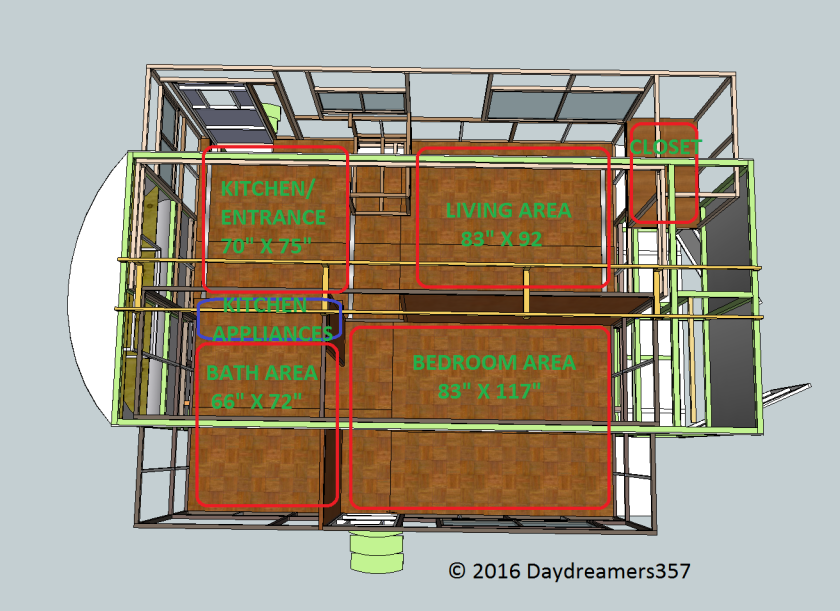
The reasons for those specification numbers are not by accident. This time, I’ve designed the Soloist from the Curbside slide-out. When I took a look at the Sonoran project, the thing that I felt the most important achievement was the Curbside slide-out. The Curbside slide-out is a fully functional kitchen and living space combined together in a full wall slide-out configuration. So using the Curbside slide-out as the focal point, I started to build out the remainder of the RV with the minimalist lifestyle as a guide. I do have to trade off a full size bath for a 24″ x 32″ combo bath design. Additionally, I will have to reduce the size of the refrigerator to 5.5 CF to make room for the 20 GAL fresh water tank.
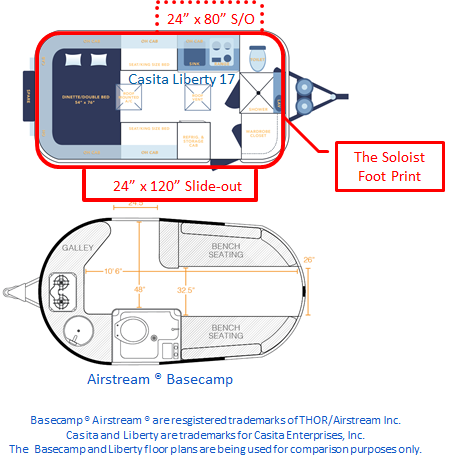
Just so that you have an idea of how small the Soloist is. Here’s a floor plan comparison:
The Soloist will share the same Full Wall Slide-out built in the Sonoran Project
The Soloist Design Concept
The Preview
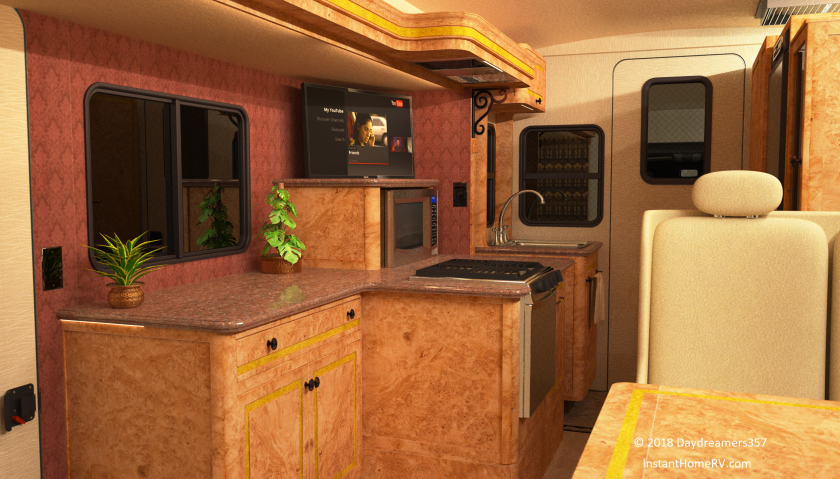
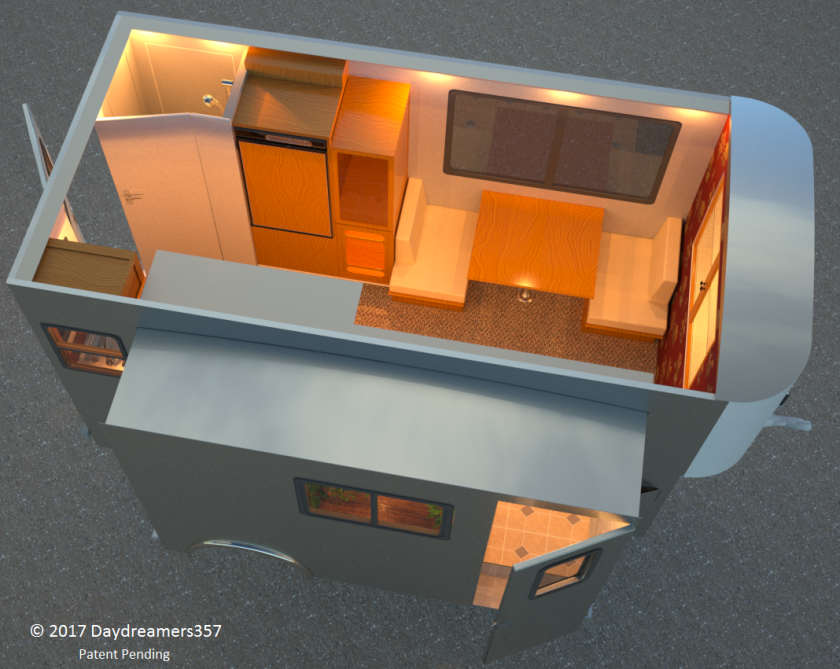
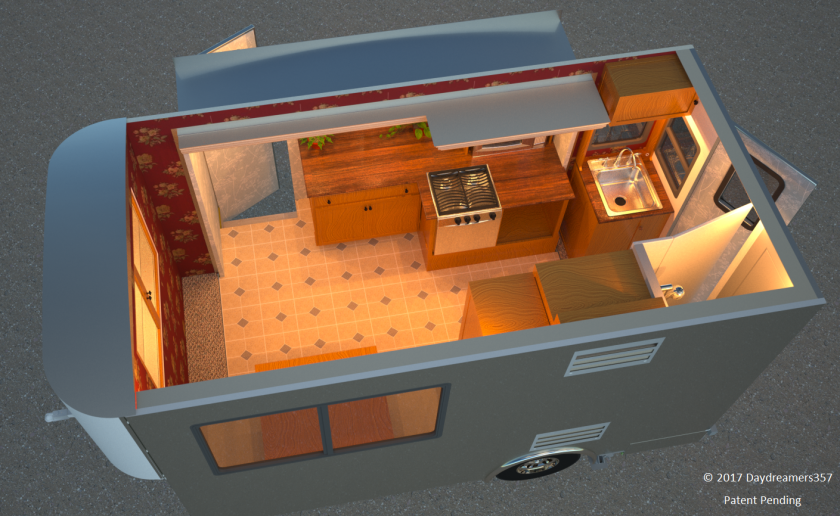
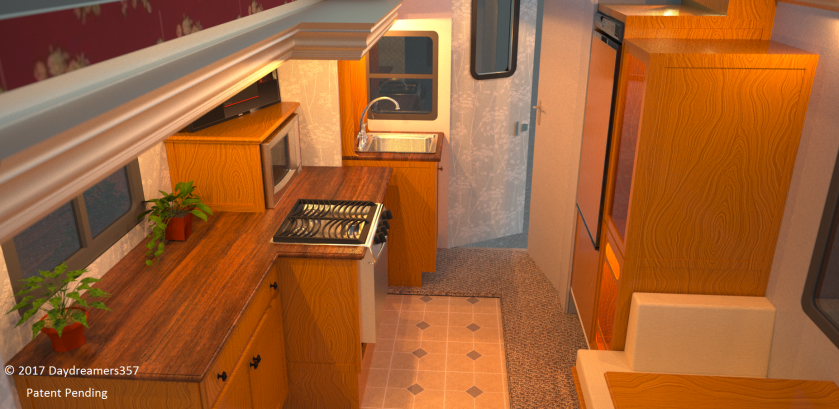
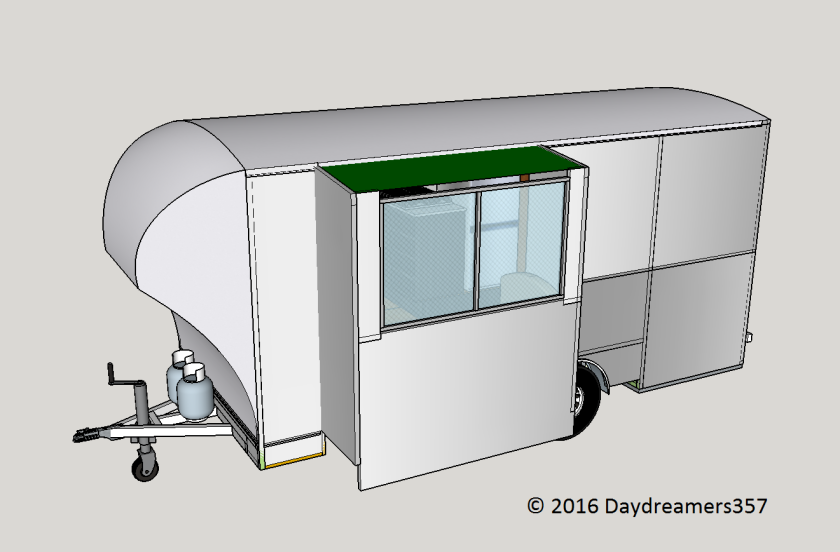
So here is the preview of what the Soloist will become. Remember, up to 80% of the components have already been built in the Sonoran project so I have no doubt how quickly I can produce this version.
Curbside View with single full-wall slide-out designStreet Side ViewLooking toward the rear entry doorLooking forward from rear entry door
Thirty seconds and counting. Astronauts report it feels good. T-25 seconds. Twenty seconds and counting. T-15 seconds, guidance is internal. 12, 11, 10, 9 … ignition sequence start … 6, 5, 4, 3, 2, 1, 0 … All engines running. Liftoff! We have a liftoff …
Well, not exactly the same kind of launch. However, at the encouragement of fellow RV enthusiasts and friends, I have decided to launch my own RV manufacturing company. I wanted to bring to the world the most innovative RV design solutions available. Have a look at the new company website here:
As you already have seen, the Sonoran project is purely a labor of love. The design itself is a result of drawing inspirations from countless of full-time and part-time RV enthusiasts’ travelogues, who have a desire for a truly disruptive RV design which is highest in quality while having maximum utility in an extremely small package so that you can venture into the remotest locales with ease. I want to be able to continue the works to bring these disruptive design solutions to the mass, but I will need your help and encouragement. You can help by visiting the new company site and let me know of your thoughts here. I am not averse to constructive negative comments. Be direct and brutally honest but please be helpful. Guide me to become successful so that I can continue to bring about the best in RV designs.
There was a kind girl named Cinderella. All of the animals loved her…
Wait, but this is about building a luxury RV. What about the RV? Well now, that brings us to the present day.
A Quest for the Extremes: Making the smallest RV to Appear as Largest as Possible
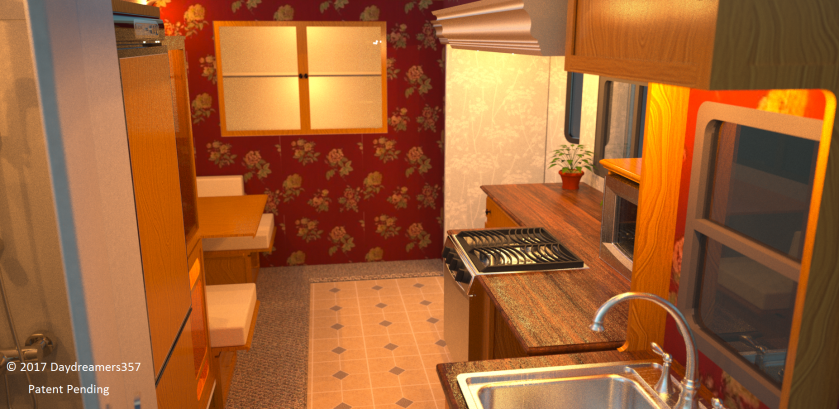
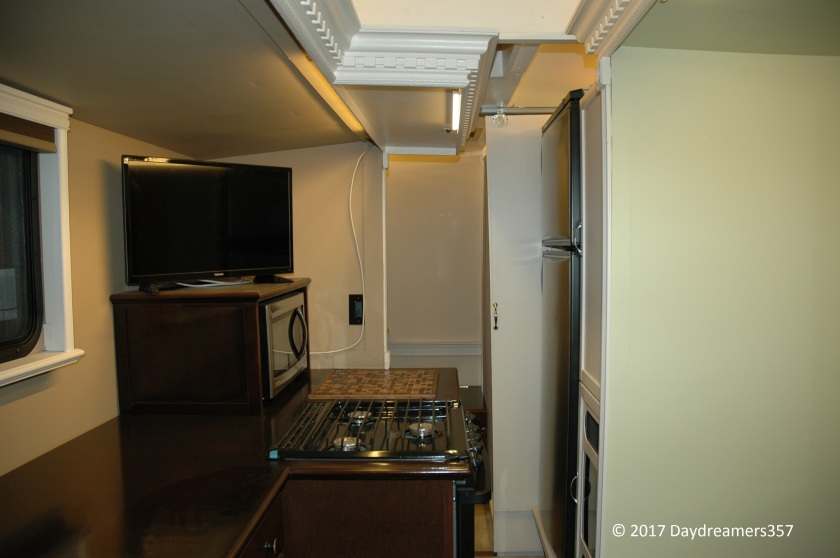
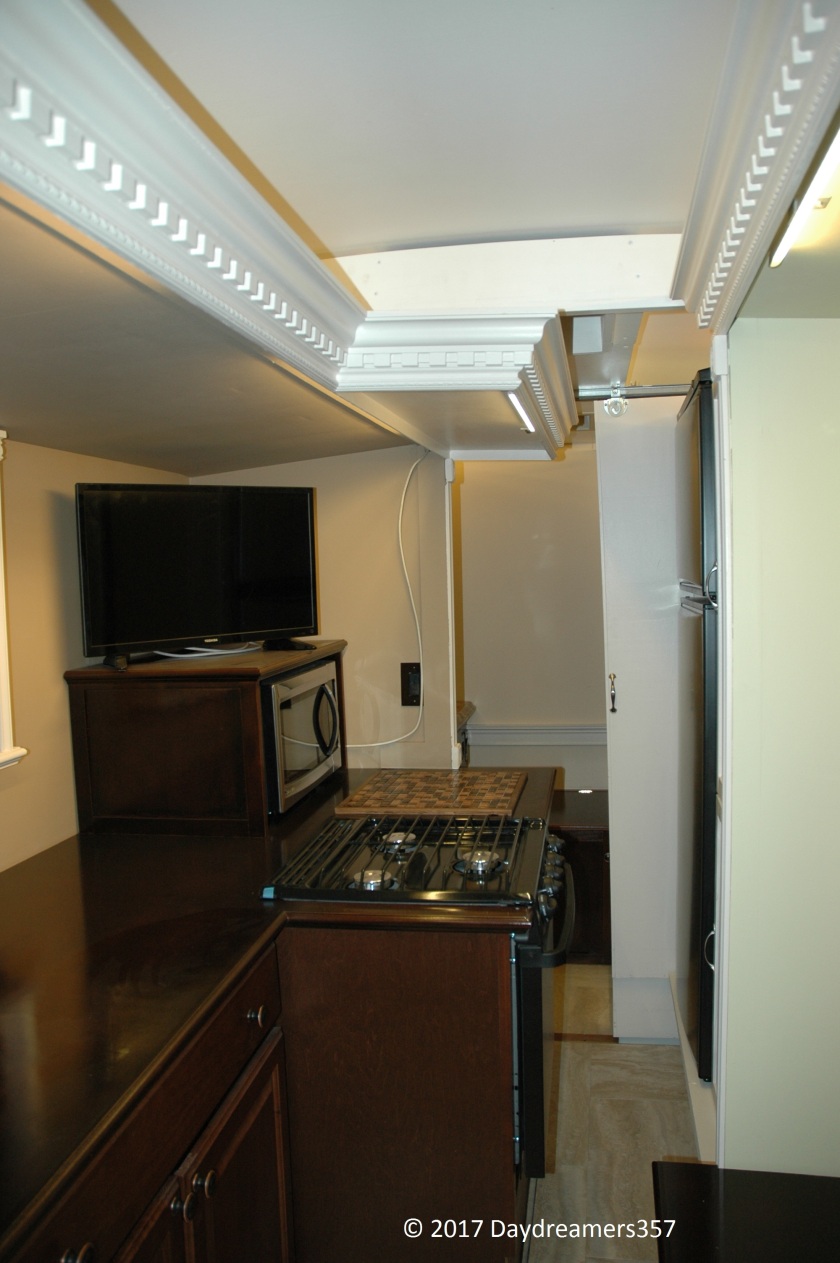
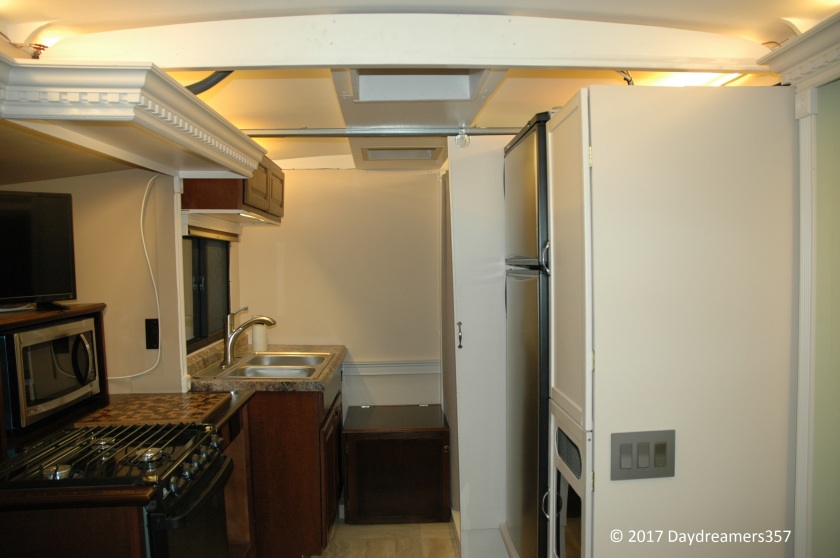
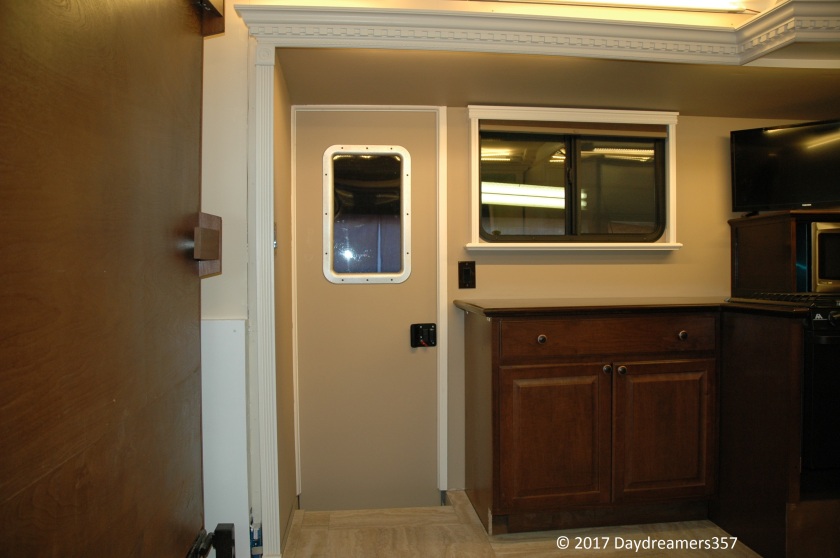
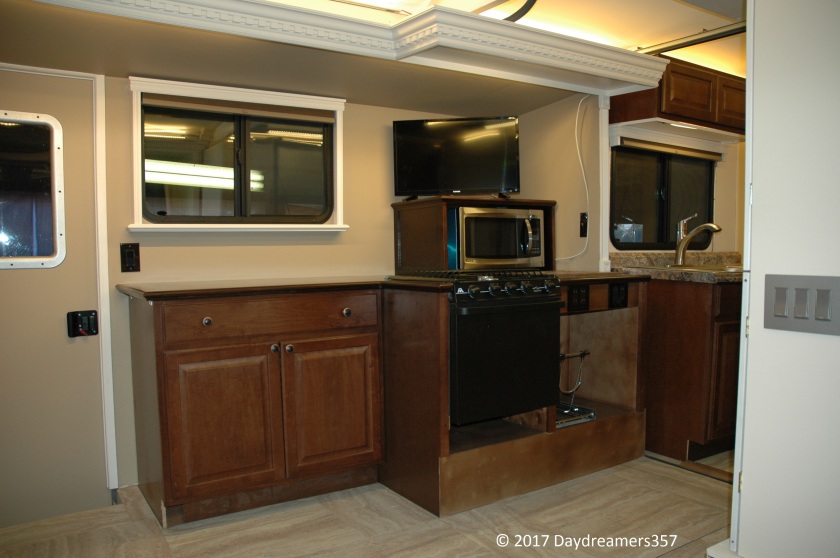
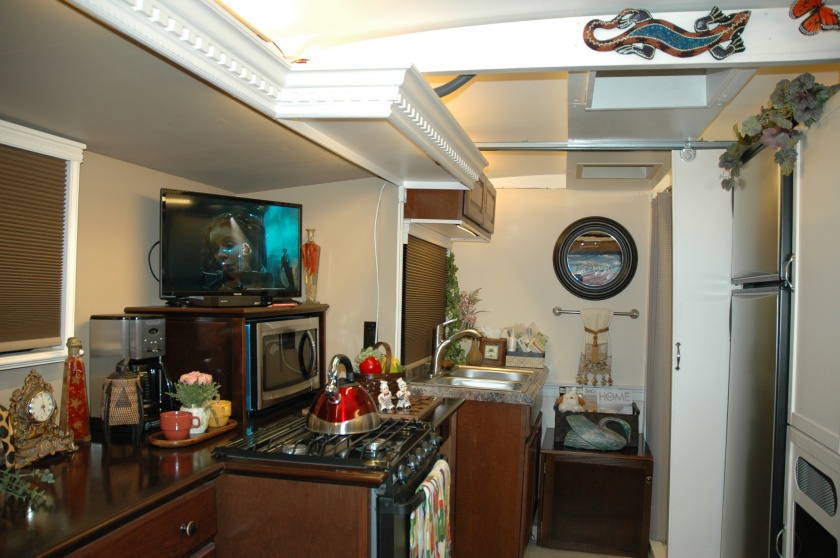
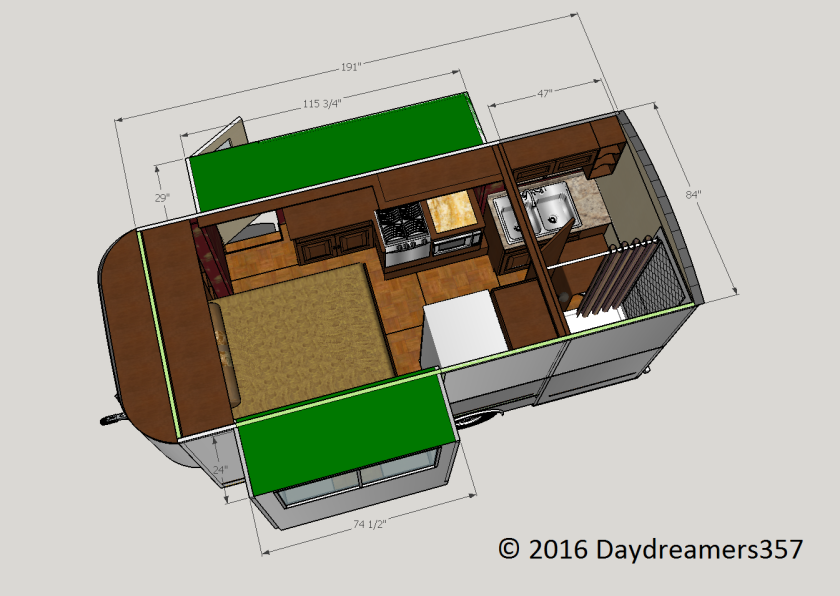
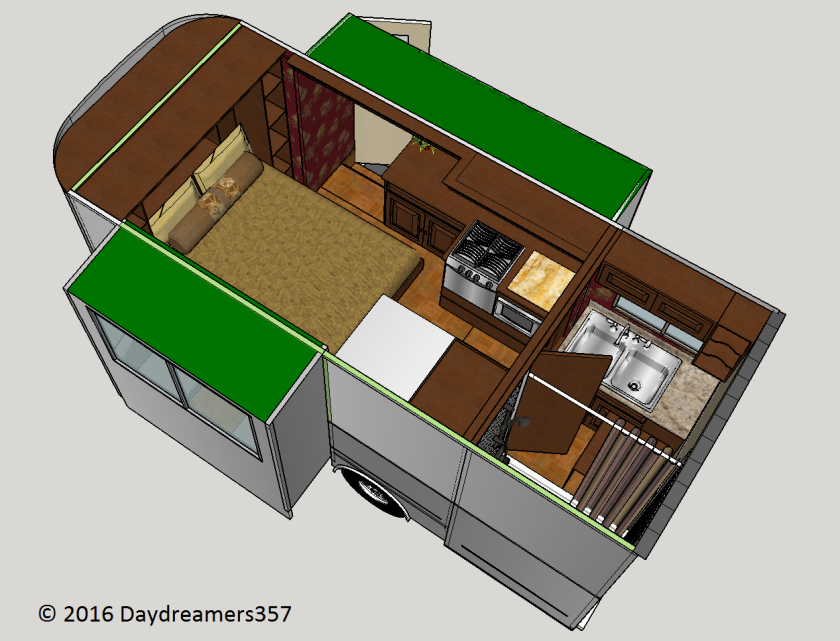
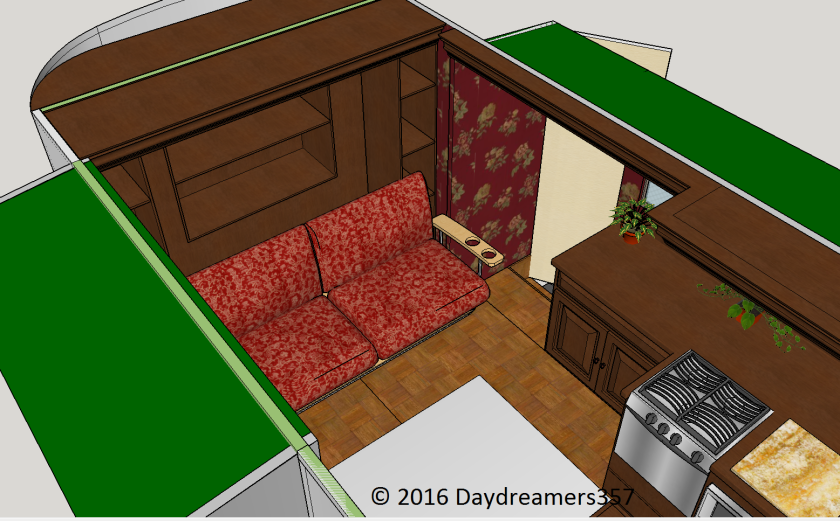
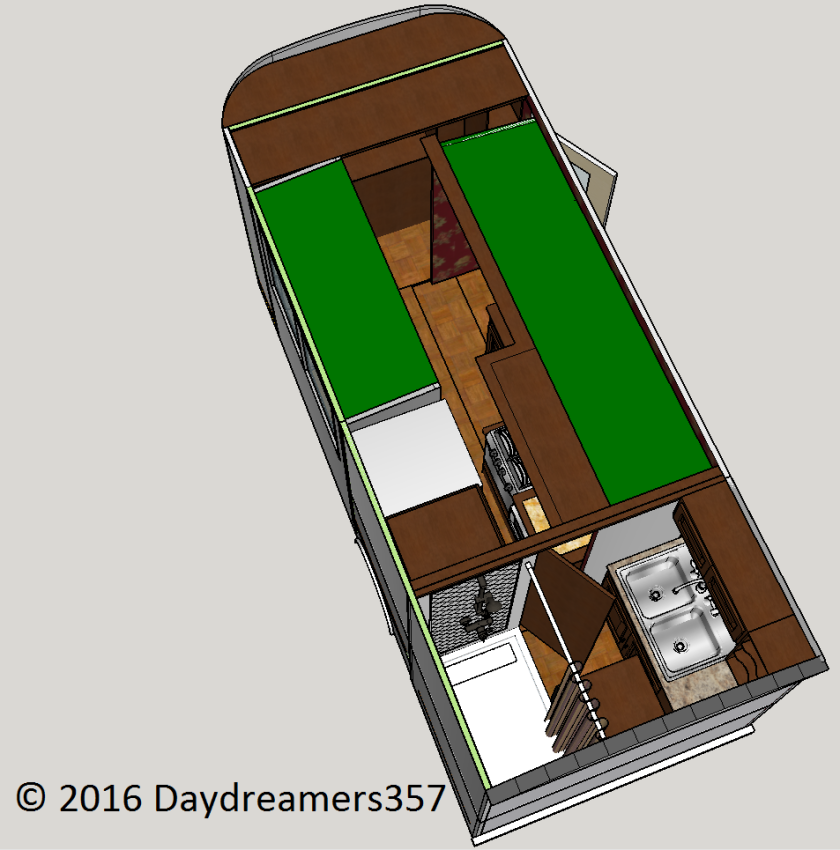
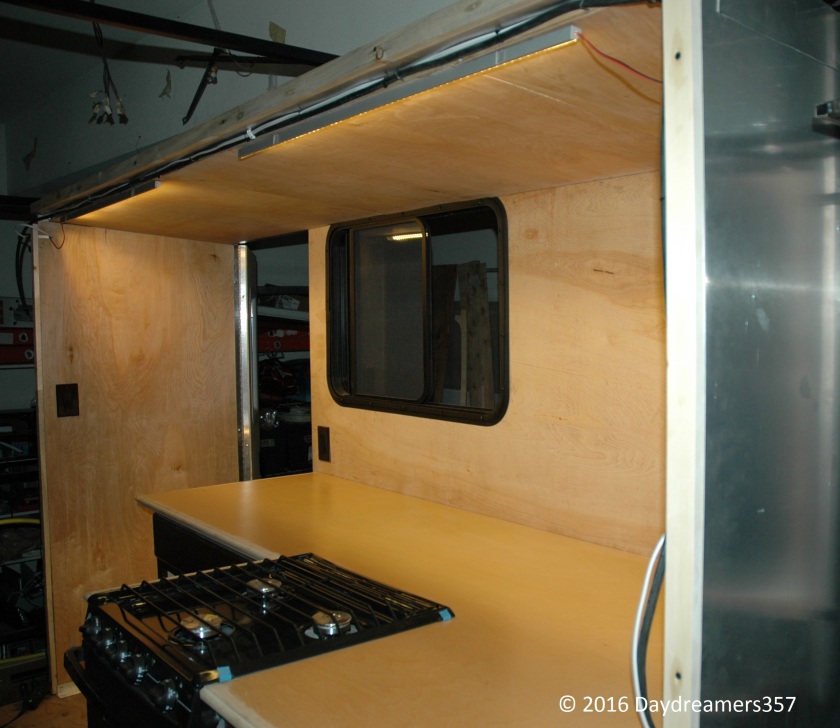
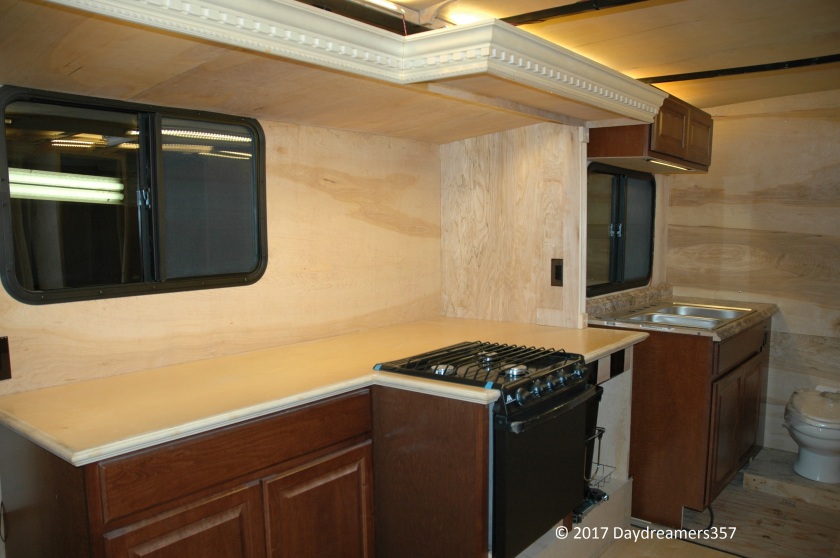
So how do you squeeze a 150 square feet of luxury home into a 16 feet by 7 feet box? These pictures from the inside view show you how. Neat huh?
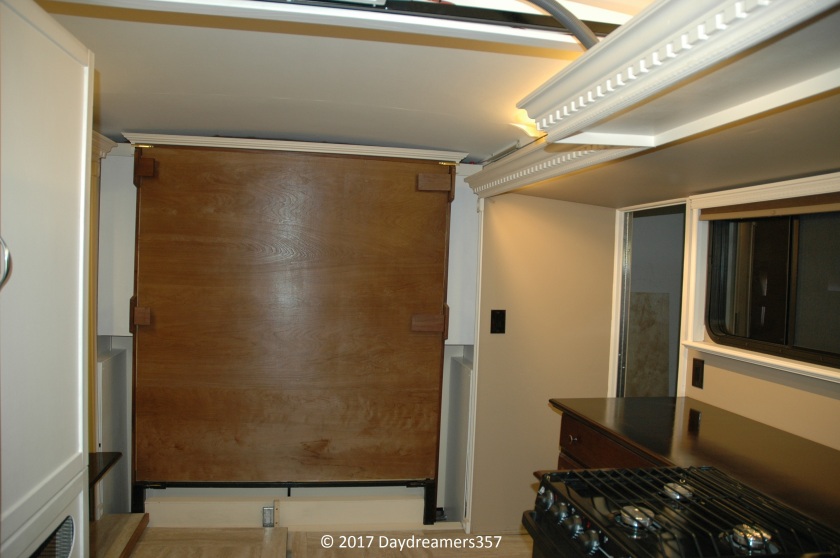
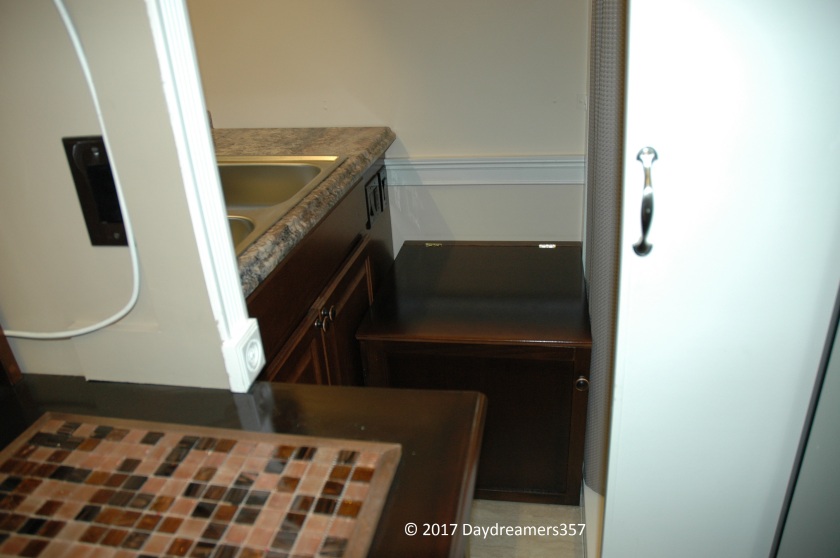
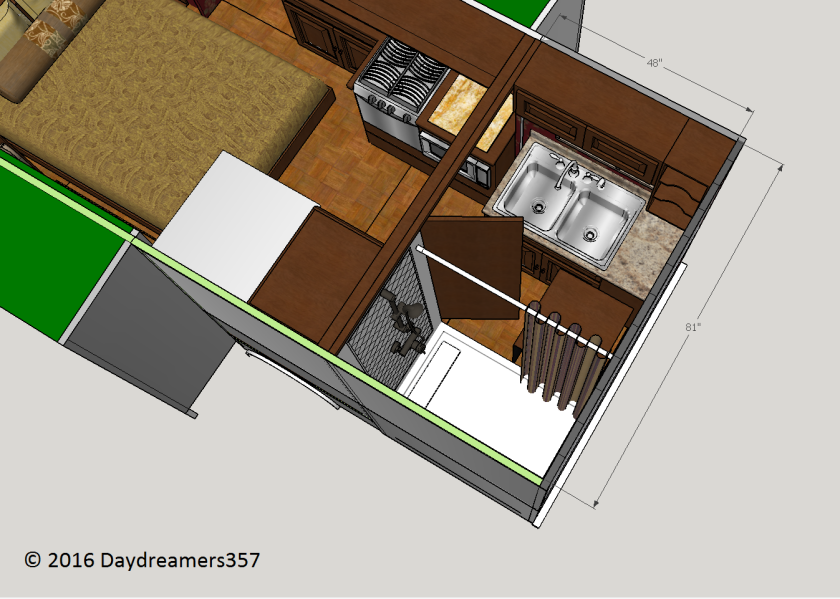
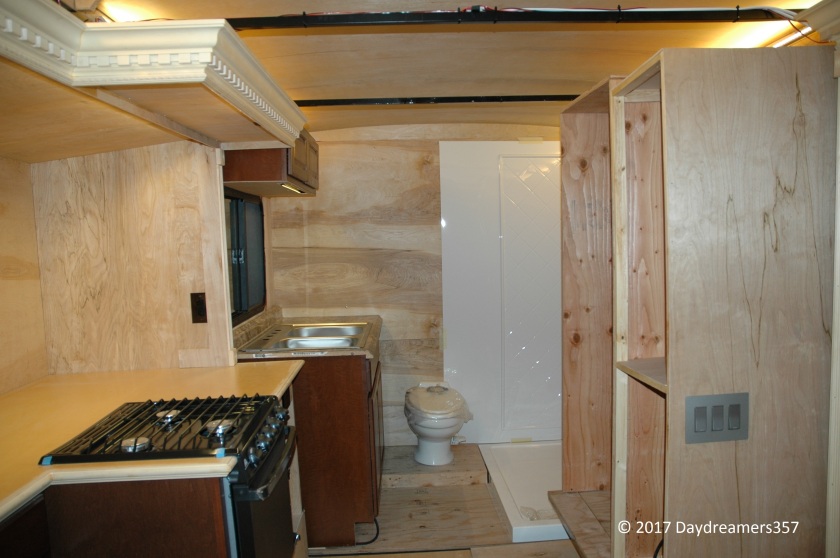
It’s almost impossible to squeeze through the gap to get to the bath area when the slide-outs are retracted. I had to climb through the counter to take the shot from the bath area to the frontBarely a few inches gap. However, since the inside of the RV is filled with heavy appliances and cabinet, I expect the RV to be less influenced by wind when towed.
Looking forward from a trapped position inside the bath area. See how everything are neatly packed?
For an extremely small footprint, this RV gives an enormous size impression of an RV twice its size when expanded. As you already have seen, the design departs from conventional RV slide-out design. The slide-outs of this RV are designed as an integral part of the RV body structure itself. The body of this tiny RV actually expands out when parked to provide an equivalence of a luxury hotel room and will contract in very compactly for travel.
Finally, the goal of creating a whole new class of extremely compact RV is being realized.
The Butterfly Effect
But like a newly hatched butterfly spreading her wings, the effects of expanding the slide-outs are simply incredible.
The Open Floor Plan
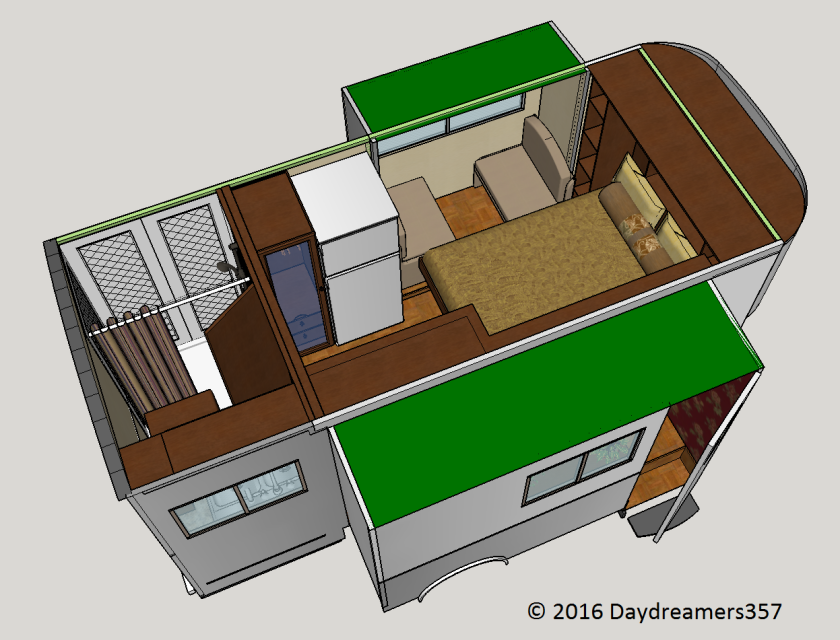
Checkout the views from the inside. Keep in mind that all this room is fully self contained inside a 7 feet by 16 feet box!
The primary design objective of this RV is to provide the occupants a sense of a home. Once you have stepped inside, you will think that you are inside a luxury home despite the fact that you may be in the middle of nowhere.
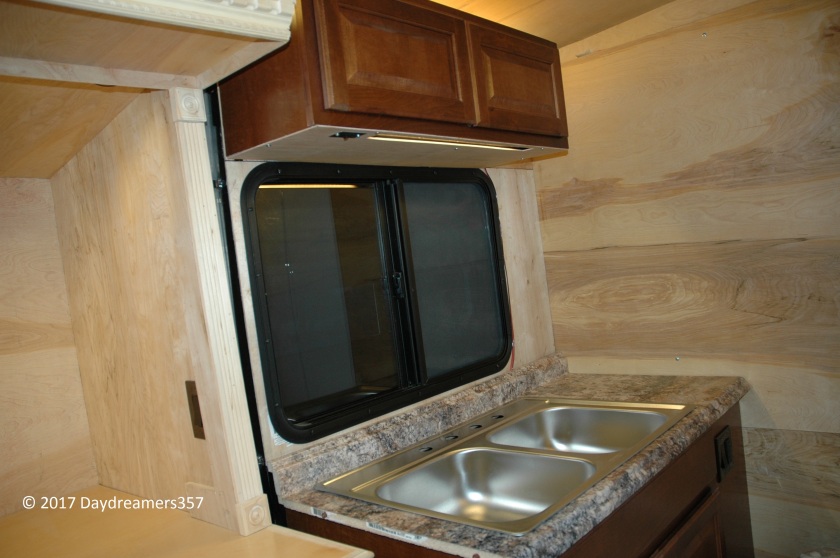
Fully Boxed Window Shades
The window shades will completely darken the room even in the mid of the day. Normally, you won’t need them because of the limousine tint of the double pane windows. However, if needed, they will help to completely darken the room for an afternoon nap or to reduce the strain on the air conditioner on the hottest days.
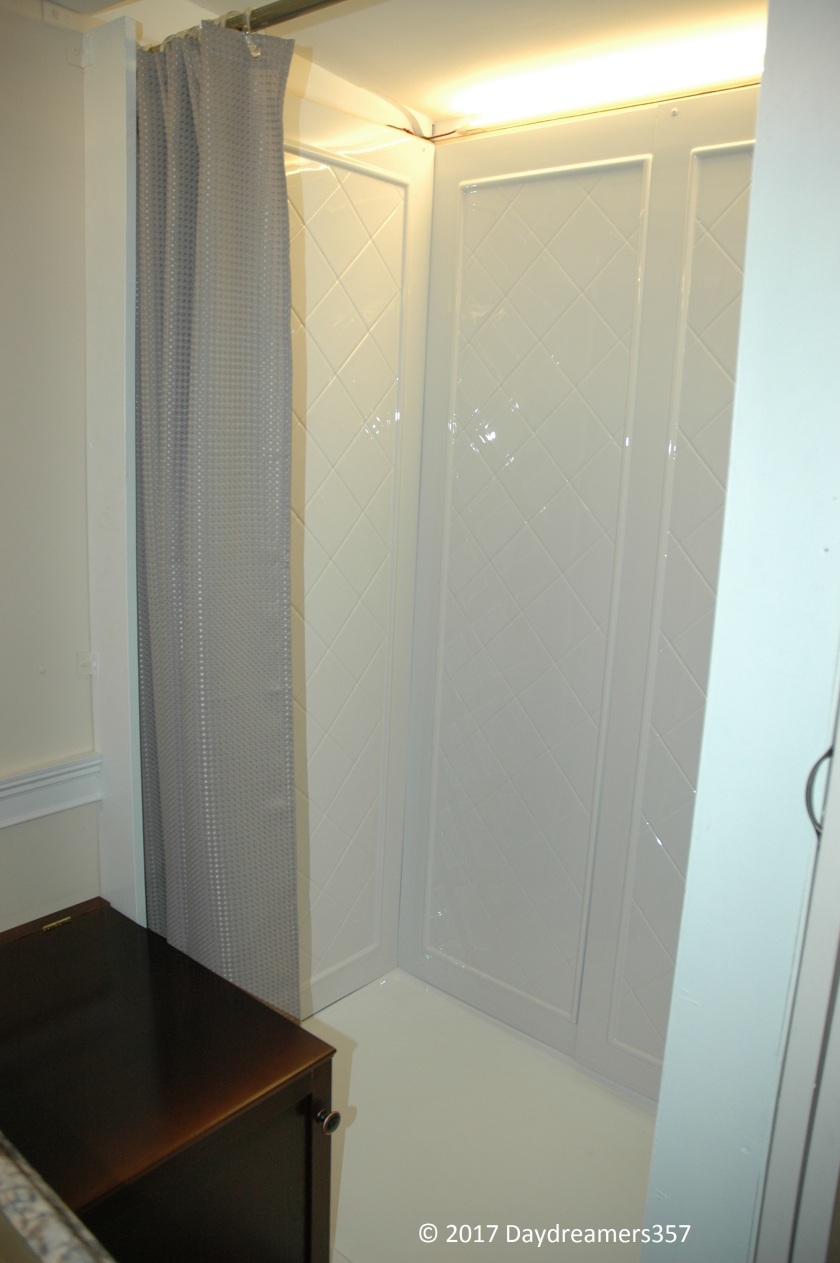
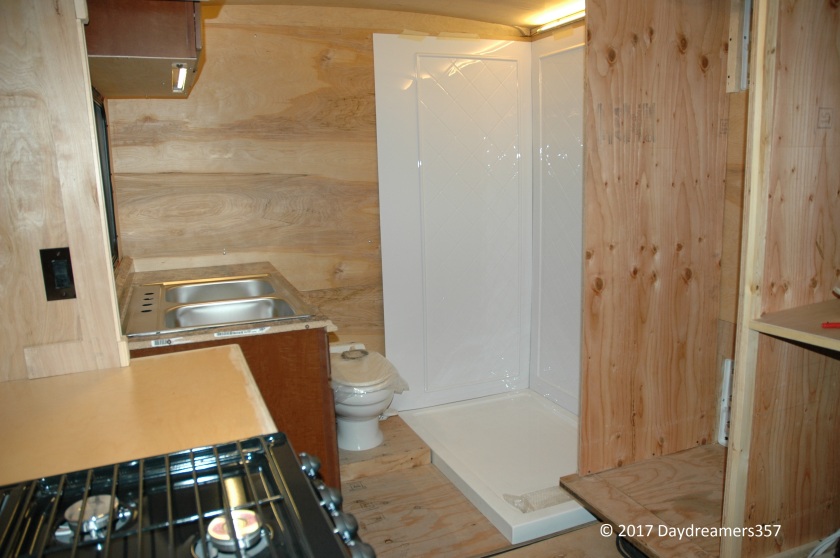
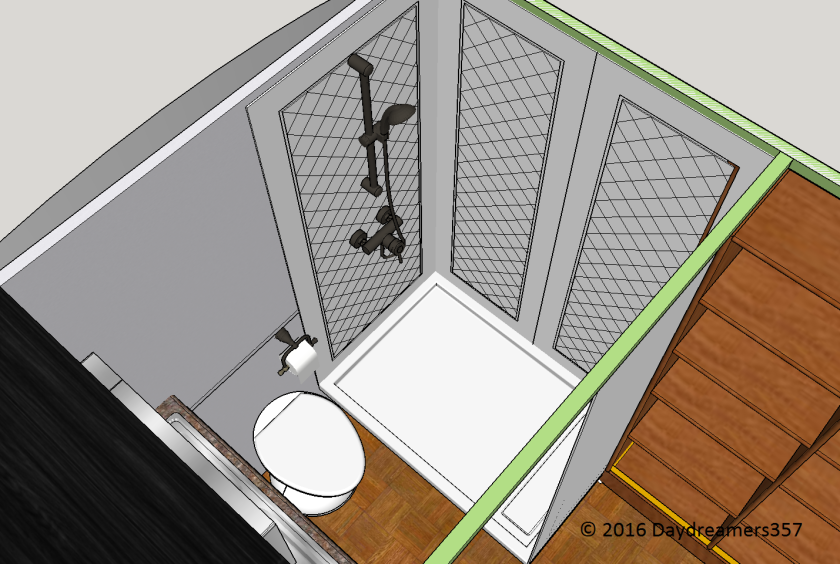
The Largest Bathroom for the RV Class Size
Check this out!
The bath pan is 48″ x 32″
The plumbing is all copper and has been checked for up to 110 PSI. However, I still put a pressure regulator in since I wasn’t so sure about the RV water heater’s capability to handle such high pressure.
This slideshow requires JavaScript.
Check Out the Privacy Mode
The roominess of the bath area with plenty of cabinet and counter space for your toiletry needs allows for a relaxing grooming. No more struggling in a confined shower stall.
This slideshow requires JavaScript.
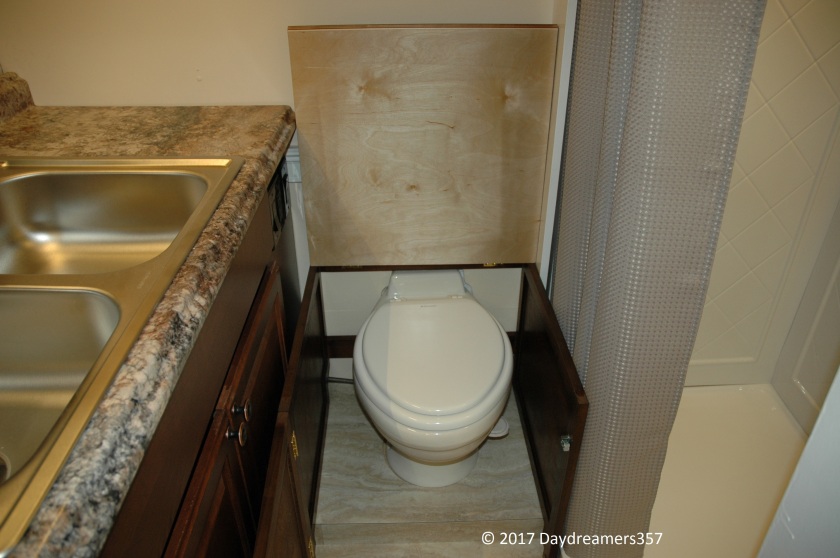
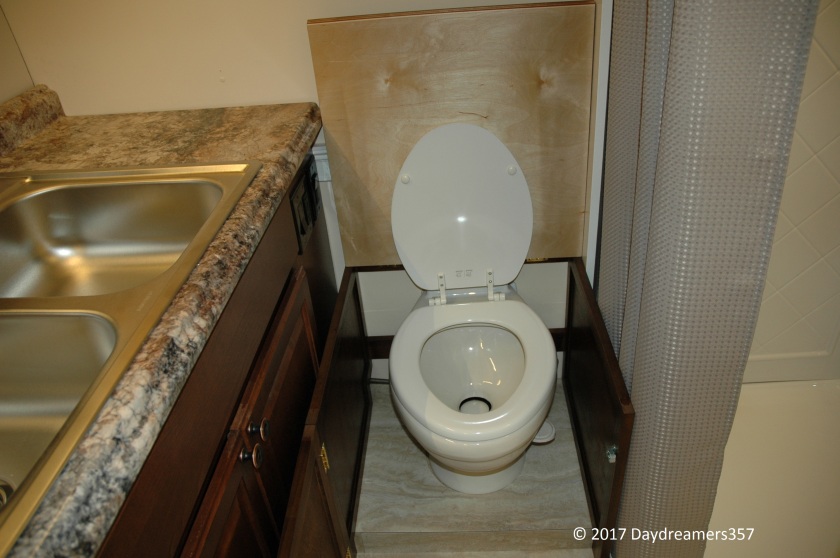
The Discrete Toilet
The box is fully sealed with a vent to the outside in the back of the toilet. No unsightly view of the toilet. No smell either.
An unassuming box.What’s hidden underneath it.Ready for service.
Flash Back. One Day, a Messenger Arrived with a Special Invitation
There was going to be a royal ball at the palace…
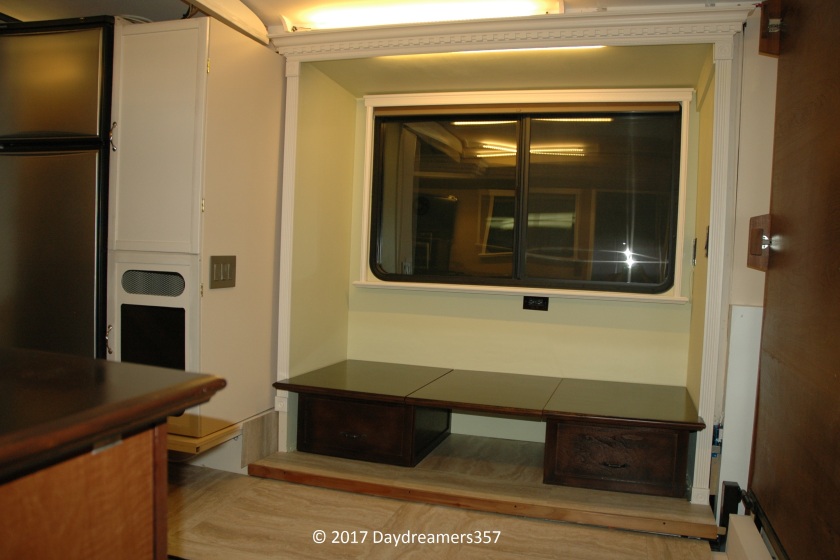
A Case Study of the Street Side Slide-out Usage
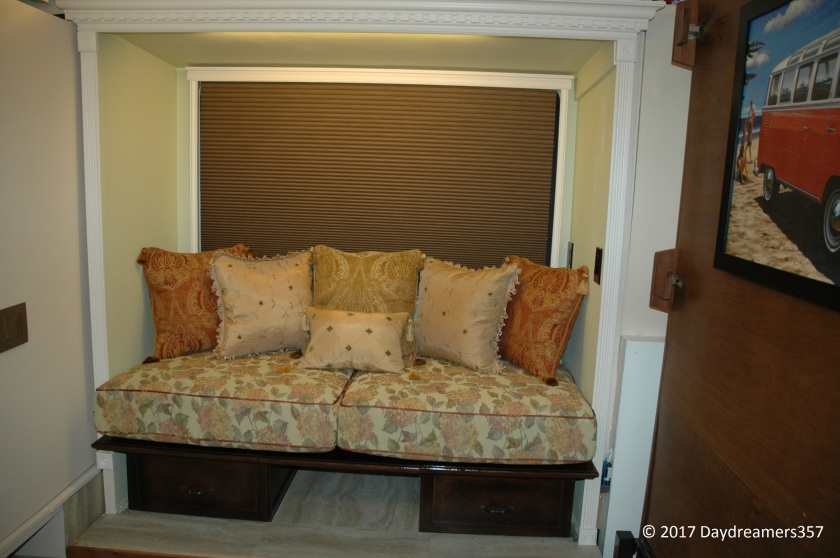
I’ve been thinking a lot about the most efficient way of utilizing the street side slide-out. In the last blog, I’ve detailed a few ideas for the street side slide-out. It would either be a dinette, or a computer desk, or a day/bunk bed. In addition, I will have to have a flipped down sofa in place of the flipped down bed…then I’ve decided to do this: It will be a combination of dinette/sofa. One of the primary goals of the design is to minimize the length and effort to set-up and packing the RV for travel.
The goal of getting the RV ready for usage is just mere seconds of pushing a couple buttons to extend the slide-outs and nothing else.
I went through the scenario of a typical day of activities then realized that most of the time I would mostly need the use of the sofa during the daytime and perhaps an additional bed at night for my two fur kids. Eating will take up only a little time of the day and mostly enjoyed outside anyway unless when it rains. Additionally, having a flipped down sofa will necessitate additional set-up time and will clutter up the main floor making the interior claustrophobic.
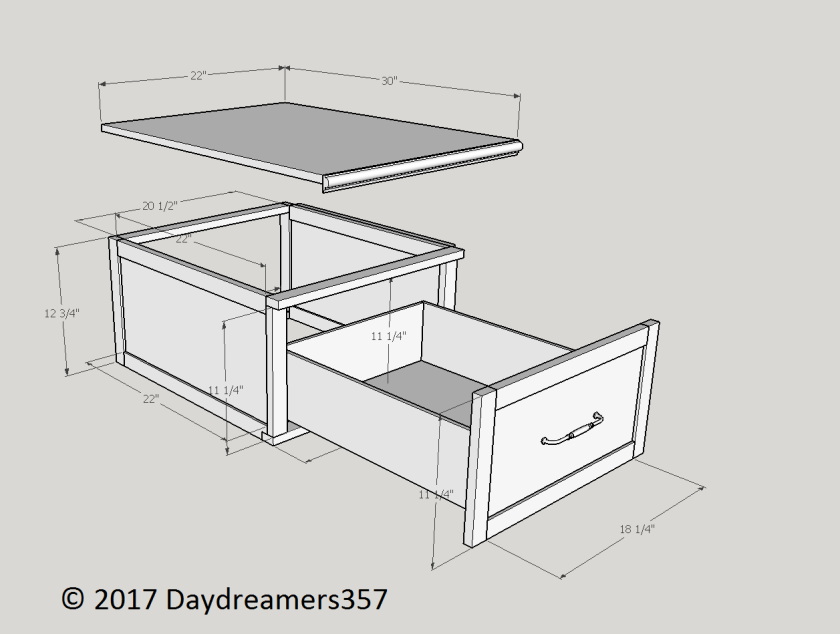
There is Something Therapeutic About Wood Working
In my previous employment, I was trained to pour over technical documents which were sized not by how many pages but by how many inches thick they were! It took endless amount of patience to go over the technical details so that the end products would be functional and safe. Wood working requires pretty much the same amount of patience or even more. This is the first time that I’ve attempted to create “furniture” at this scale without any formal training. Mistakes were made. Lessons were learned. But unlike reading technical documents, I’ve enjoyed the process immensely. I hope to get better at it in the future.
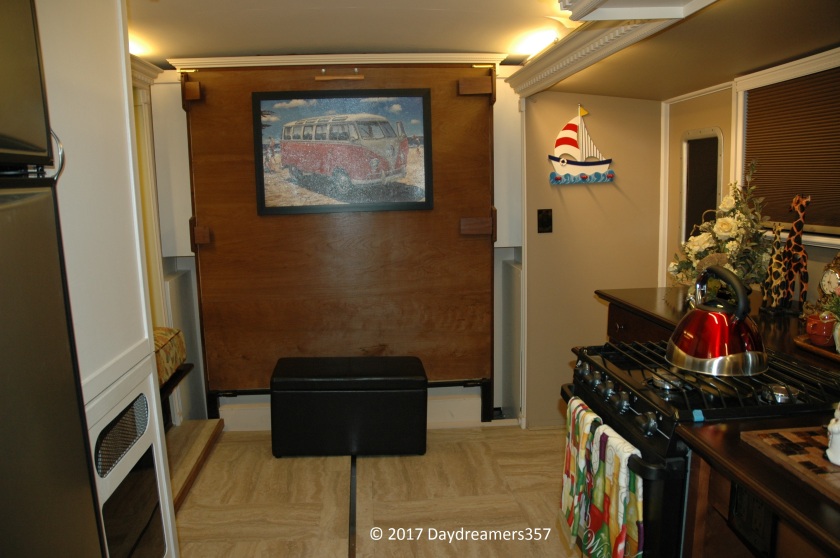
From this simple box…
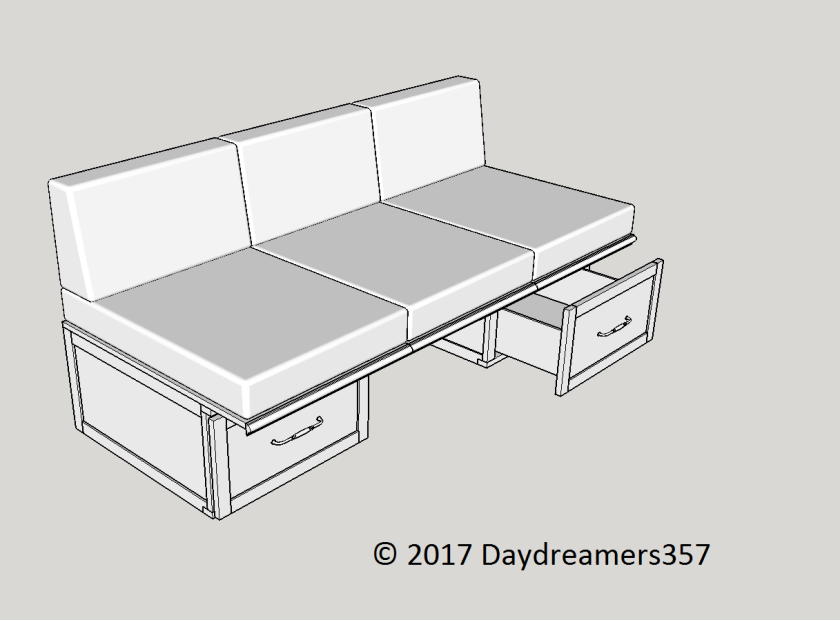
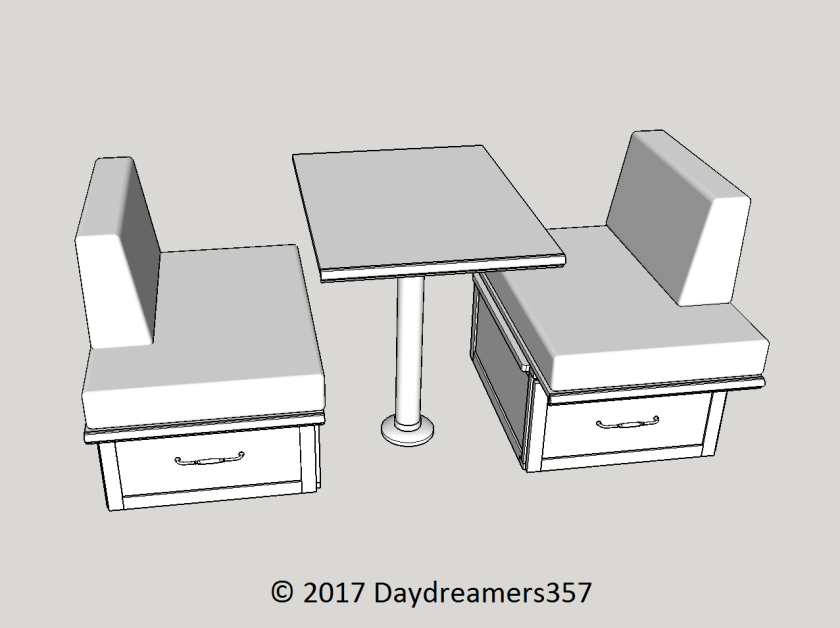
with this vision in mind…
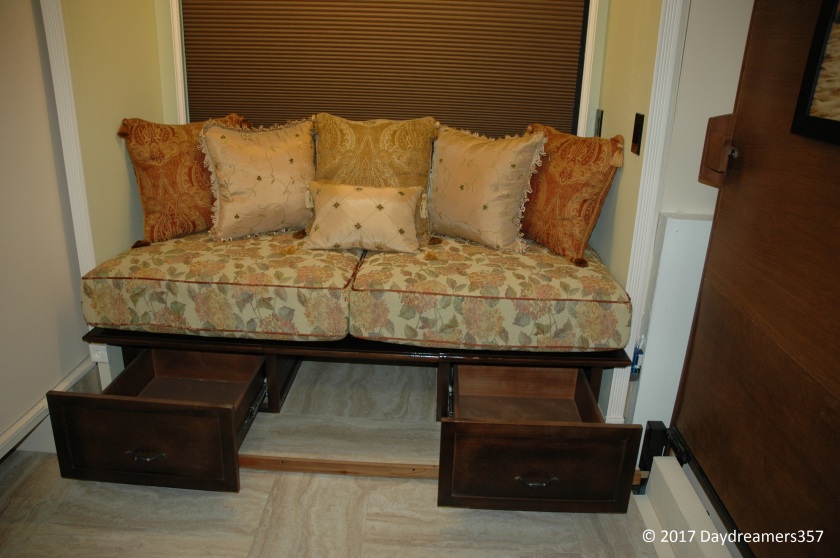
The sofa backings can be removed to make a 68″ x 30″ bed for a child/teenagerEasy entry and exit for a romantic diner for two.
Then this….
This slideshow requires JavaScript.
Finally,…a completed product.
It took a while for the vision to become reality but it’s so worth it.More bin storage!
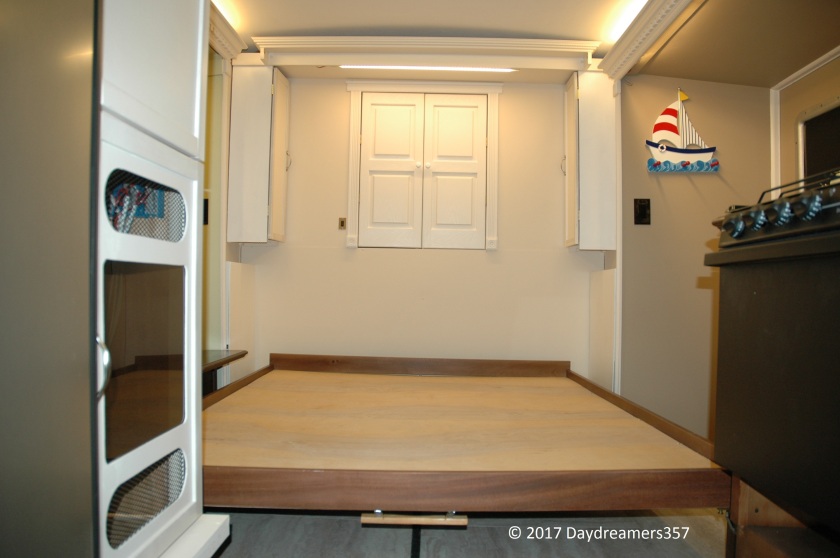
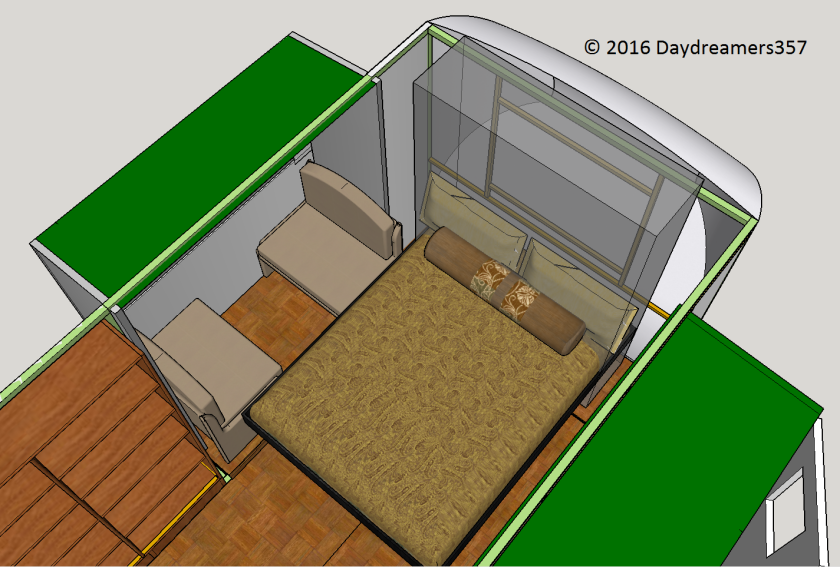
A Luxuriously Good Night Sleeping Under the Stars
Featuring a Queen bed with plenty of reading light for a quiet evening retreating from the wilderness.
My two fur kids claimed the day bed. I am so thankful for their unconditional love. Nothing is too good for these two little girls. Yep, in my family, the girls out number the boys, hence, the acute needs for glamping.
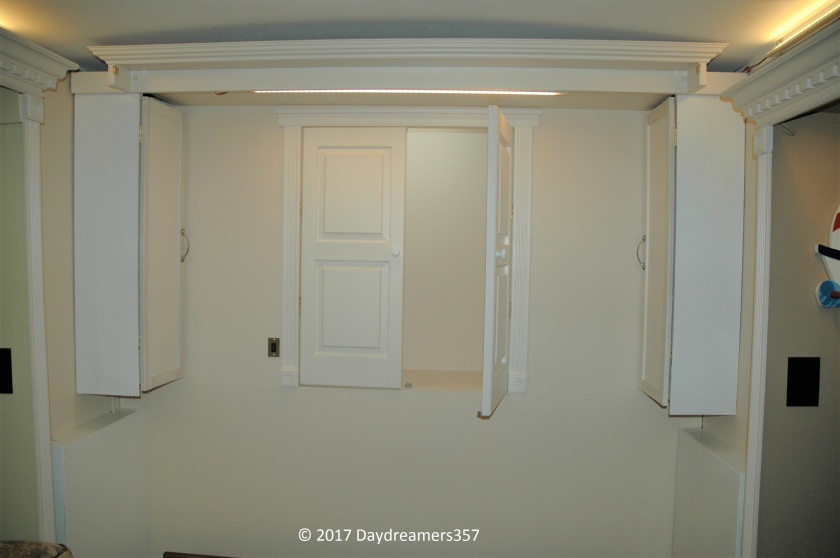
Nose Cone Storage
Linens and beddings can be stored here when not in use.
Suddenly, Her Fairy God Mother Appeared
With a wave of her hand, she turned a pumpkin into an elegant coach.
The Feminine Touch
Now that the home is actually taking shape. My dear wife has decided to set aside a little bit of her time to feather the nest with her own feminine touch. I am so glad for her involvement. These shots show the transformation of an ordinary pumpkin into Cinderella’s princess coach. I wish I was a better photographer but you will have to put up with me for now.
Let’s take a walk around, shall we?
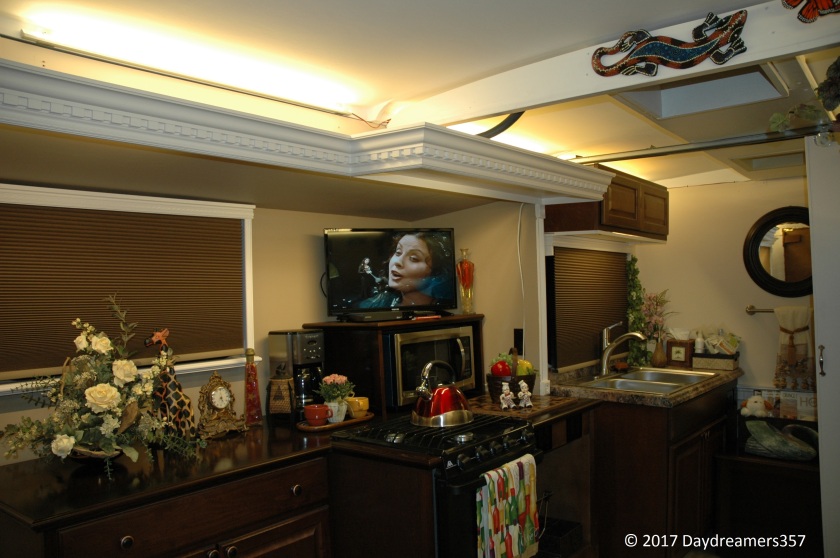
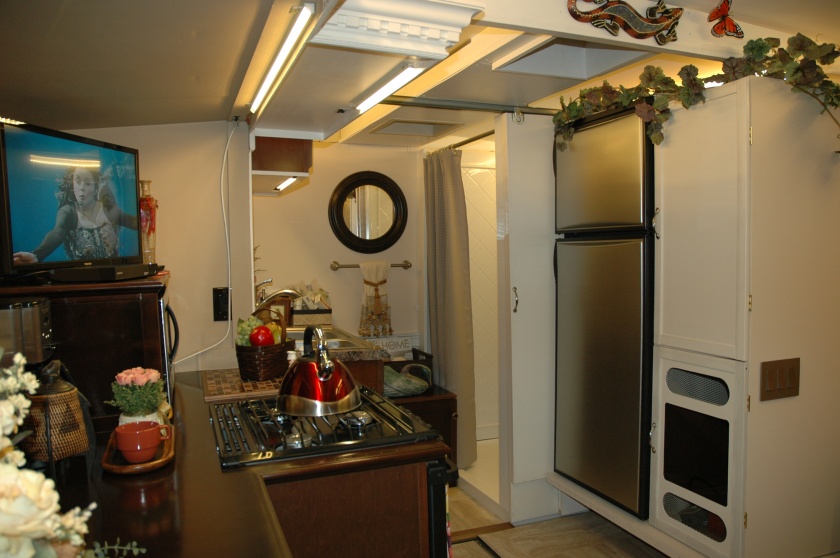
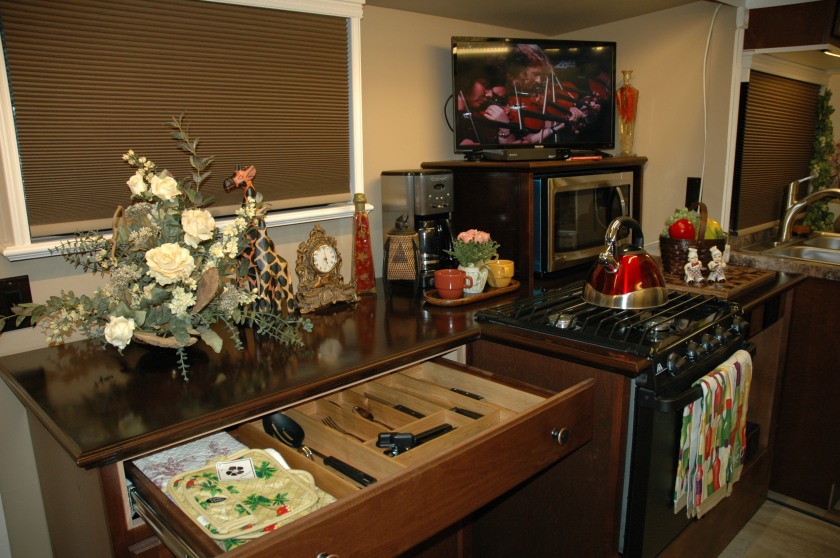
See how nicely the LED lighting is without being seen? When the LED are on, they cast a warm glow enveloping the entire home.The 9 cubic foot dual mode refrigerator fits nicely into the cabinet. The size will help cutting down the number of trips to the grocery store.Most electronics and appliances power cords are hidden behind the cabinet. I forgot the TV cable but it will be hidden too in the near future.The picture was affixed with 15 lbs. double sided command tapes
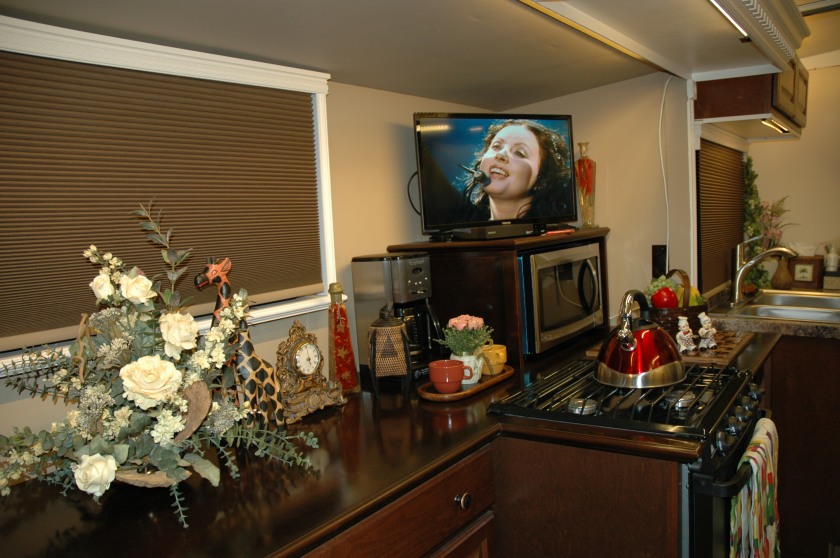
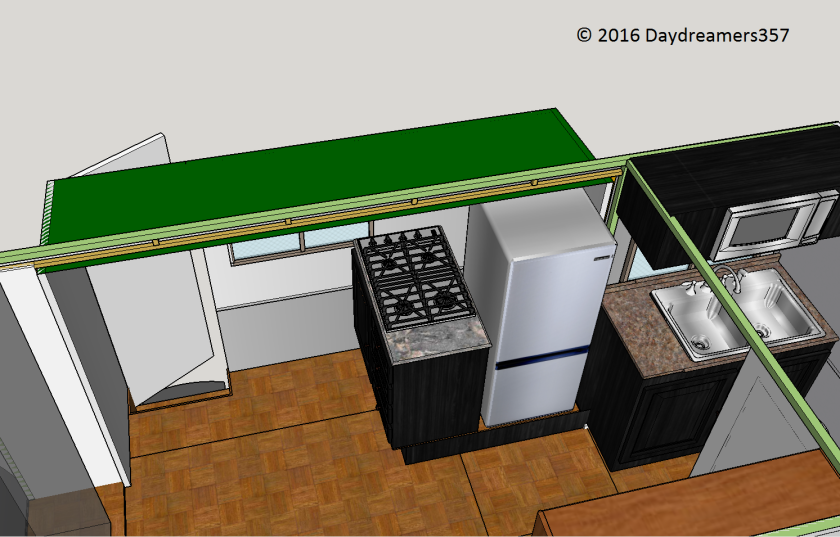
Kitchen appliances and storage
Ample storage spaces are provided. Upper drawer is for your silverware. Lower cabinet is equipped with wire racks for efficient storage of dishes, pots and pans.A 13 Gallon pull out trash can is provided. There is still room for household cleaning agent storage. Additional storage is provided behind the counter cabinet accessible from outside.
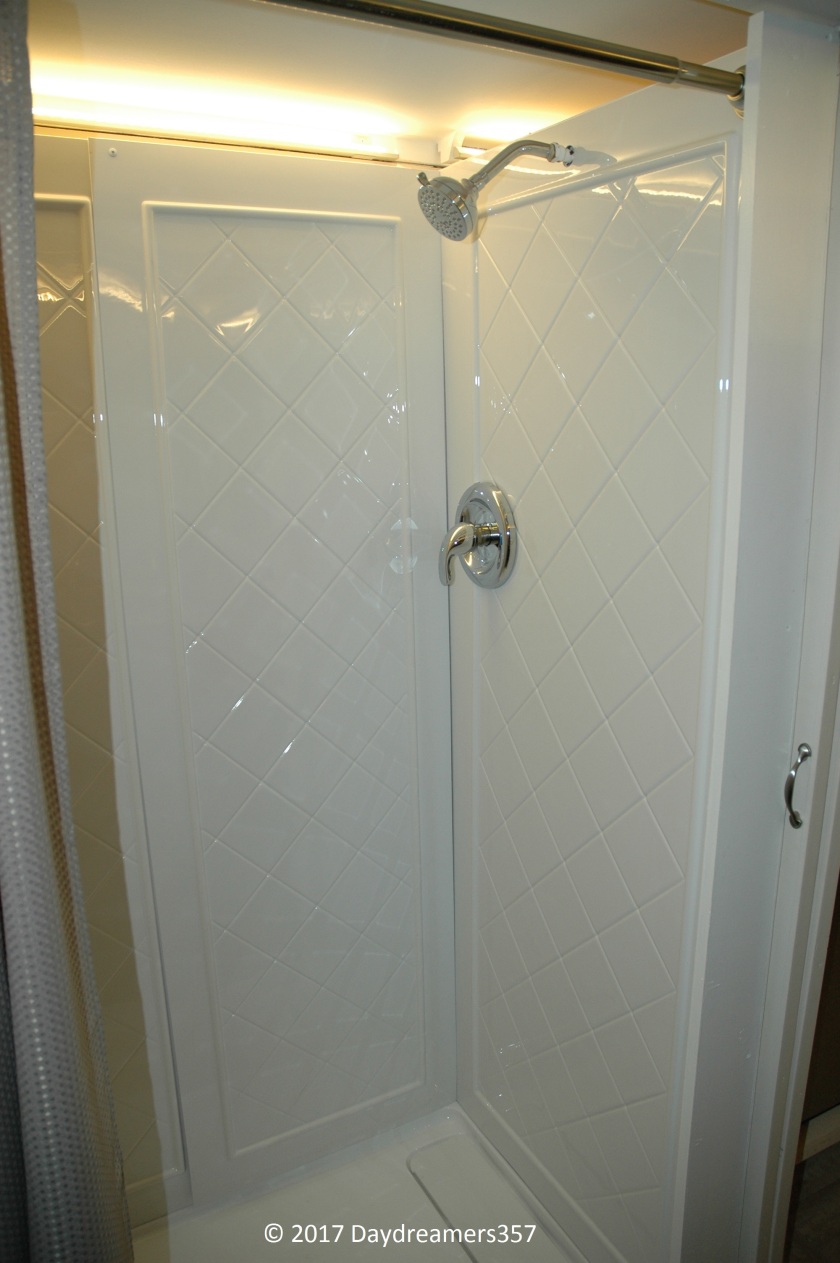
Your luxurious hot shower awaits
Here’s a Collection of the Images for your Viewing Pleasure
This slideshow requires JavaScript.
Romance on the Road
A romantic candle light diner for two with a Desert Moon hanging low outside of the gigantic window. As I worked on the street side slide-out, I kept hearing these lyrics from Dennis DeYoung in my mind. Gee, I am showing my age:
Those summer nights when we were young We bragged of things we’d never done We were dreamers, only dreamers And in our haste to grow too soon We left our innocence on Desert Moon
…
I still can hear the whisper of the summer night It echoes in the corners of my heart The night we stood and waited for the desert train All the words we meant to say All the chances swept away Still remain on the road to the dune
Dennis DeYoung
This slideshow requires JavaScript.
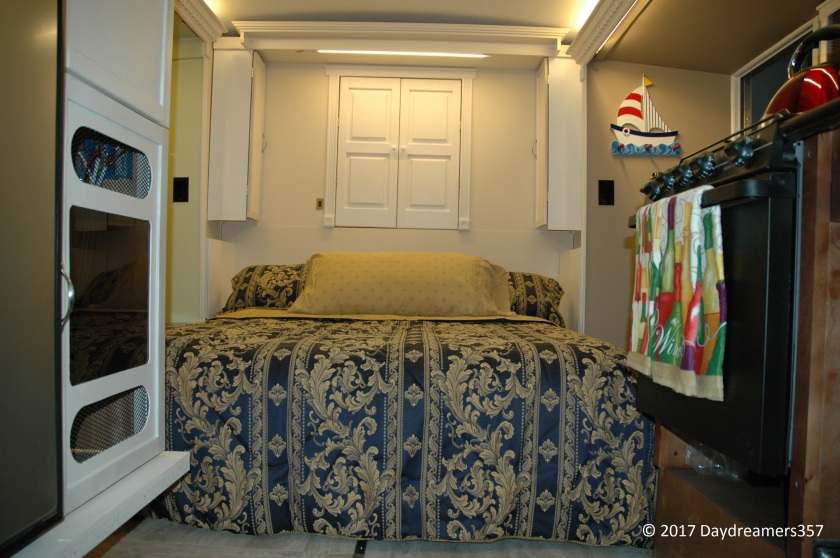
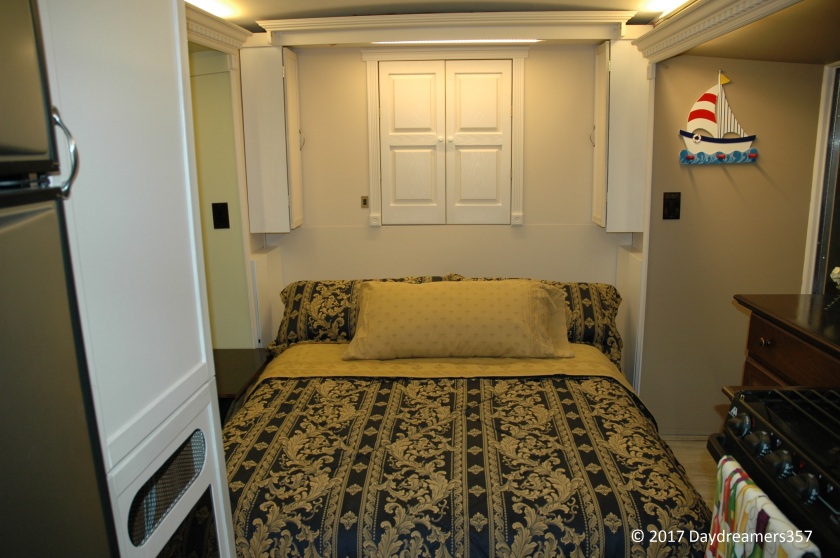
A Bed Fits for a Queen
There’s an overhead LED light bar for evening reading to unwind from a long day of adventure.The bed has a commanding view of the television in case you want to relax with your favorite shows.
Ok, so I am very sorry for ruining your idea of cabin in the wood vision and your children story in one post. However, how do you like meeting this new twenty first century version of the cabin in the wood?
A Green Design
The fact that this luxury home runs entirely on 12 VDC with each LED light having a switch so that you can control the amount of energy usage is to provide the smallest carbon foot print possible. It is designed so that you can be off-grid for an extended period of time. I am making sure that the electrical design is solar compatible. I haven’t had time to look into a companion solar design for this luxury home yet; but rest assure that whatever the design solution is, it will be as innovative as the home itself.
Just to prove the point, the entire home is illuminated with a calming effect using one single 6 Watt LED light on the kitchen overhead. It is equivalent to a single 6 Watt incandescent night light bulb that you typically use at home. These unretouched low light shots truly demonstrate the criticality of strategic LED light placement.
This slideshow requires JavaScript.
The Transformation is Complete
Oh Cinderella…are you ready to go to the Ball and meet your destiny?
There’s still a little bit of electrical works for the interior, but my attention is now turned to the outside of the coach. Aluminum skins don’t buff themselves. Wait until you see the results of the buffing and a clear coat has on this pumpkin coach. The fairy God mother will be so proud!
It’s been a while since I’ve last posted but rest assure, I’ve still been working on the new model making sure that every square inch has a purpose. The system engineering phase of this project took far longer then I would have anticipated because I wanted to provide the most innovative solutions in the areas that mattered the most: the kitchen, the bedroom, and the working counter spaces. I believe that this trailer is the true embodiment of what should be an extremely compact trailer that can handle the wrath of Mother Nature and be the perfect accompaniment for a road trip of a lifetime. I imagine myself being able to enjoy a warm evening staring at the stars or cozy in on a rainy day in this tiny luxury home. Late last year, I put the final finishing details into my plan and began to build it. All along the way, I’ve been documenting my handiwork in a multi-part blog series starting with this blog post.
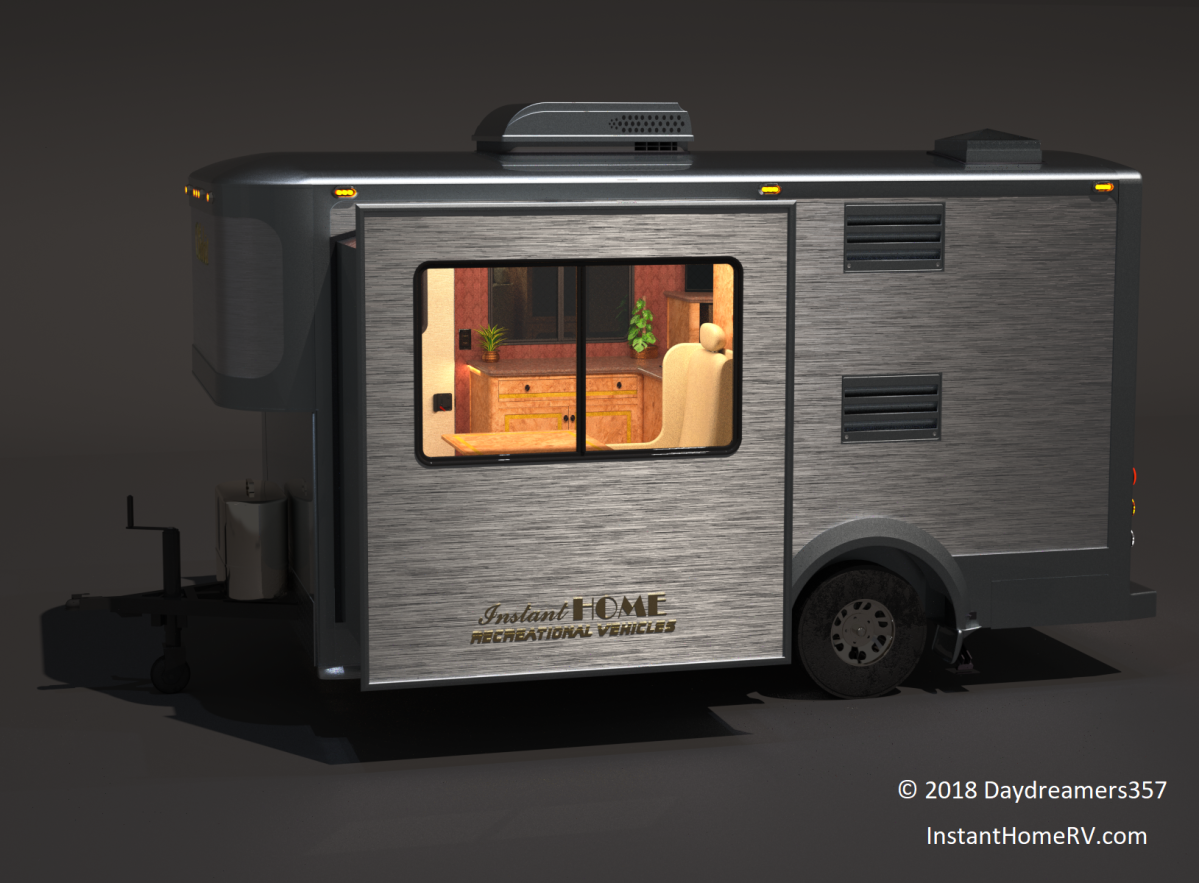
Introducing the Silver Fox
The Vision: An extremely compact Aluminum skin RV designed as a tiny home without sacrificing the luxuries of a residential home.
Specifications
Sleeping Capacity
2-4
Overall Length
19’ 5”
Exterior Width
7’
Exterior Height
9’ 7”
Interior Height
6’ 5 “
Dry Weight
~4,000 Lbs.
Fresh Water Cap.
40 Gal.
Grey Water Cap.
39 Gal.
Black Water Cap.
17 Gal.
A/C
13, 500 BTU
Overall Dimensions
Curb Side View
Street Side View
A Flip Down Sofa in Day Mode
No TV will be complete without a comfy sofa.
Shared Bath and Kitchen Area
Years ago, I had the chance to observe the works of an architect in Arizona when he designed the house my sister has just purchased. One of the noted design features was the openness of the floor plan for a relatively small home. In order to achieve this, the architect eliminated the walls and hallways to combine the kitchen, dining room, and living room into one large open living space all under a vaulted ceiling. Then, the individual living spaces of these areas were partitioned through the strategic placement of furniture, house plants, and working counter spaces. I can still remember the sense of openness of the home. Family gatherings were particularly fun when I would be talking to my mom in the kitchen, still able to see other members of the extended family eating in the dining room, while my brothers were watching the games in the living room. So here is my interpretation of the same concept in a 7′ by 16′ box! Some people may ask, “Why the obsessi0n with making a big deal out of a tiny space? Shouldn’t you be outside anyway?” Yes, while it’s true that the idea of camping is to be outside, you can’t really be outside 24/7. Nature can be a lot more enjoyable when you can sometimes just hole up in a cozy den and get recharged for a few hours. Especially, when it rains!
Privacy Mode
When you need the privacy for a certain task, there’s a sliding partition that can be used to block off the shared area and provides total privacy for the occupant. The blocked off area provides a full size residential style bath area of 4 feet by 7 feet with a 48 inch by 34 inch shower stall. With an equipped Atwood XT® water heater that runs on either propane or electric mode, you won’t miss your stick and brick home’s bathroom.
Of Love and Kindness, a “Peace” coin
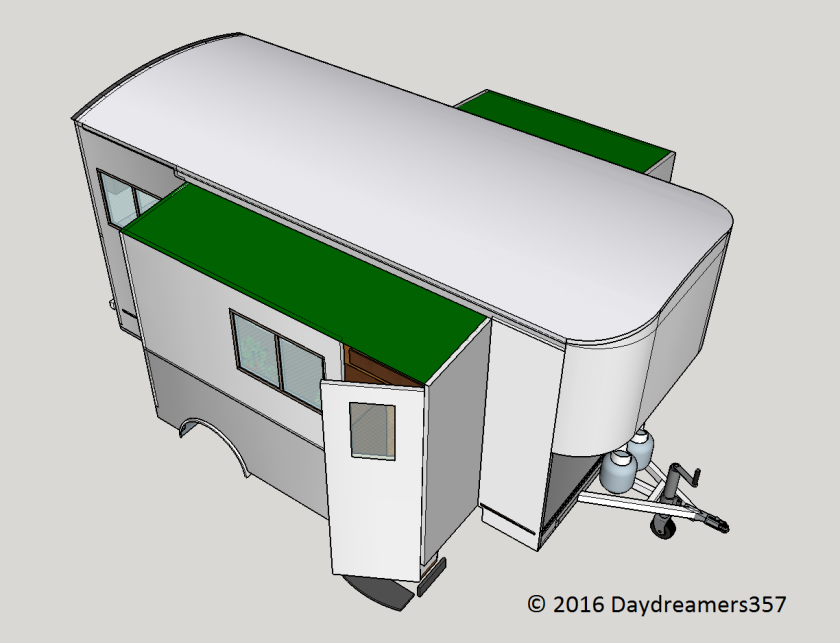
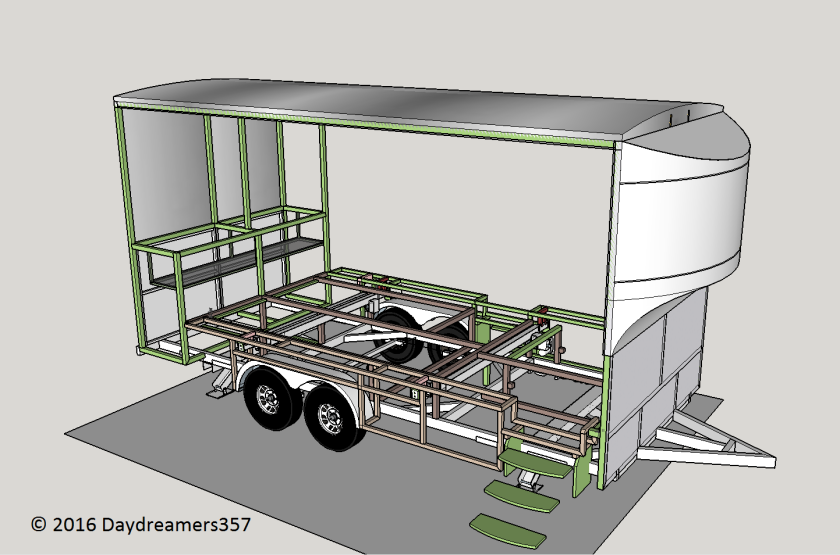
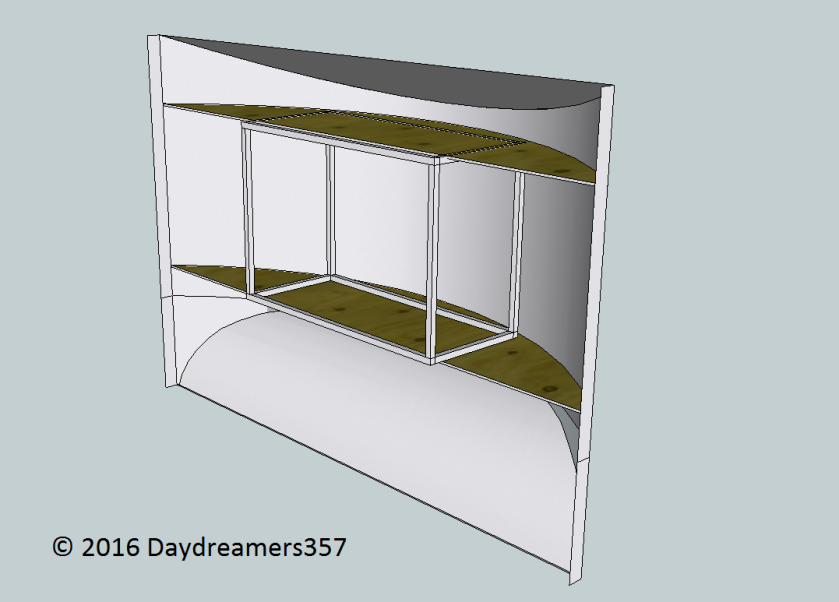
Okay, so that was the plan. The execution is going to be extremely challenging. The smaller the unit, the harder it is to stack so many flooring levels (i.e. main deck, curb side and street side slide-out decks, hidden bed deck) while allowing for tolerances between each deck. Additionally, with two large slide-outs on opposite sides of a very narrow seven foot wide body, the tiny RV will have to make use every cubic inch of its interior volume to accommodate the slide-outs when retracted as shown in the computer model below:
I have had many days of spending countless hours on the computer with the frame design. On one of those fine days, my wife of many years was looking at me kind of funny but she wouldn’t say a word. All morning long, I just had a nagging feeling that I was being carefully watched. Finally, I could not stand it any longer, I blurted out in an agitated voice: “What?”
With the sweetest smile and yet a sulking voice, she said: “Today is a very special day!”
Suddenly, an overwhelming sense of guilt and shame has taken over me. Oh no, not again! How could I have forgotten that today is her birthday? As many years as we have been married, she has never forgotten my birthdays. On my birthdays, she always started with a special breakfast then all day long I would be treated with kindness and kisses then topped off with a special lunch and then a lavish dinner. No worry, no task, no to do list. For one day of the year, I would feel the carefree relief of being cared for, just like when I was a little boy. On the other hand, her birthdays would be a series of sometimes last minute planned dinners, some clueless gifts, worse yet, forgotten just like today. There are times I just had to wonder, why did she let me get away with it all?
With the most sincere voice of a truly remorseful offender, I asked her meekly not hoping for any chance of forgiveness: “Honey, I am so sorry to have forgotten your birthday. What can I do to make it up to you?”
“Well, since you have been pretty preoccupied and agitated with whatever that you have been doing lately and the day is mostly gone, I will let you off the hook this time but …not completely. I want you to give me a chip or more like a coin. Call it a “Peace” coin so that I can use it whenever you are irritated or sad or whatever that’s bugging you. With this coin, whenever I’ve decided to cash it in, you will have to set aside the day and completely forget whatever that’s you are working on, be pleasant and spend the day with me”.
Gee, a clean “Get out of jail free” ticket and a vision of a carefree day at the beach with her? It’s just too good to be true! Not quite, but rather I’ve just been thoroughly schooled in the art of gift giving. More often or not, we tend to take our loved ones for granted. We enjoyed lavishly the attention and kindness that our loved ones bestowed daily on us assuming that we are entitled to it and never a thought for reciprocation. Least we have forgotten that it is better to give than to receive. More importantly, the “gift” doesn’t have to be of a material kind. It’s the time and effort that really count… but I would gladly give a rain check today. Ok, so here you go honey, your newly minted Peace coin circa 2016.
I wish that I could solemnly promise that I will never forget your birthday again. However, with my past checkered track records and in addition to getting older, the promise would seem pretty empty. Perhaps, this coin will be my constant reminder for things that are most important in life more than any material things. Rest assure that the lesson was well received.
Can we have some of those coins, too? We’ve neglected to mention a certain damp spot in Mom’s carpet which she may discover later on.
Well, that was a memorable lesson, now let’s get back to the task of building the RV.
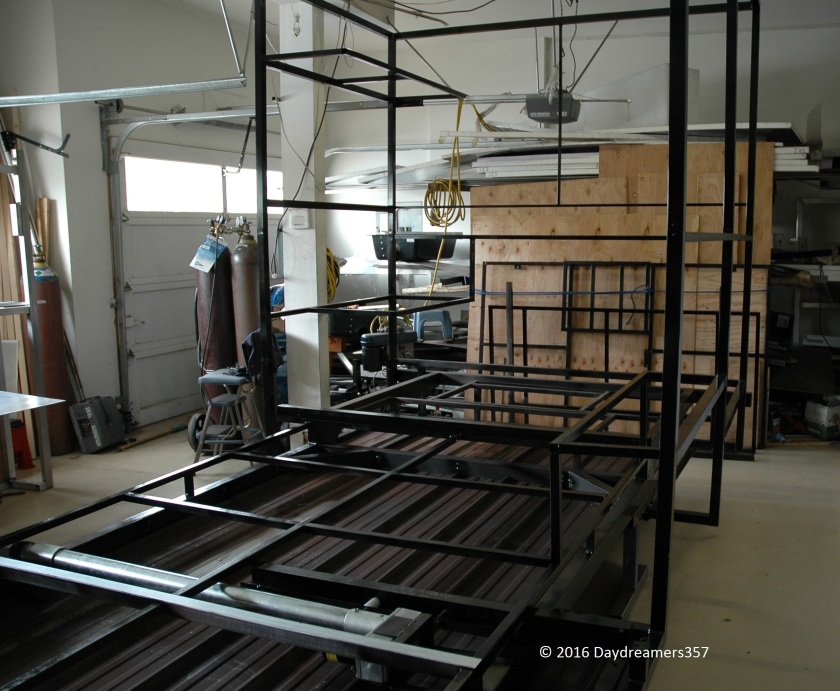
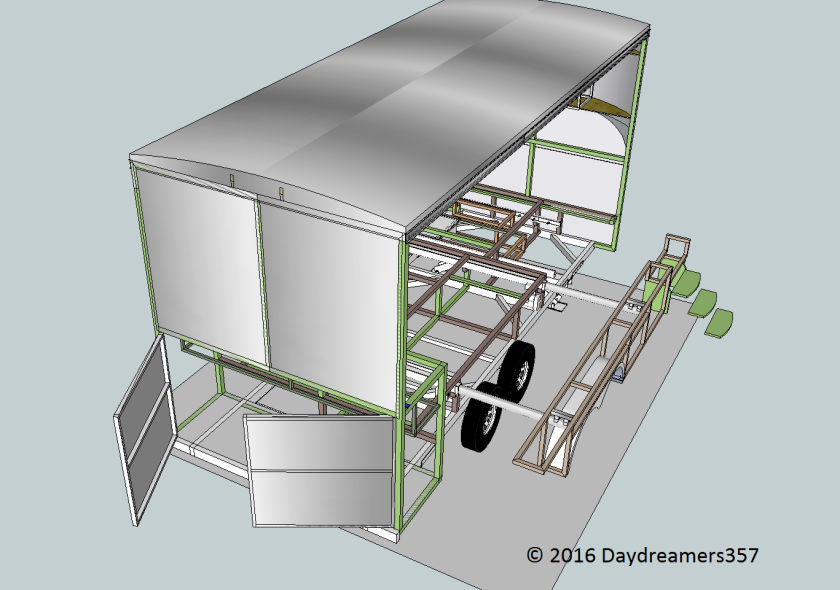
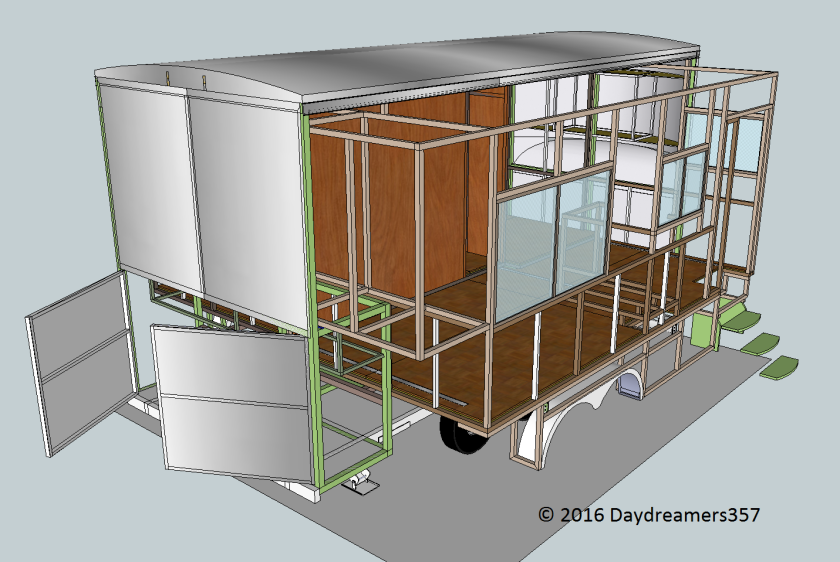
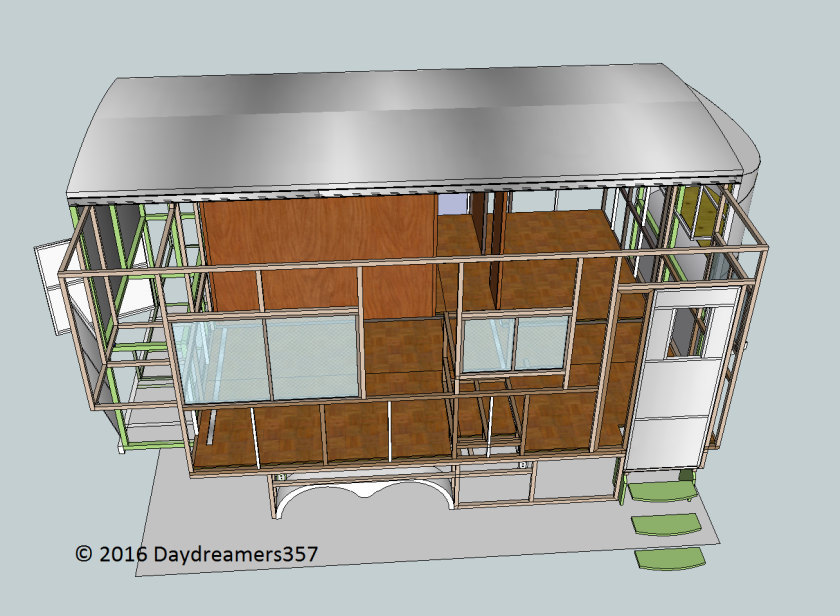
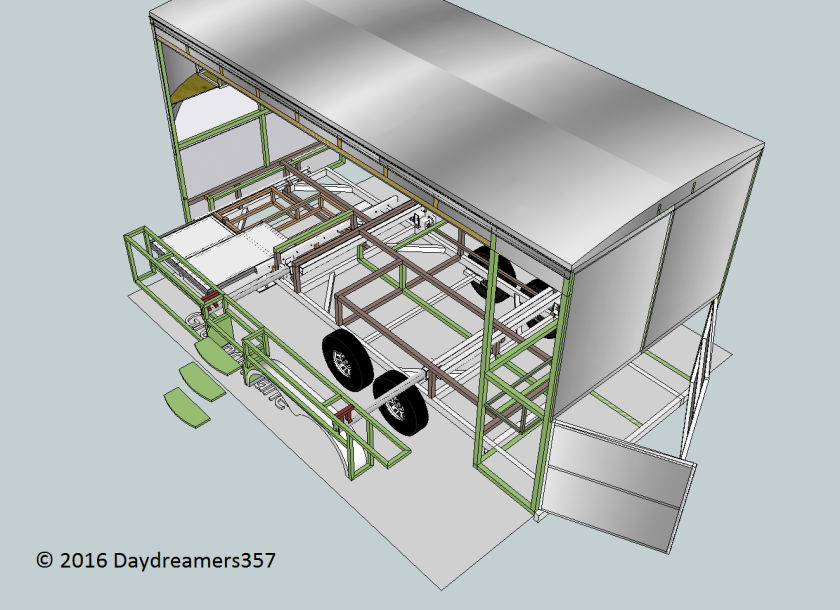
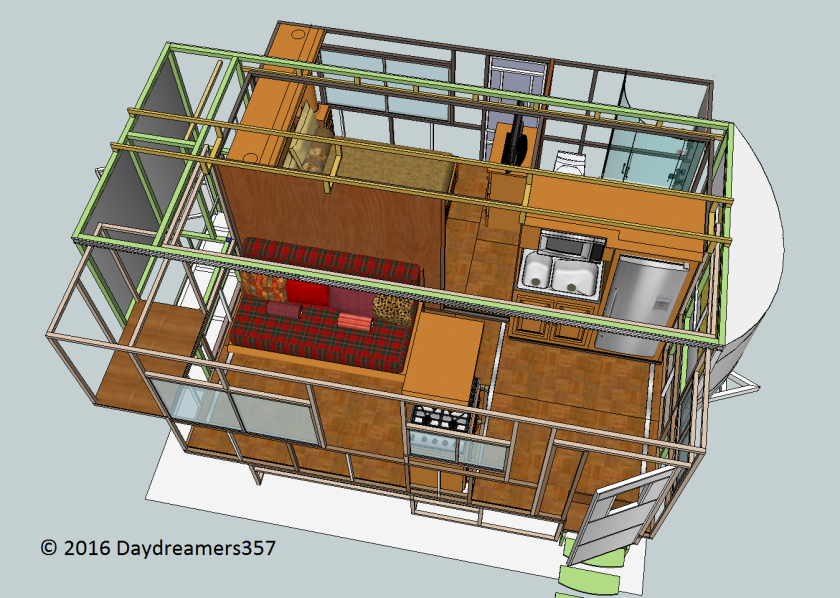
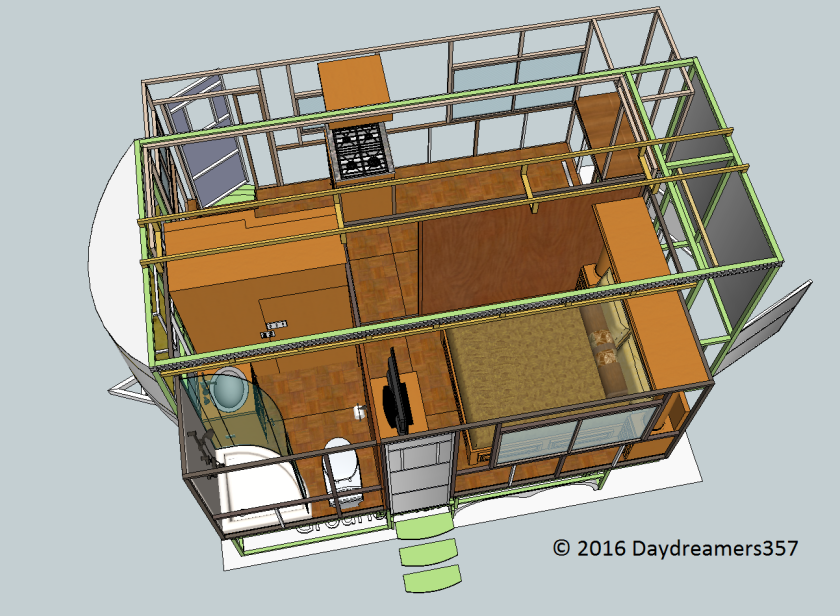
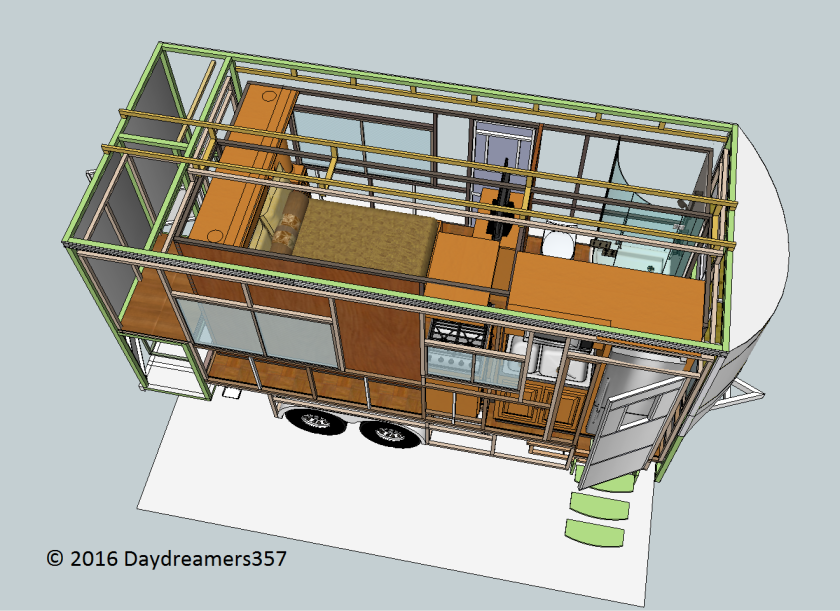
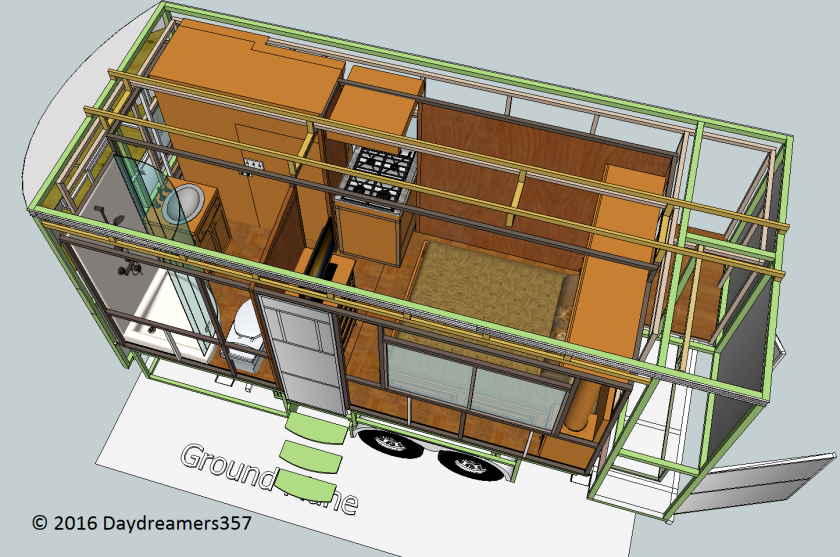
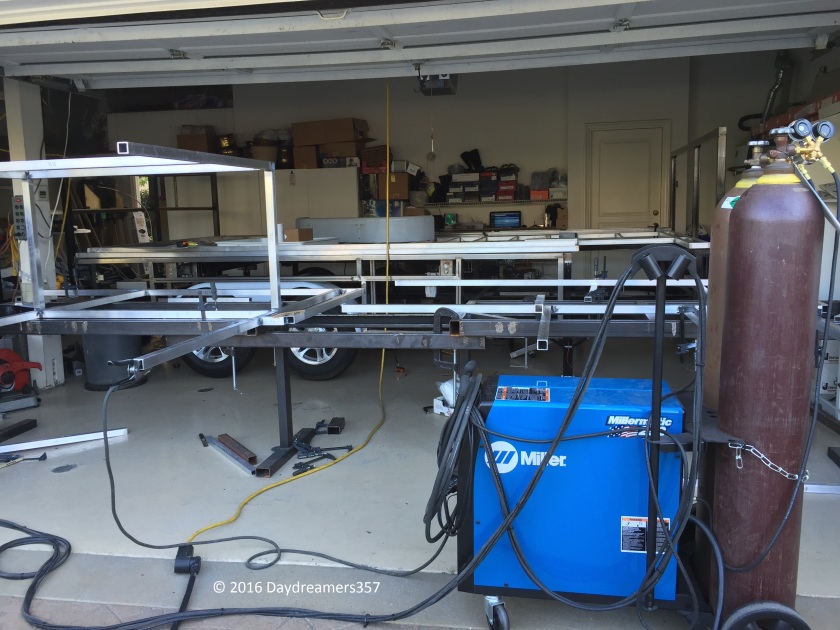
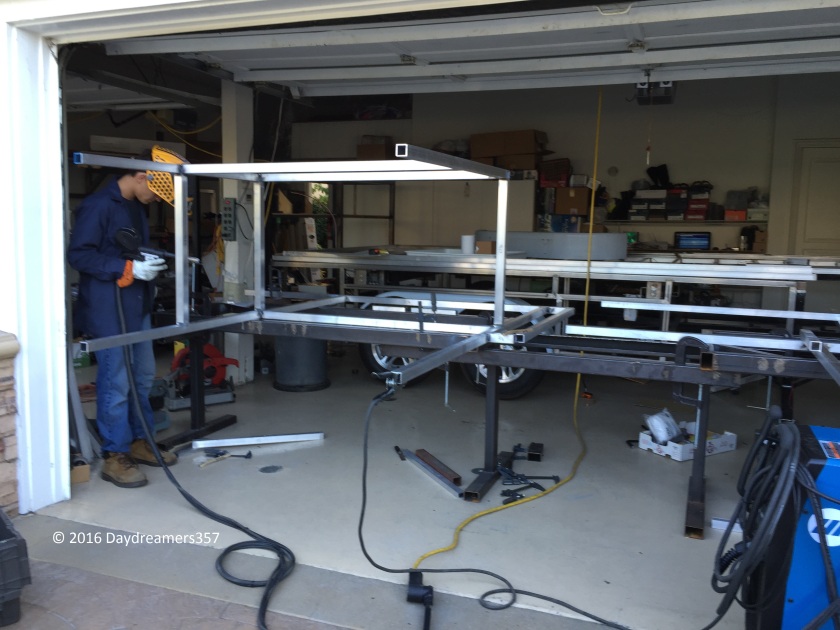
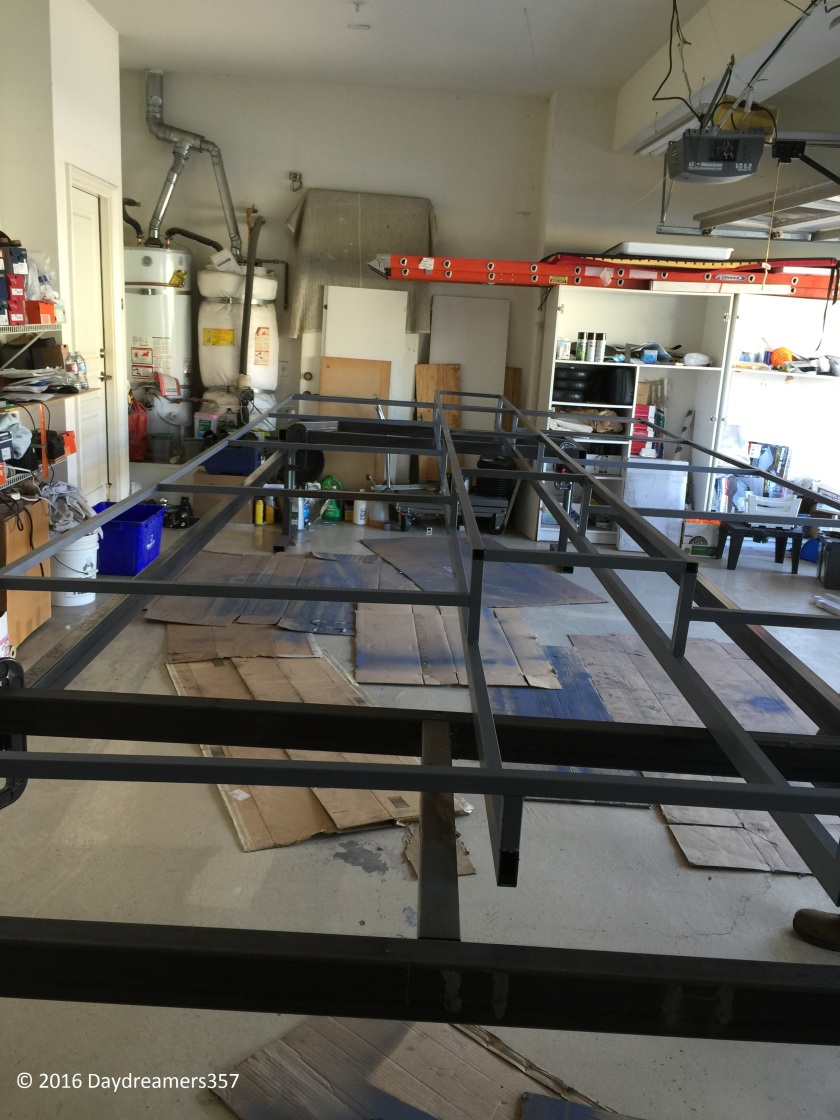
One Integrated Steel Frame with Built-in Slide-out Decks and a Hidden Bed
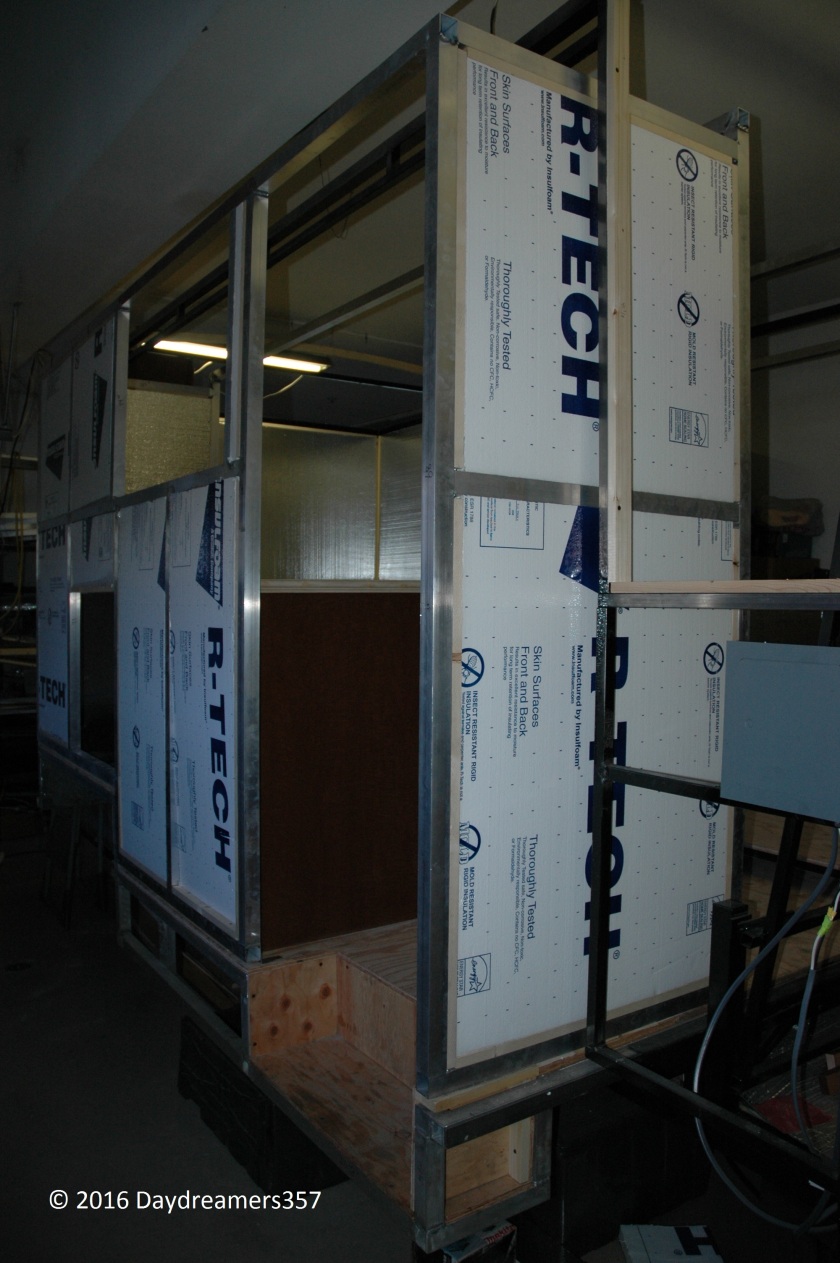
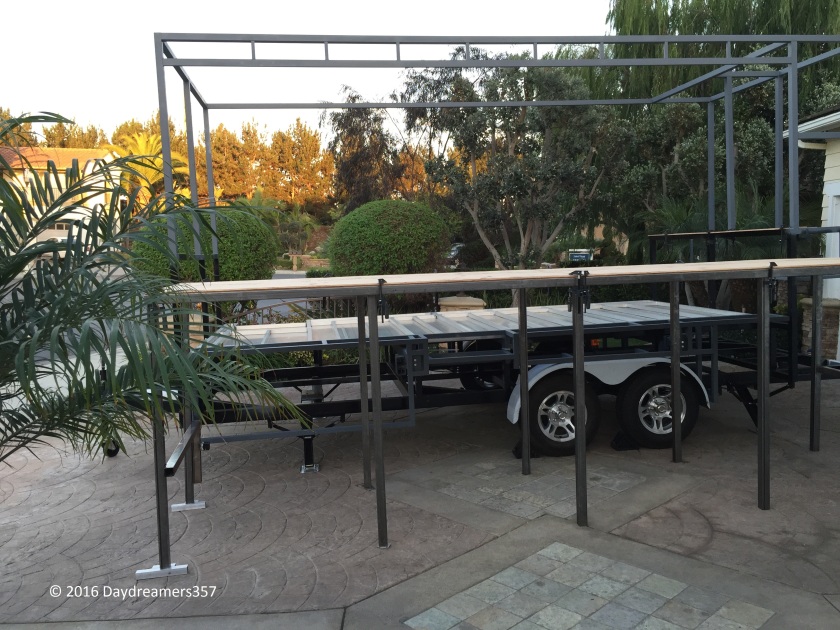
Conventional travel trailers started out as a rigid flat frame on wheels, then the “house” is built on top of it; but to pack this much real estate into a box of 7 feet by 16 feet requires a completely different engineering approach to frame design. The frame has to be one integrated unit with all major components (i.e. slide-out decks, waste storage basement, hidden bed frame) built as part of the frame itself. See the squished down basement? No room for anything but thermal insulation and various electrical wirings.
Instead of a flat frame on wheels, the rigid box frame is built as a chassis for the rest of the trailer components to be built upon.Looking toward the rear of the RV. The entire left side is open for the curbside slide-out frame to extend through.Looking forward. Street side slide-out deck and hidden bed were built as an integral part of the frame.
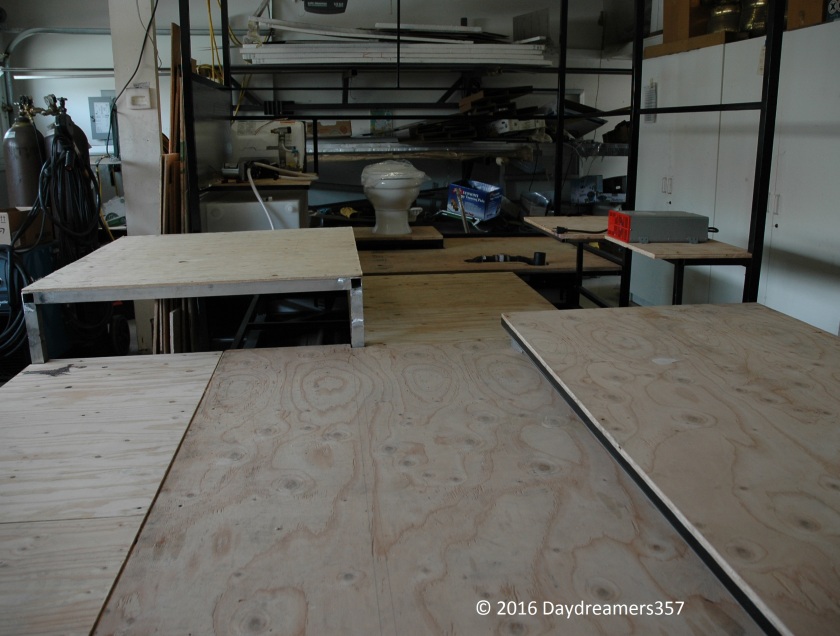
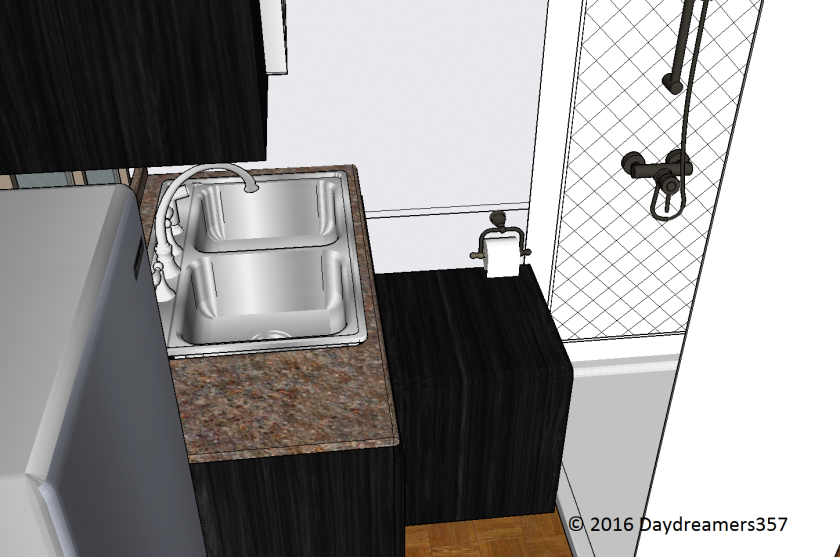
The most tightly packed section of the RV is in the rear where the shared bath and kitchen sink is. What above hides a huge engineering challenge of fitting all hidden components underneath securely in their proper places. Gas and water pipes/hoses are the worst to keep them streamlined. The waste pipes connecting to the waste tanks were designed to be a mere few inches long to prevent clogging. They all have rubber connections to allow for vibration without the risk of cracking the connecting pipe joints.
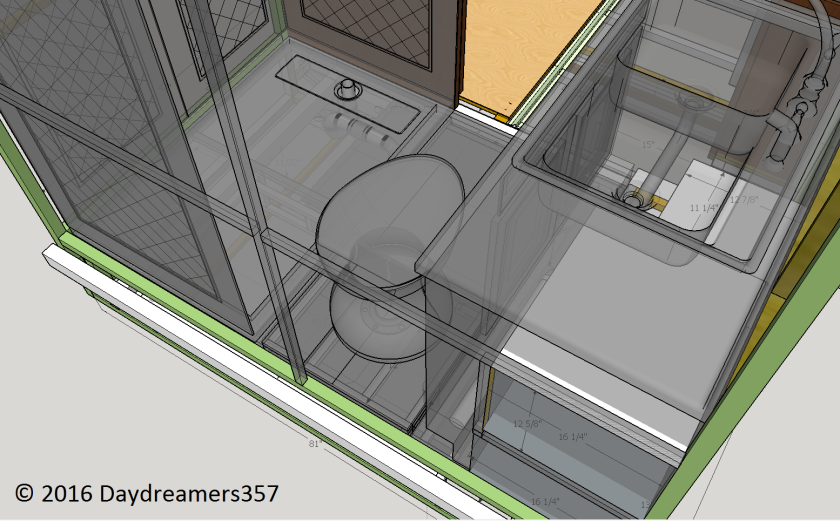
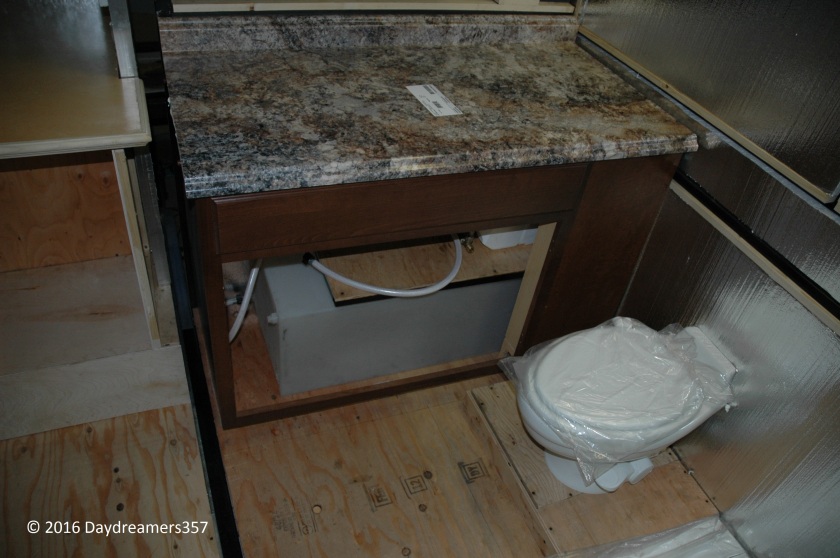
Bath and water closet equipment placement.
The placement of the water closet equipment was so tight and critical that I had to use computer modelling to ensure that the fitting and the sequence of installation was correct. The above shot was taken after the initial installation. Computer model below may be able to show the fitting of the final placement but it wouldn’t be able to tell you whether your hands may be able to reach certain part easily or not.
Thanks to the transparency mode, I could clearly see the placement of the equipment and their associated pipe routing in 3D. Any potential interferences can be detected before the installation has actually taken place
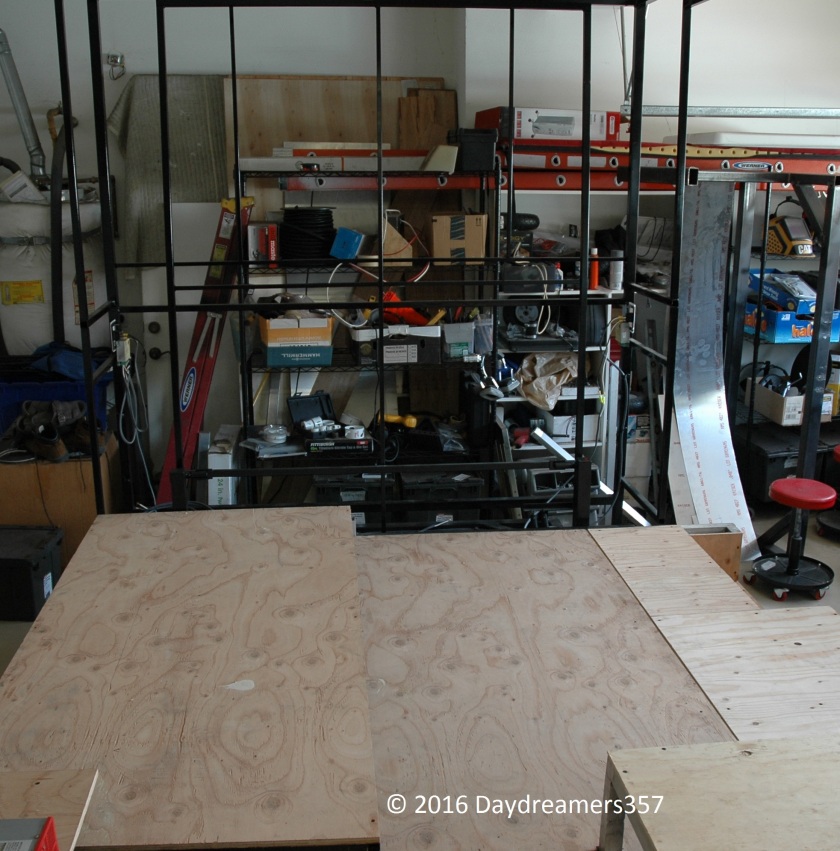
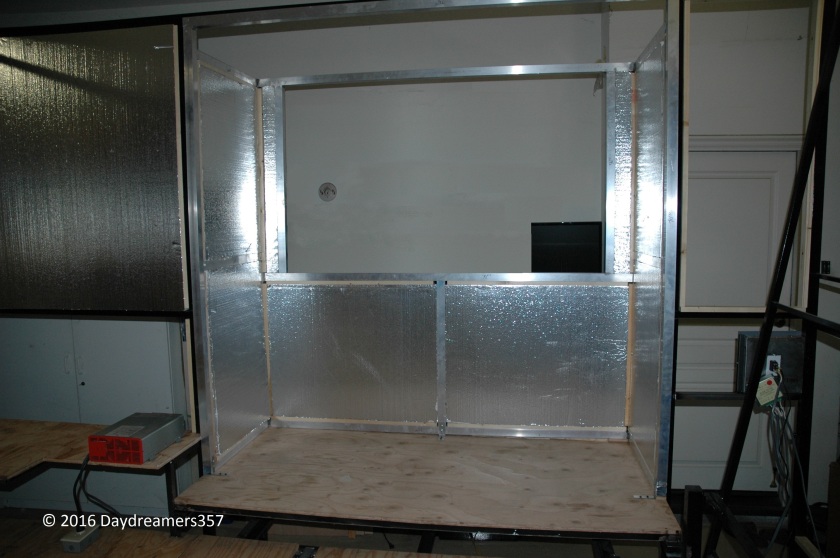
Fully Insulated Floor Basement and Waste Tanks
The entire floor basement is sealed and insulated. Three inches of thermal and sound insulation, then Reflectix ®sheeting.
There is a separate compartment for the waste tanks which was also fully enclosed and insulated. Plenty of room for hose storage, too. Presently, the black tank is 17 gallon but the frame can easily accommodate up to a 39 gallon black tank.
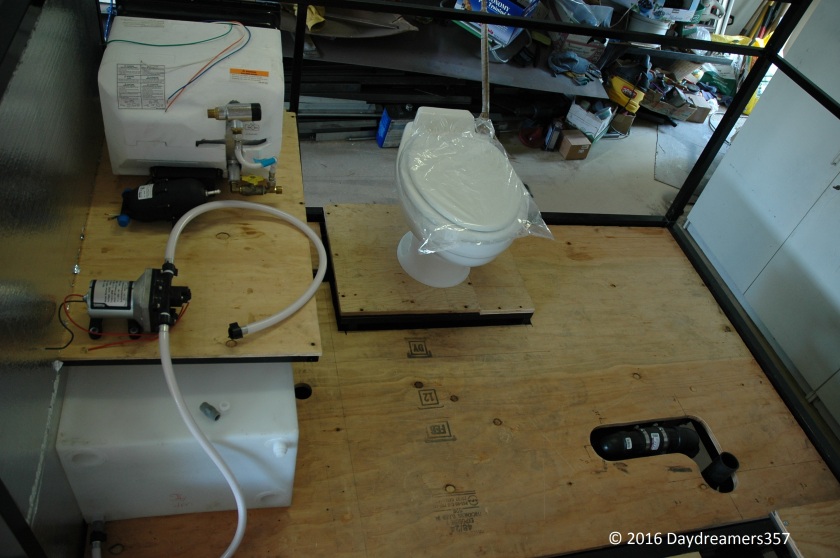
Notice the steel deck for the toilet? The toilet is rigidly held by the steel deck and its wooden floor to support the weight of the occupant. Below the steel deck is a straight 3″ diameter rubber hose connecting the toilet directly to the black tank, hence, the elevated platform and a low profile toilet to maintain the same typical toilet height. The tanks are supported by a different set of steel frame. The design is intended to separate the toilet movement from the tank movement so that it will help to keep the rubber seal in the toilet from ever leaking. I don’t ever want to fix an old and leaky toilet, period!
40 Gallon Inside Fresh Water Tank
Fresh water tank is placed inside to maintain at room temperature. Right above the tank is the water heater and pumps. Space is premium around here.
At this point, both slide-out decks were completely checked out and calibrated. Water closet equipment and waste tanks were installed in their proper places. This is when I can take a relief breather knowing that the design is feasible although I still have many months of works to go.
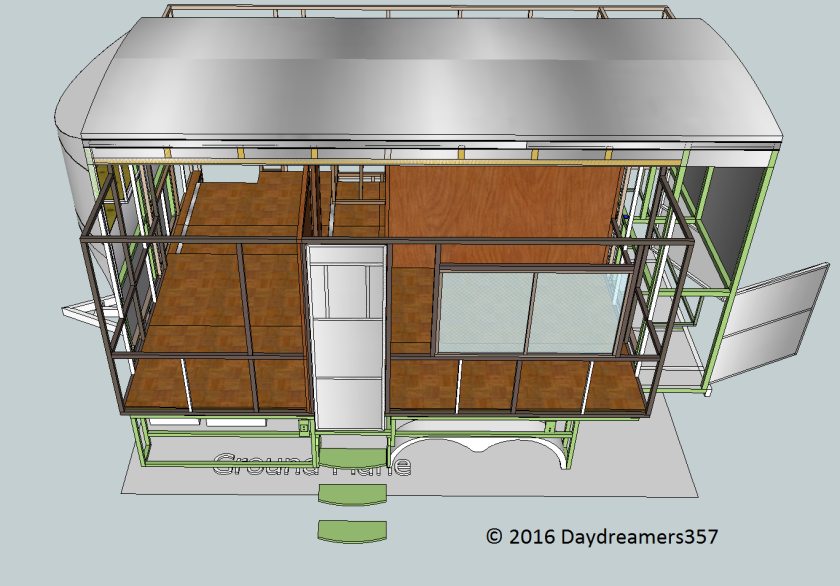
Interior Views
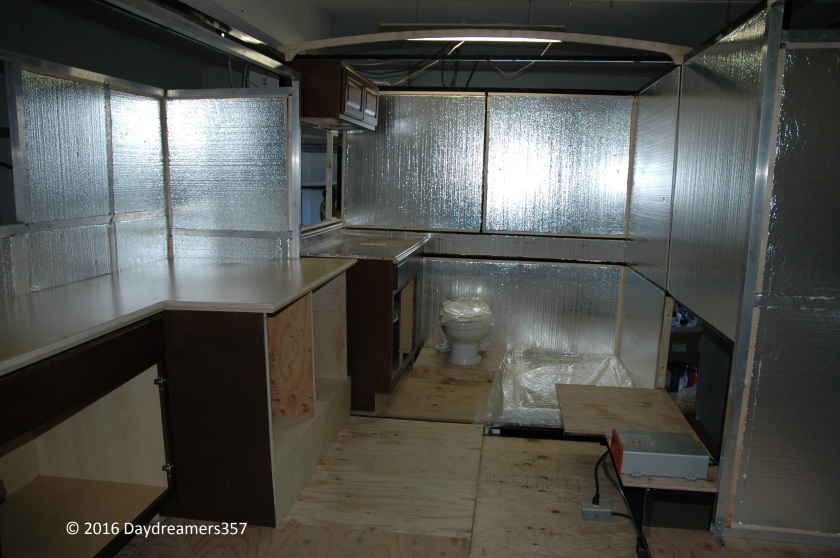
When fully extended the cavernous interior provides an instant cure for any cabin fever. This picture was taken when both slide-outs are extended and the cabinets and toilets are tentatively in place for a fit check. This is the first time the structure truly provides a spatial sense of the interior space and it did not disappoint.
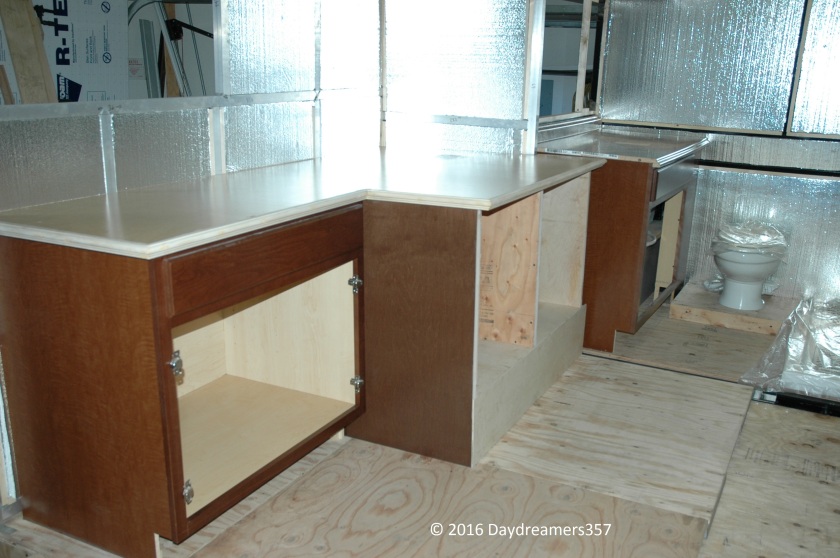
Residential Size Counter Space
One of the recurring theme about this project is the use of residential cabinets and furniture instead of irregular size cabinets and furniture that you will usually find in many typical RV designs. The main design objective is to give the occupants a sense of living in a regular stick and brick apartment instead of a cramped tin can.
Light Weight Aluminum Curb Side Slide-out Frame
Aluminum Street Side Slide-out Frame
Residential Size Shower Stall and China Toilet
Finally, the shower pan and shower surround are placed in for fit check. These items are the same ones that typically used for stick and brick homes. It took more than two months to order them.
Hidden Bed in Deployed Position
Unlike many Tiny Home designs, at my age, I refuse to climb any staircase and sleep in a loft with the ceiling inches away from my face. I want a restful night of sleep. I want a residential sized 60″ x 80″ Queen bed that I can walk around. I am an early riser but I do not wish to disturb my wife’s sleep at 5 AM. Here’s the bare frame built as part of the chassis flipped down for clearance check. The bed frame and its expected mattress height of 8″ clear the ceiling by mere inches!
Flip-down Bed Frame built as part of trailer frame
When the bed is not in use and in the upright, stowed position, there’s a 62″ flip-down sofa in place of the bed! Hmm, the only missing item is a computer workstation. I need one to design the next RV while camping. Okay, maybe the booth dinette will have to do for now.
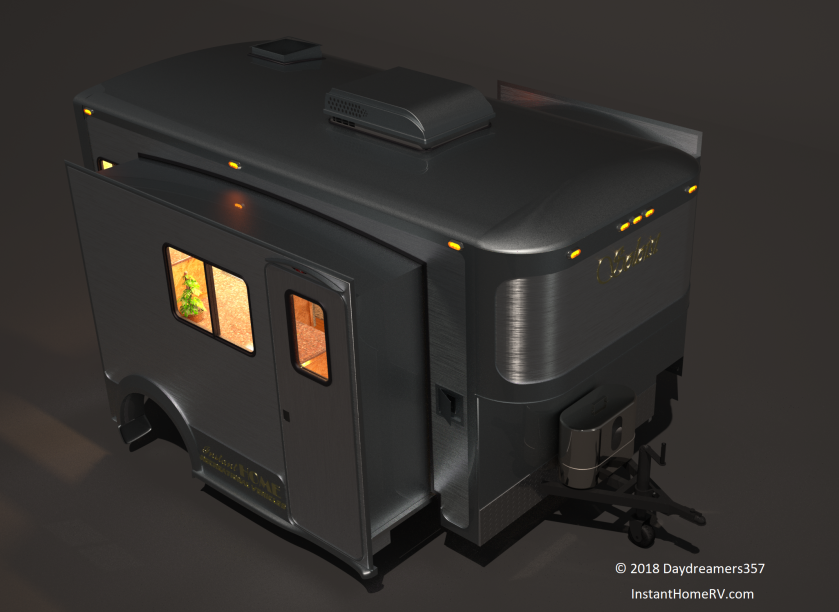
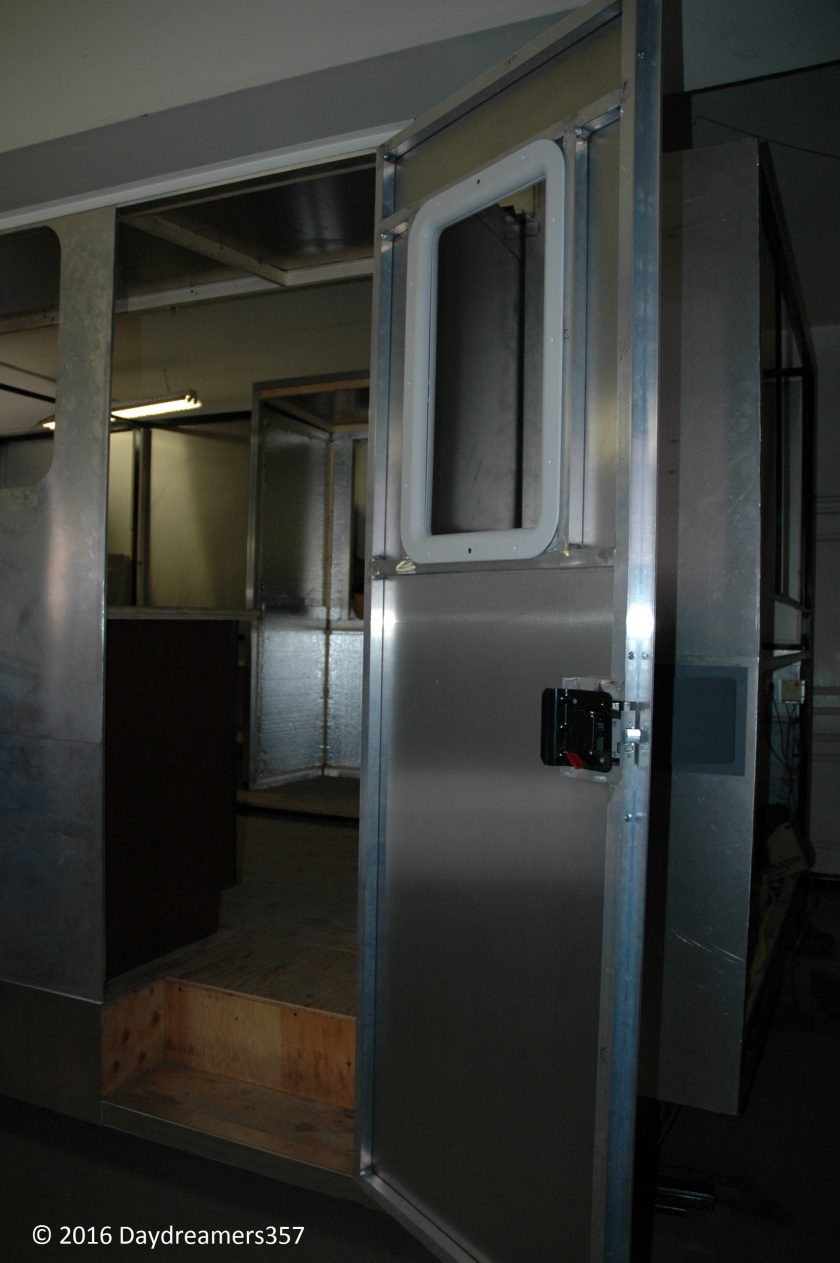
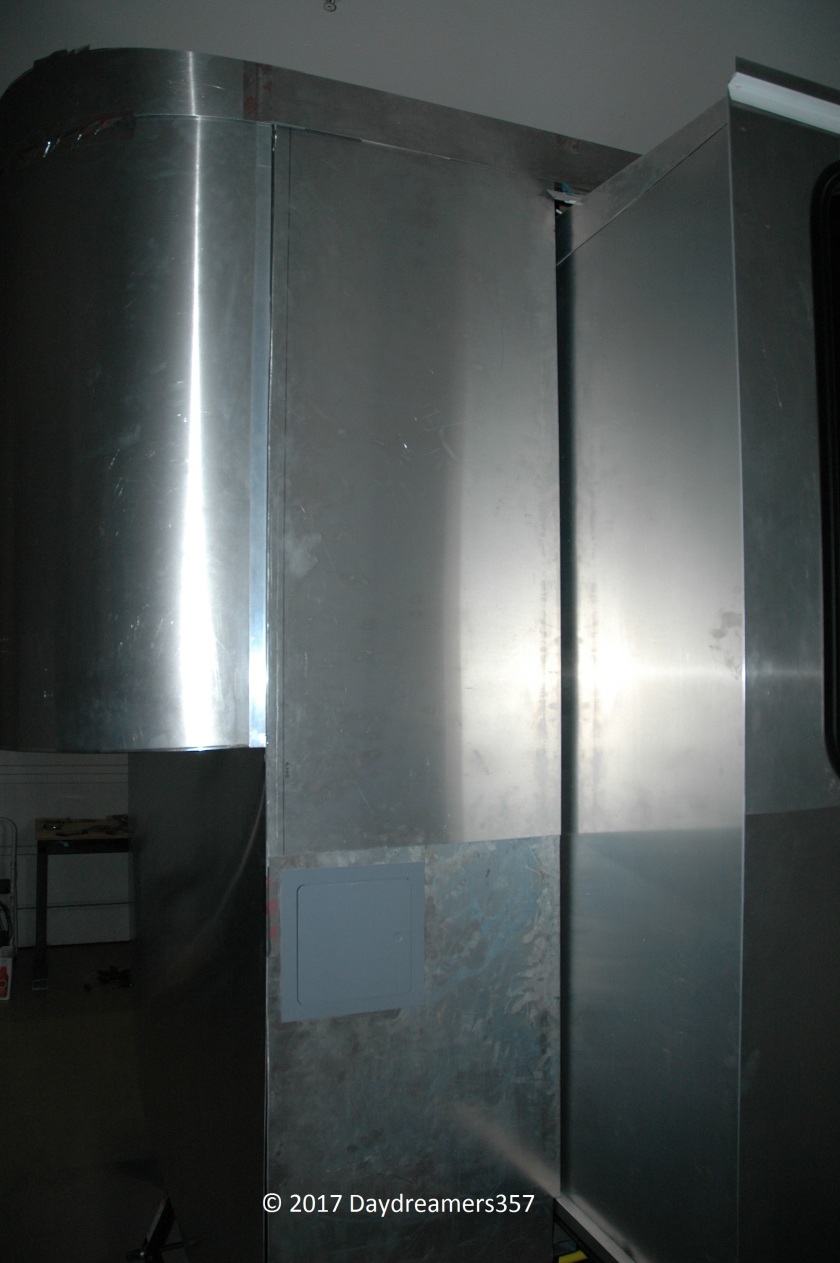
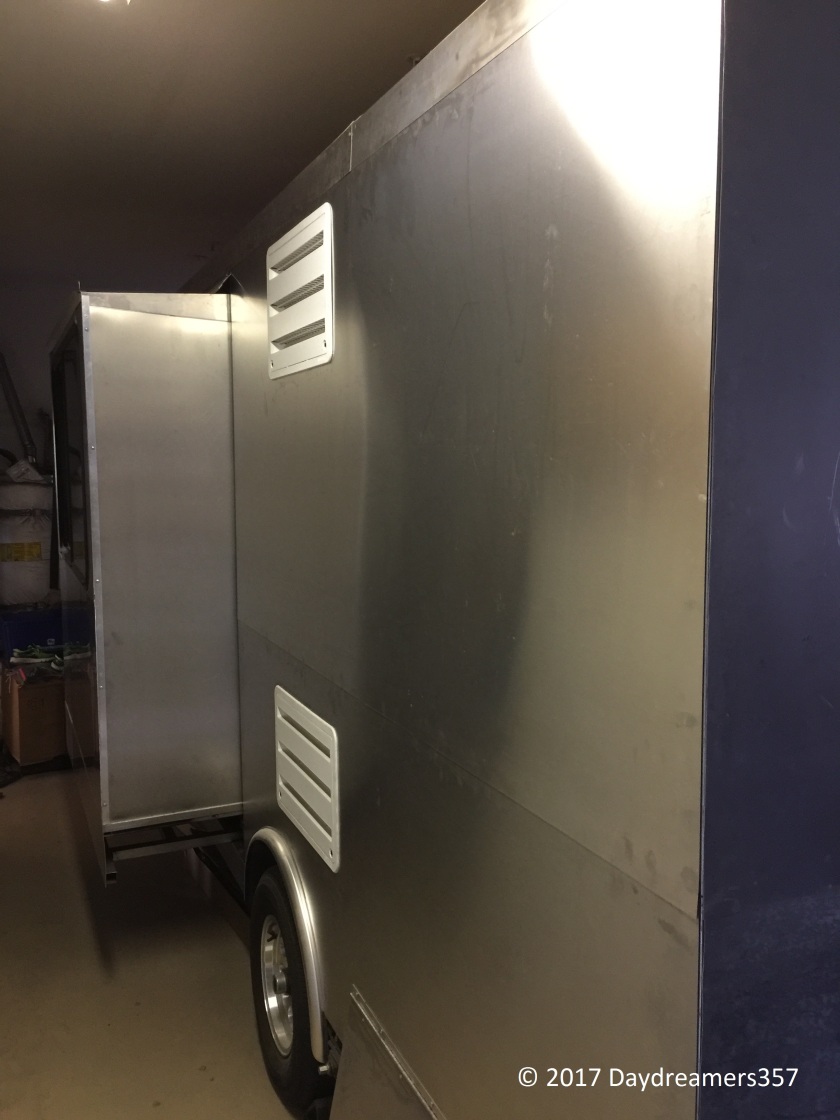
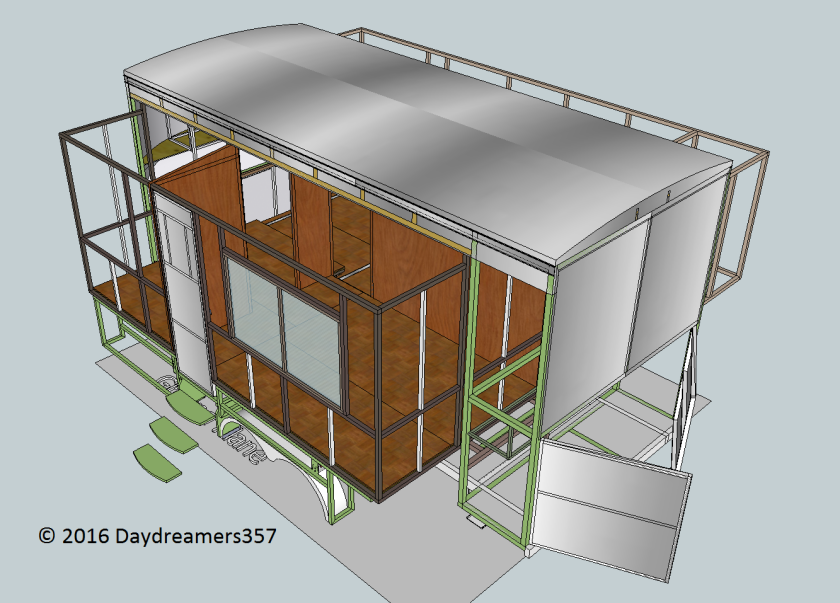
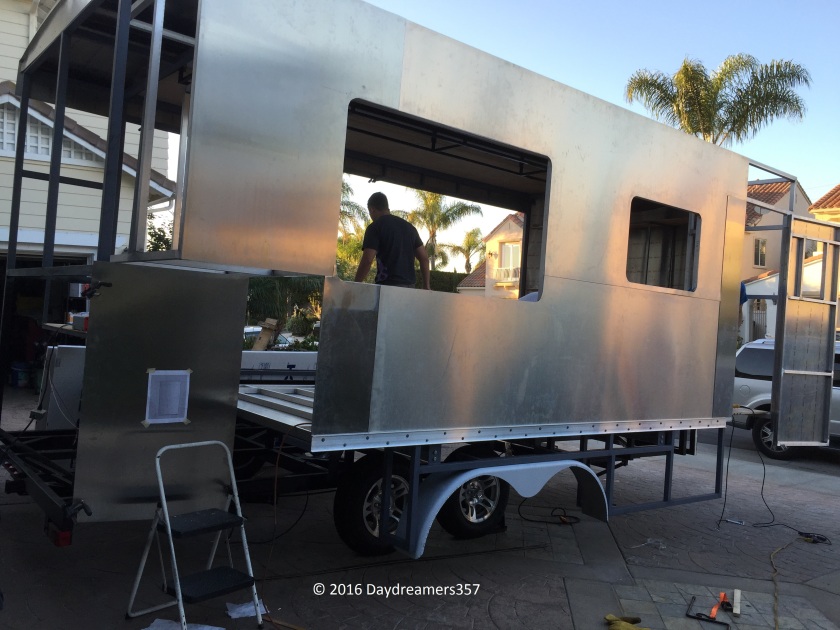
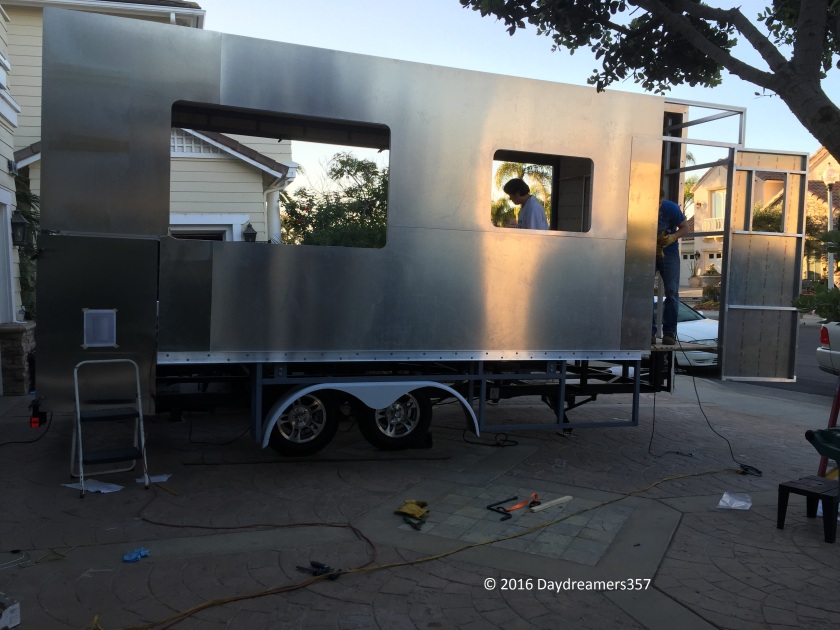
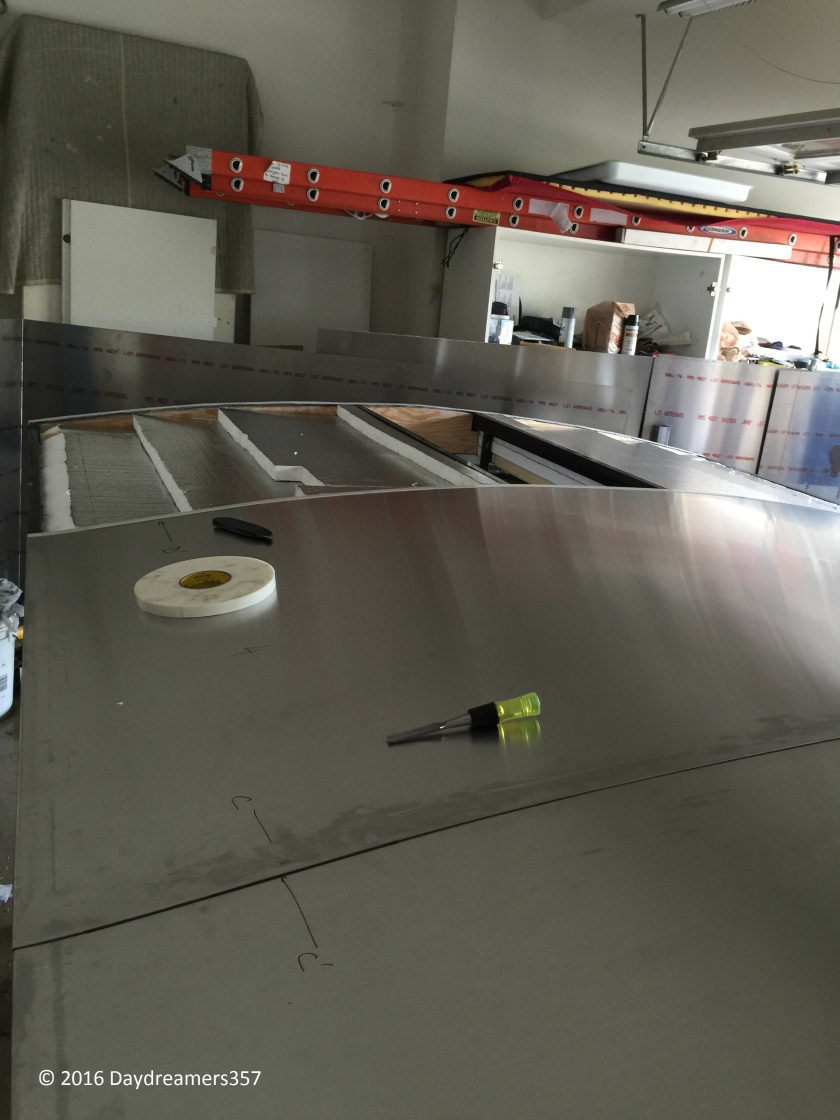
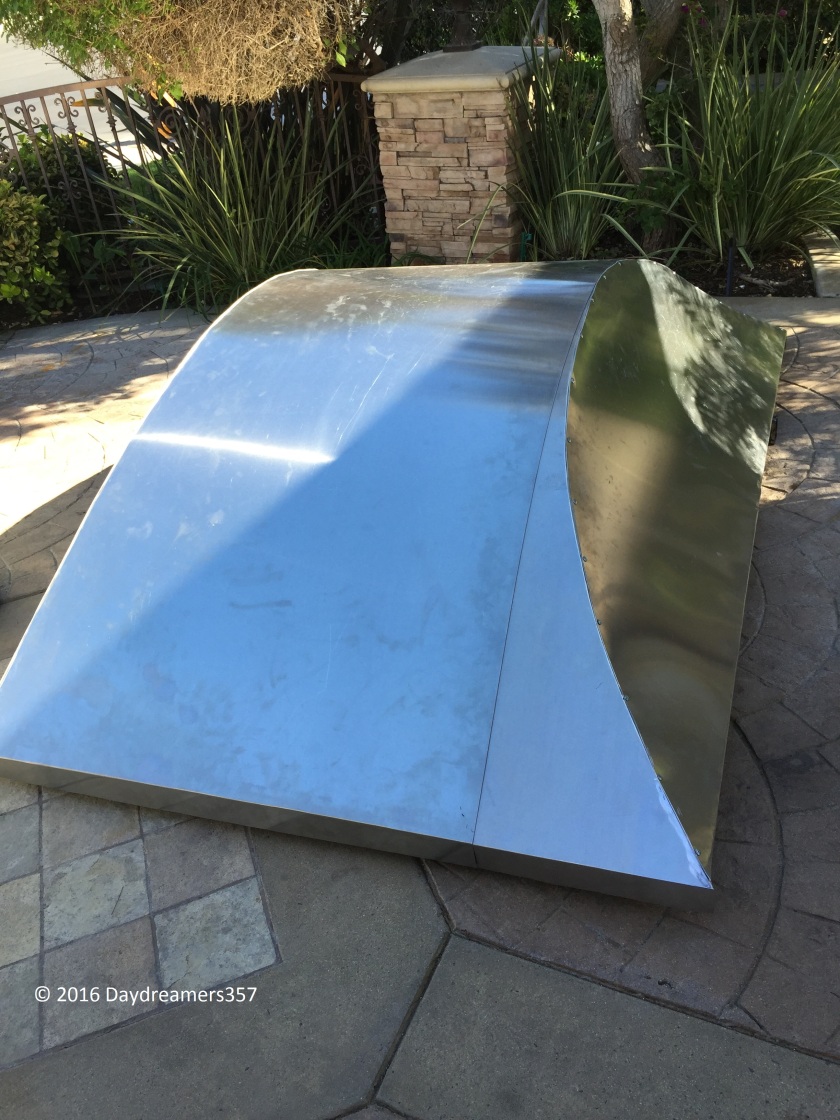
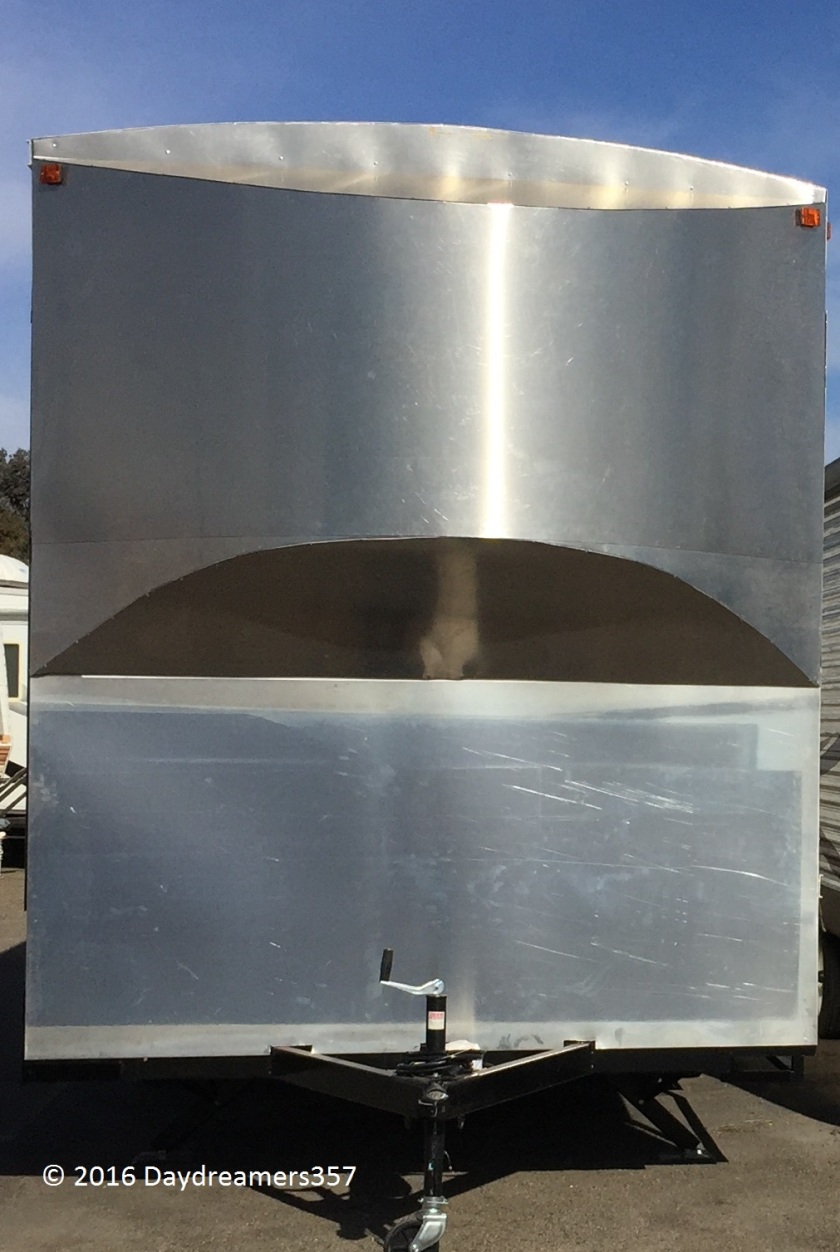
Curb Side Exterior Aluminum Skin
Like the previous design, the RV is fully covered with aluminum skin. I don’t use rivets except maybe for a few strategic locations. I wanted a smooth exterior look. Can’t wait to buff her up and give her a clear coating. Oh, how this baby will shine!
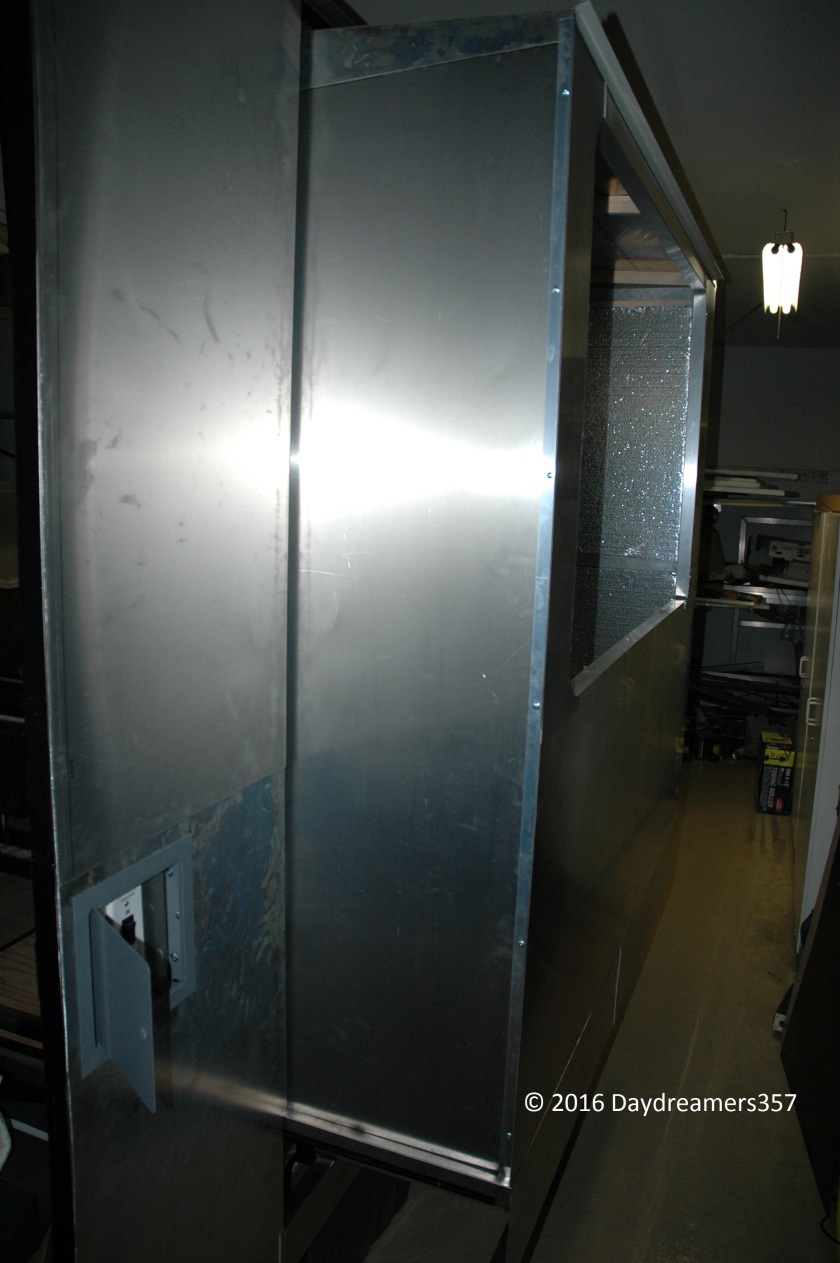
The following pictures show the curbside slide-out in operation during a fit check. I have limit switches on both the extend and retract operations of the slide-out so I can set where the slide-out will stop.
Looking from front with the slide-out fully retractedView from the rear with slide-out retracted in. See the little access door? That’s where a 20 lb. propane bottle for the kitchen will be located. There’s enough room in there for other odds and ends. There’s even a LED light in there to illuminate the entire storage area. I remember how dark it was when camping in the middle of nowhere.Curbside Slide-out extended. Pardon my greasy palm prints all over it!
Looking from the rear with Curbside Slide-out extended. The wheel fenders have not yet been installed. This picture does not do justice for the actual slide-out. To see the nearly 10 feet long slide-out extruding from the tiny body of the RV for nearly 3 feet out was really amazing
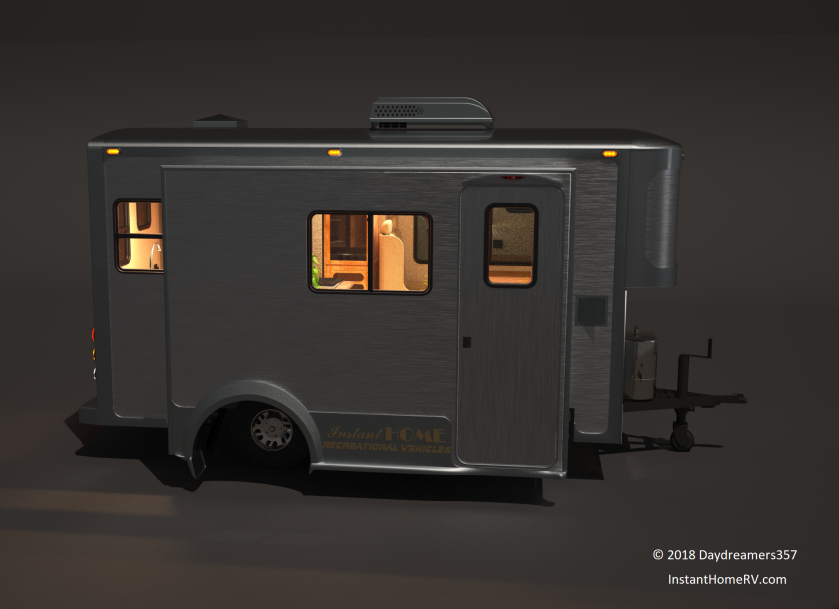
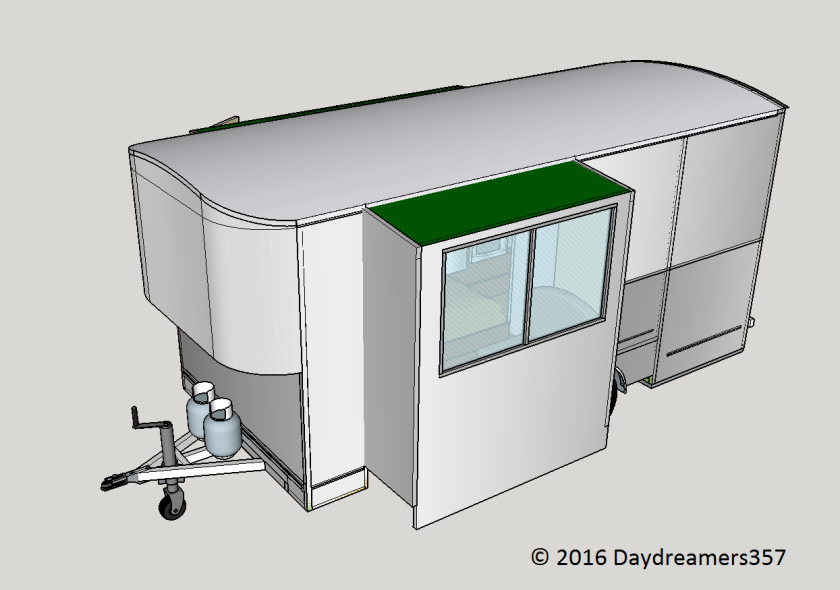
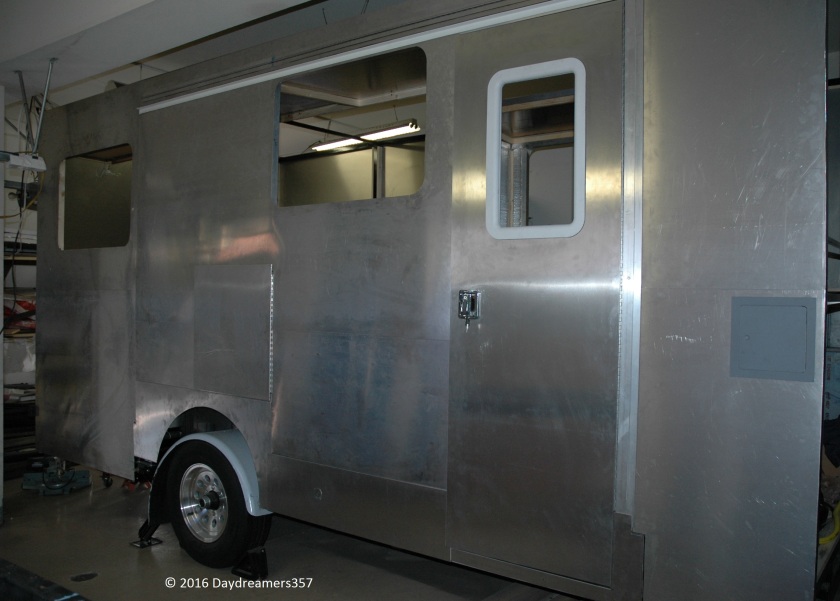
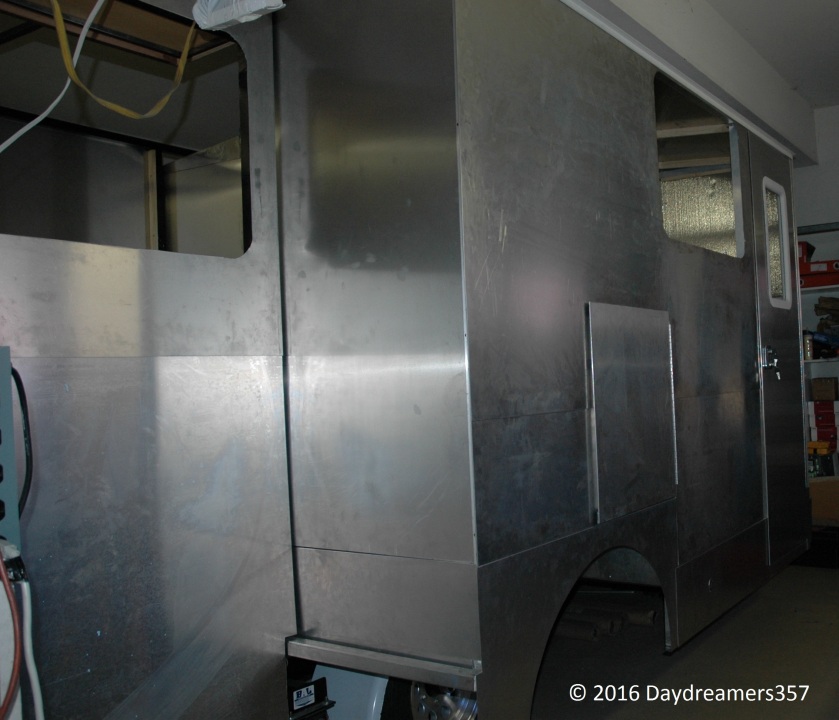
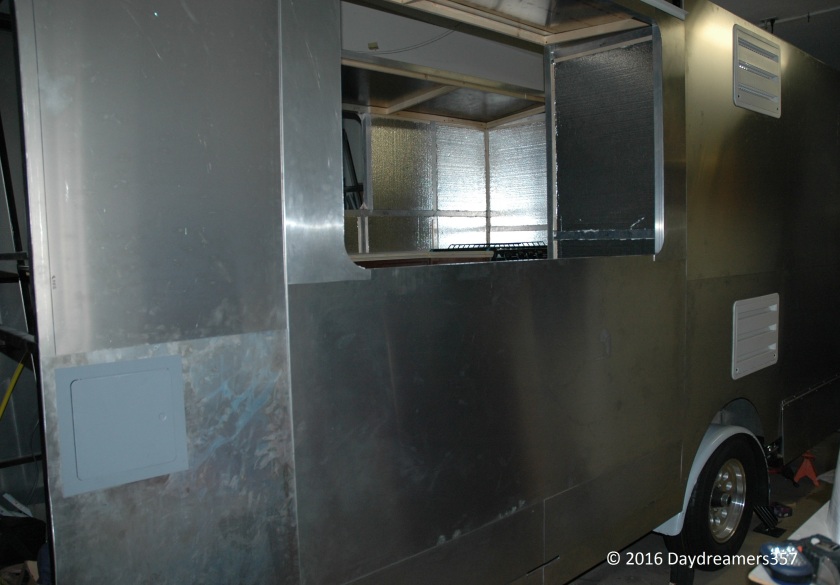
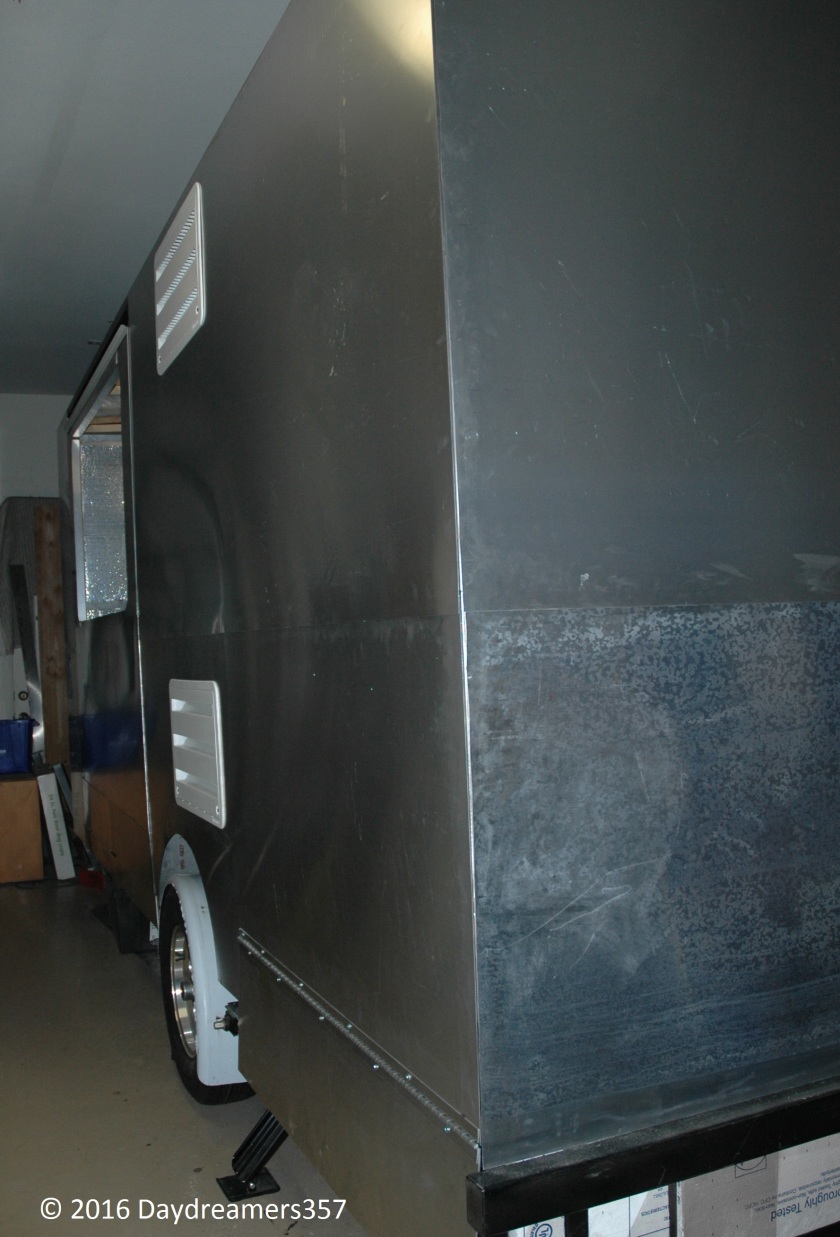
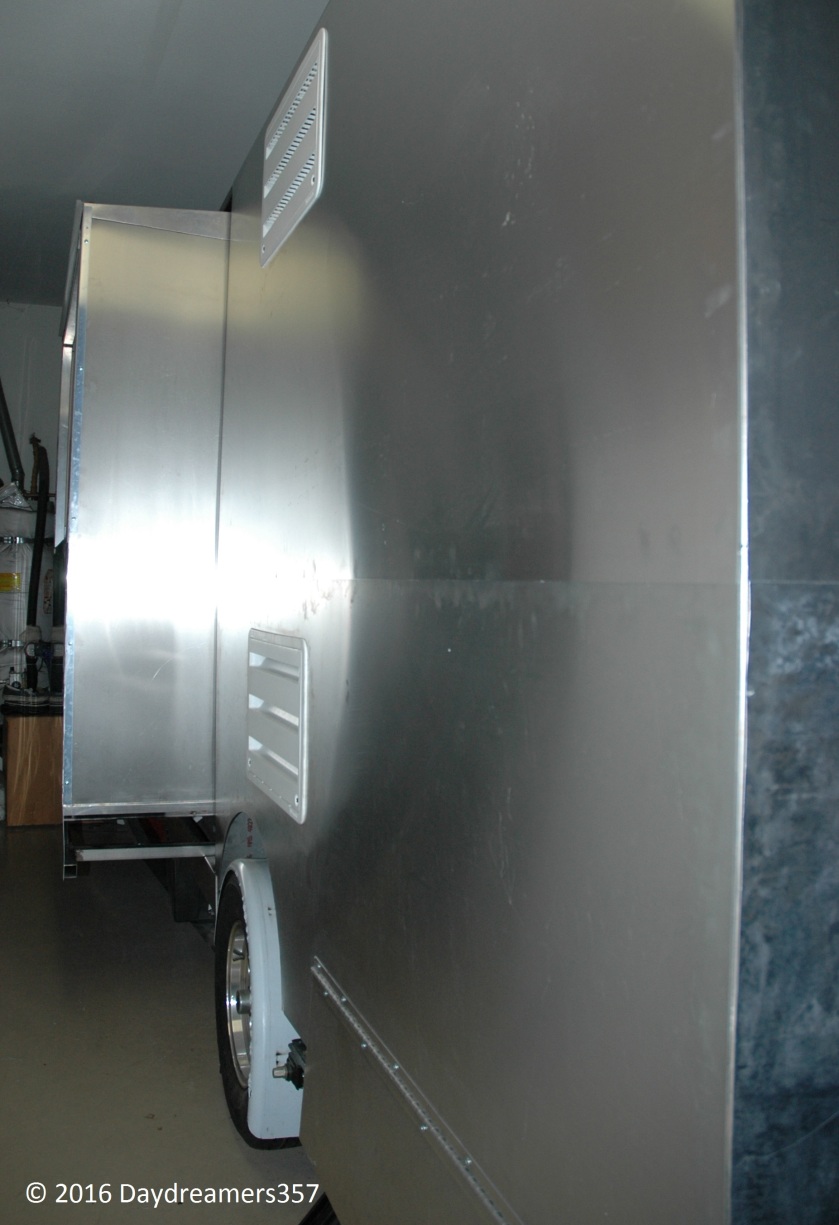
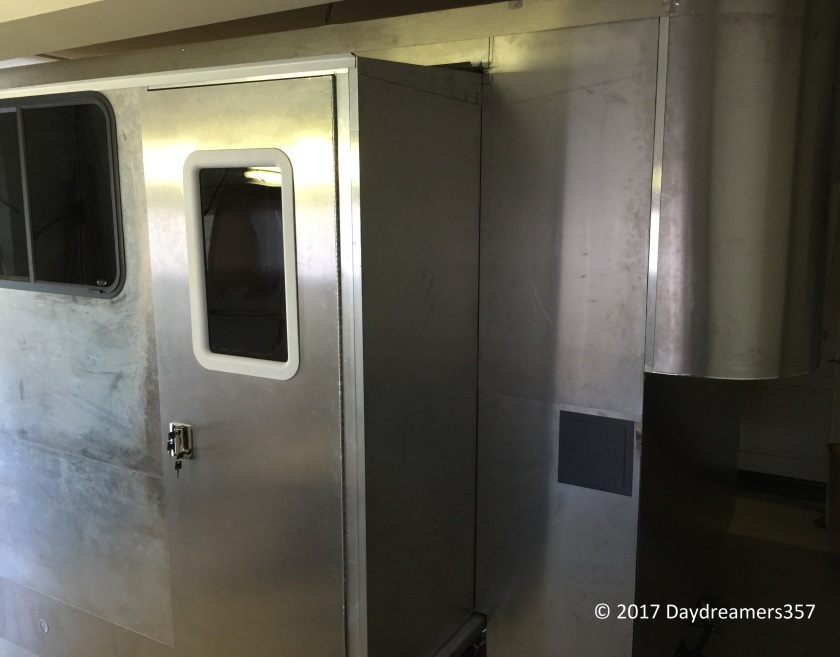
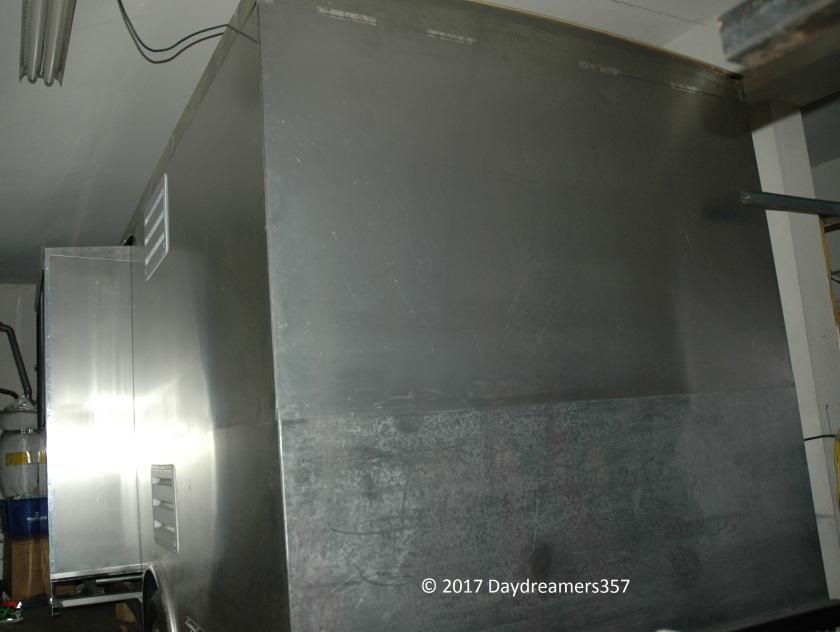
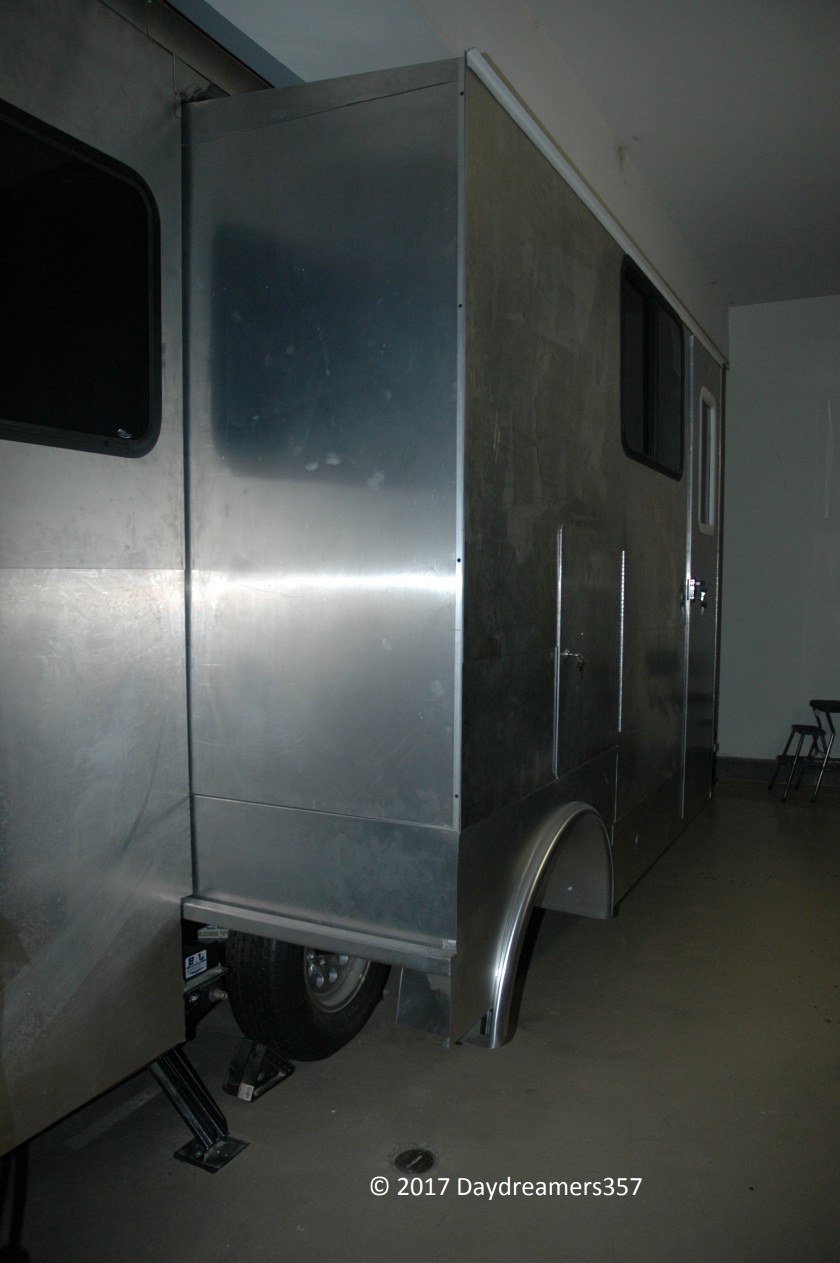
Street Side Exterior Aluminum Skin
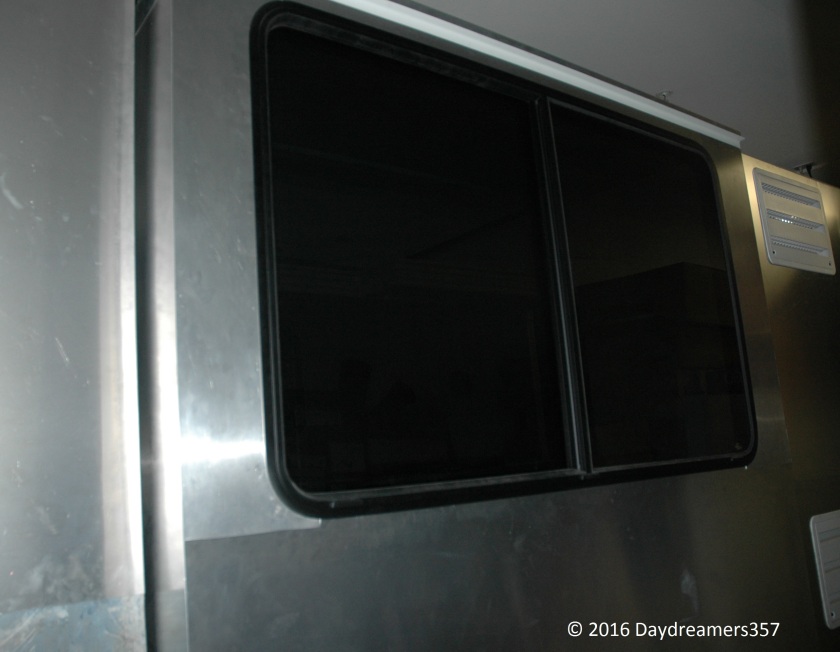
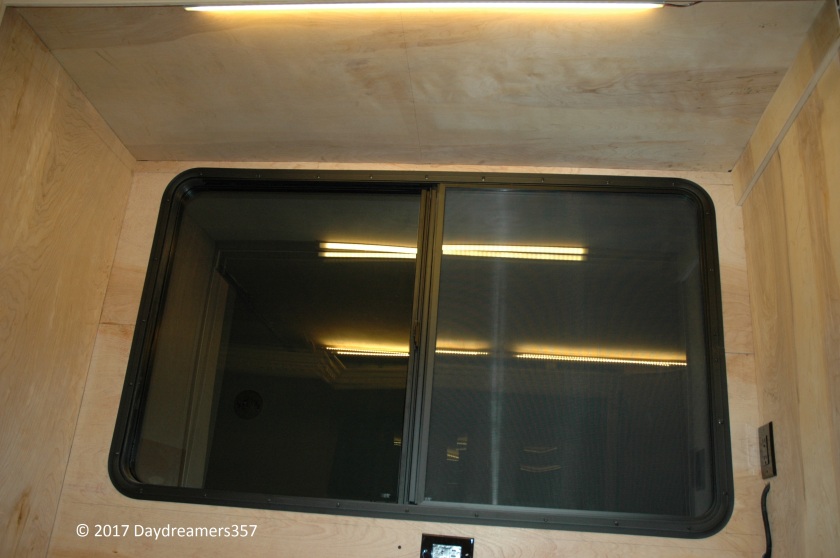
The entire street side slide-out is graced with a huge 60 ” x 36″ window. Like the previous design, all windows are double pane with dark limousine tint for maximum comfort.
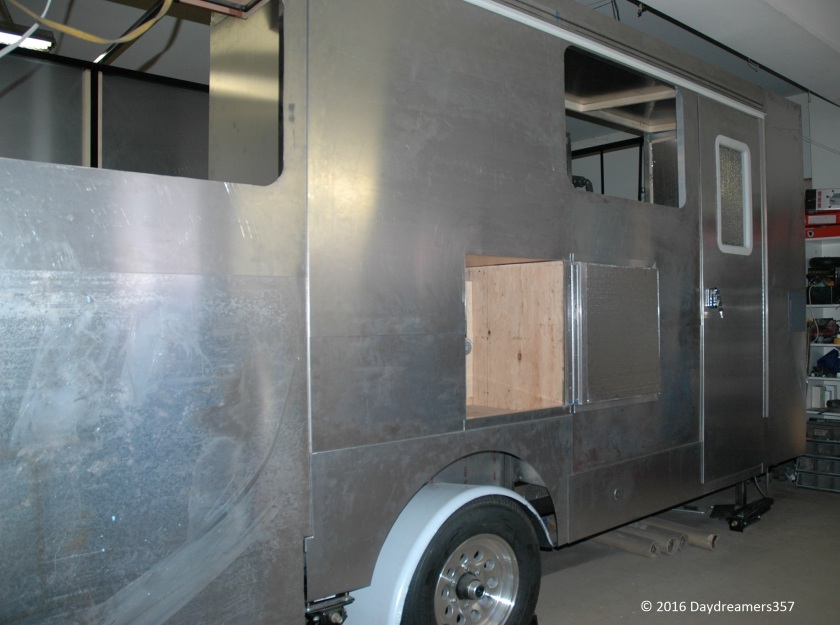
Street side with slide-out fully retracted looking from the front. The little electrical panel contains a switch to manually extend or retract the slide-out.Looking from the rear. Notice the flap door at the lower bottom? That’s where all accesses to water/electric connections in addition to the tank valves are located.
When not in full hook-up mode, the door panel is fully closed and locked. The entire waste storage area will be tightly sealed all around with 1 1/2″ Styrofoam insulation. I plan to add a 1 1/2″ Styrofoam panel with cutout holes for water spigot connection and waste drain port so that even when the flap is open, the waste storage will still be completely sealed just in case I am camping with hookup in the Winter.
Okay, I am getting a little claustrophobic here with the street side slide-out extendedLooking from the rear with the street side slide-out extended during fit check and slide-out calibration
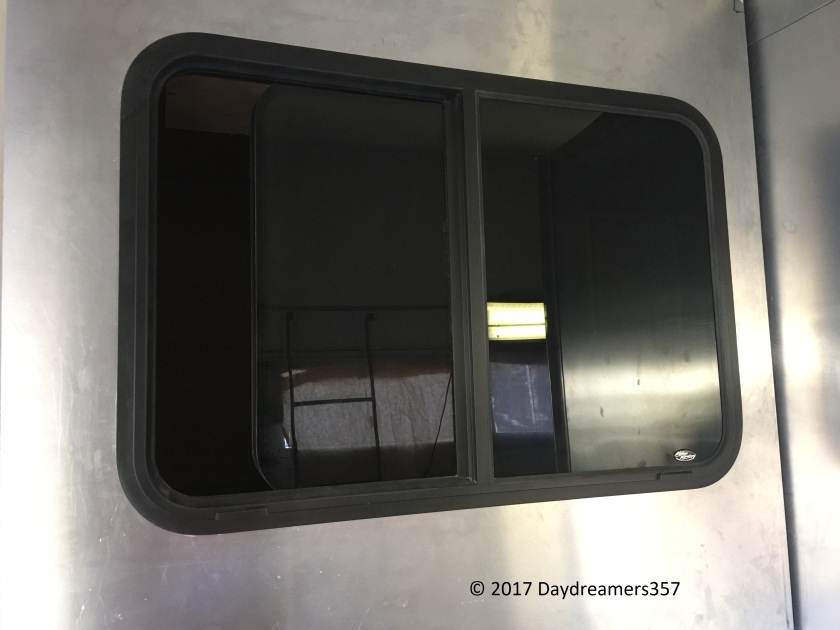
Windows fit checks
I’ve ordered these windows months ago based on the initial design calculations. They were very expensive but their quality is top notch. They were also non-refundable! The frames were built based on the initial dimensions while the same dimensions were provided to the window manufacture. Steel was welded. Aluminum sheets were cut and mounted. Any mistake will wreck havocs into the design. So you can understand my nervousness for this step.
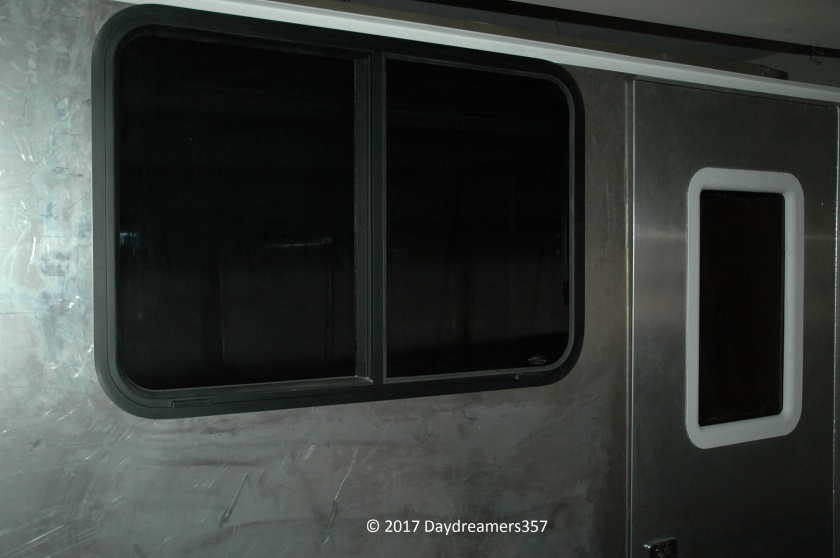
First up, the kitchen and the rear bath windows.
Rear Bath windowKitchen and Entrance Door windows
So far, so good. Aren’t they gorgeous? It’s just too bad that I am such a pitiful photographer. The pictures I took don’t do justice for the RV in real life at all. Next, the street side window.
Street side slide-out window. This is a huge 60″ x 36″ double pane windows. It was quite heavy!
There was a little hick up since the manufacture has used pan head screws in some locations along the edge instead of the flat counter sunk heads which has caused some fit issues. No matter, they were easily replaced. This huge window is gorgeous both from the inside and the outside. The double pane and a limousine dark tin features will allow you to enjoy the outside views in comfort no matter what the outside weather condition may be.
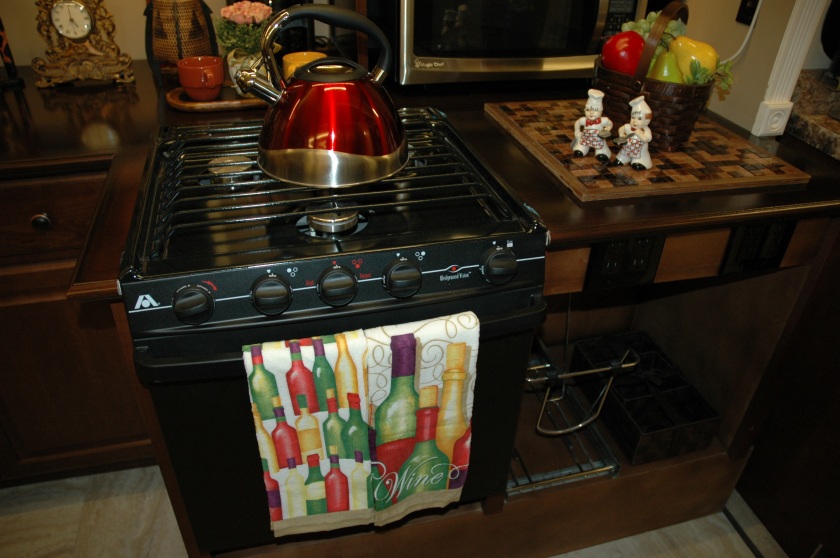
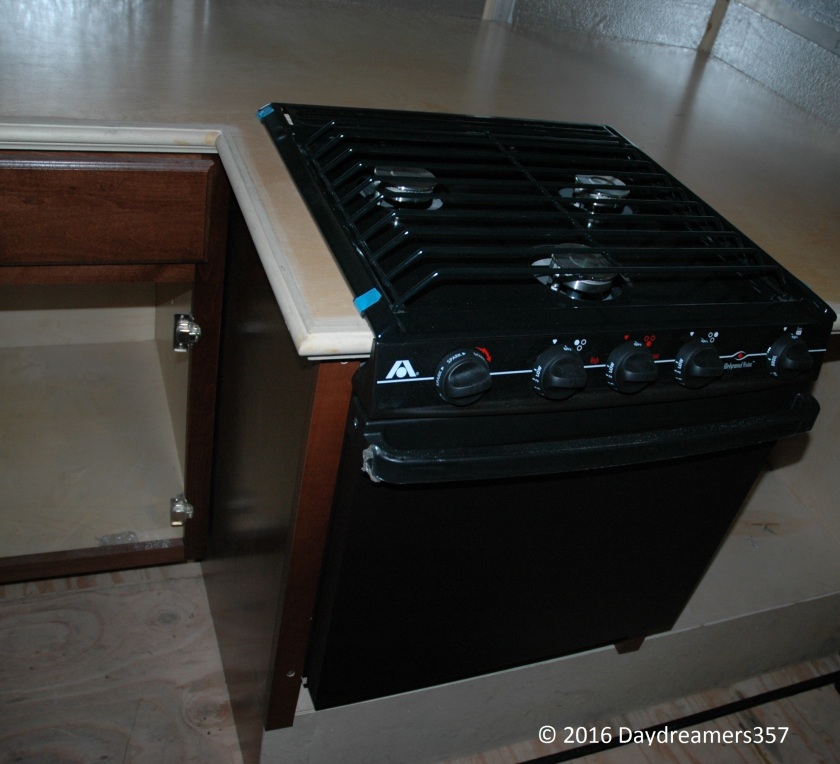
Checking out the newly installed kitchen appliances
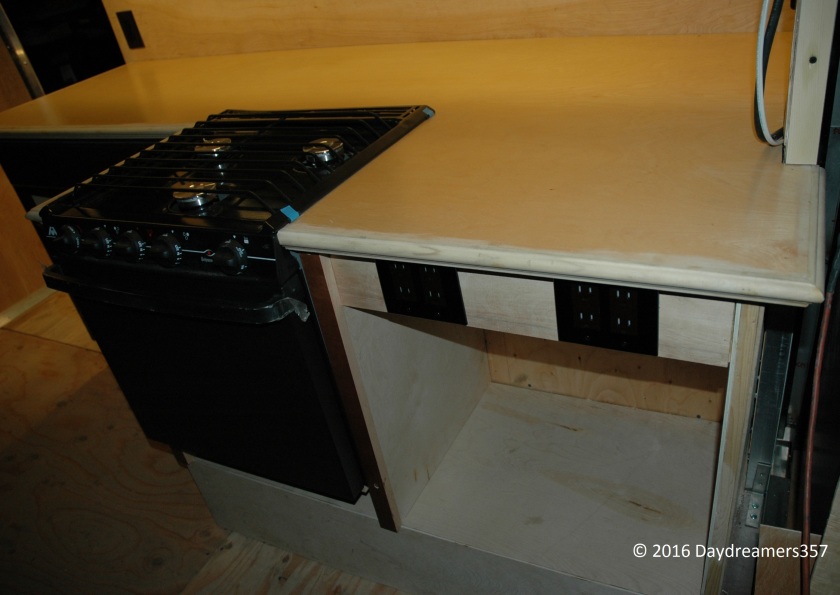
Let’s boil some eggs, shall we? Since I am not constrained by counter space, I installed a 21″ three burner range. My wife loves cooking and I love to eat. We are a match made in heaven. There’s still plenty of room for a full size microwave next to it. There is a 20 lbs. propane bottle in the slide-out storage accessible from the outside. I did not want to risk tethering the rubber propane hose to the slide-out fearing there’s a remote chance of slicing the propane hose. Years of working on airplane has taught me to leave no room for error when it comes to safety matters.
Plenty of 120 VAC outlets for the small kitchen appliances. There’s another four outlet box in the storage area accessible from the back of the slide-out and the through hole on the counter. The through hole on the counter allows the TV and the microwave to be mounted on the back of counter with all power lines hidden from view.
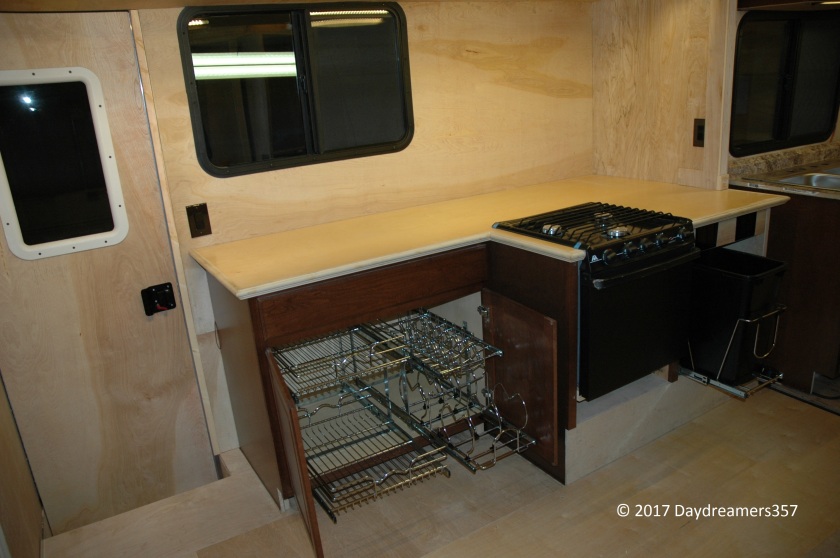
Kitchen Storage Galore
Pots and pans storage racks ready for action! Utensils are stored on the top drawer. There’s even a pull-out 13 Gallon trash bin right next to the kitchen sink.
Testing, testing…calling all LED’s
I am very particular about my interior lighting. The “warm” color has got to be just right. I simply can’t stand the “greenish” tone from many of the LED lights claimed to be “warm” color. I bought and tested many different types. Most ended up in the trash bin! To pass the visual test, each LED was mounted about 3 feet above my head, I then held a page of white paper with texts and pictures from a magazine. The page has to be easy to read and the paper does not reflect harshly to my eyes. I then look at my own skin tone, I shouldn’t look like a gremlin with greenish skin tone color. Then, it’s a pass! Could it be anymore unscientific and easy? The tests were conducted at night so that sunlight wasn’t interfering with the test. Yet, so many have failed the test and subsequently relegated to the trash bin!
I was looking for a true warm color of about 2700K – 3000K which would be closest to the familiar incandescent lights and the LEDs must have a very high brightness. However, a lot of the available high brightness LEDs tend to be in the “natural” white with a greenish tint. Some even flicker intermittently due to overheating when operating for an extended period of time. This issue manifests itself quite often with the round bulbs encasing in a plastic housing since there’s so much light is concentrated in a small area without a means to conduct heat away effectively from the LED bulb. So, I tend to stay away from this design.
I had quite a few quality issues since almost all LED were originally made with little or no quality control. I threw away quite a few LED bulbs and LED tapes before I’ve found one LED tape that has met my visual criteria and had a very good operational reliability. As for quality control, I am my own QA. I cut and discarded any defective sections that I’ve found. Not a happy camper with that but I don’t compromise on quality.
What I ended up doing was building my own LED lights from the selected LED tape using another part vendor’s Aluminum casings. It took a bit of time but it’s something I was happy to do. Here are what I’ve ended up with.
The warm color lights has a clear transparent cover to provide maximum brightness. The casings were 1 Meter long and made of Aluminum so that it can dissipate the heat effectively. The RGB mood lights and the light bar in the street side slide-out have oyster white covers to soften the effects. The mood lights have a remote control for changing the color and dimming. Both are indirect lighting at a 45 degree angle, hence the requirement for high brightness. In a small confined space, it is important not to subject your eyes to intense direct lighting so that you don’t feel like you are in a torture chamber. I wanted to “flood” the interior with a nice and even indirect lighting for a comfortable feel. Each of the light bar is 1 Meter long (or roughly 3 feet 3 inches) , although, I do have some that are 1/2 Meter long, too. As tested, the 1 Meter warm color bar draws about .87 Amp at 11.9 VDC or about 10 Watts. The 1 Meter RGB mood light bar averages about .362 Amp at 11.9 VDC (4.31 Watts) for each primary color (RGB); however, when all colors are on at max brightness, the light bar will consume roughly 10-11 Watts max. Perhaps, it’s a function of the LED chip controller? In any case, I’ve made a bunch of these.
The LED warm color light and the mood light bars. Not much to see until they are installed in the RV interior strategic locations
This easy to reach light switch from the outside is used to illuminate the stair step for safe entry at night.
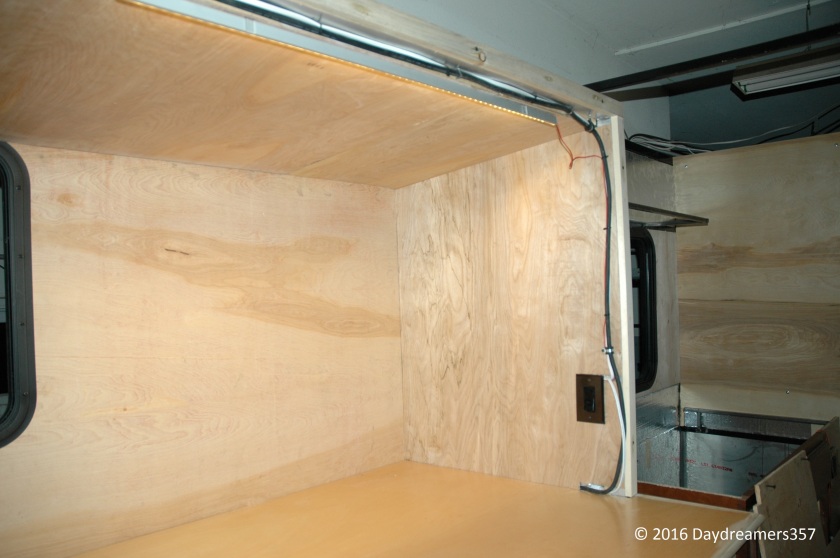
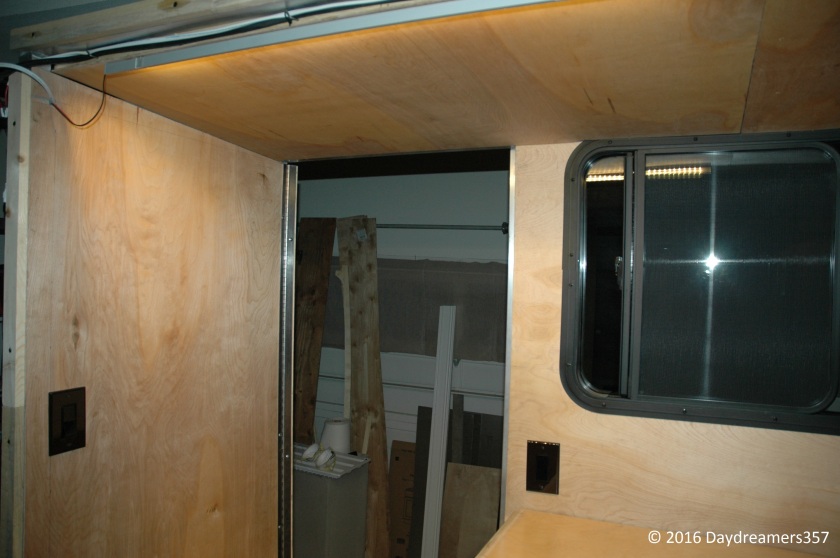
There are two light bars to flood the curb side slide-out with a warm and even light. They have separate switches to allow you control the amount of light desired in the interior of the living quarter. The reflected light from these light sources will cast an even tone throughout the living area of the RV.
Kitchen light with its own light switchLight bar at entrance area with its own switchWhen both are on, the whole curbside slide-out is fully illuminated
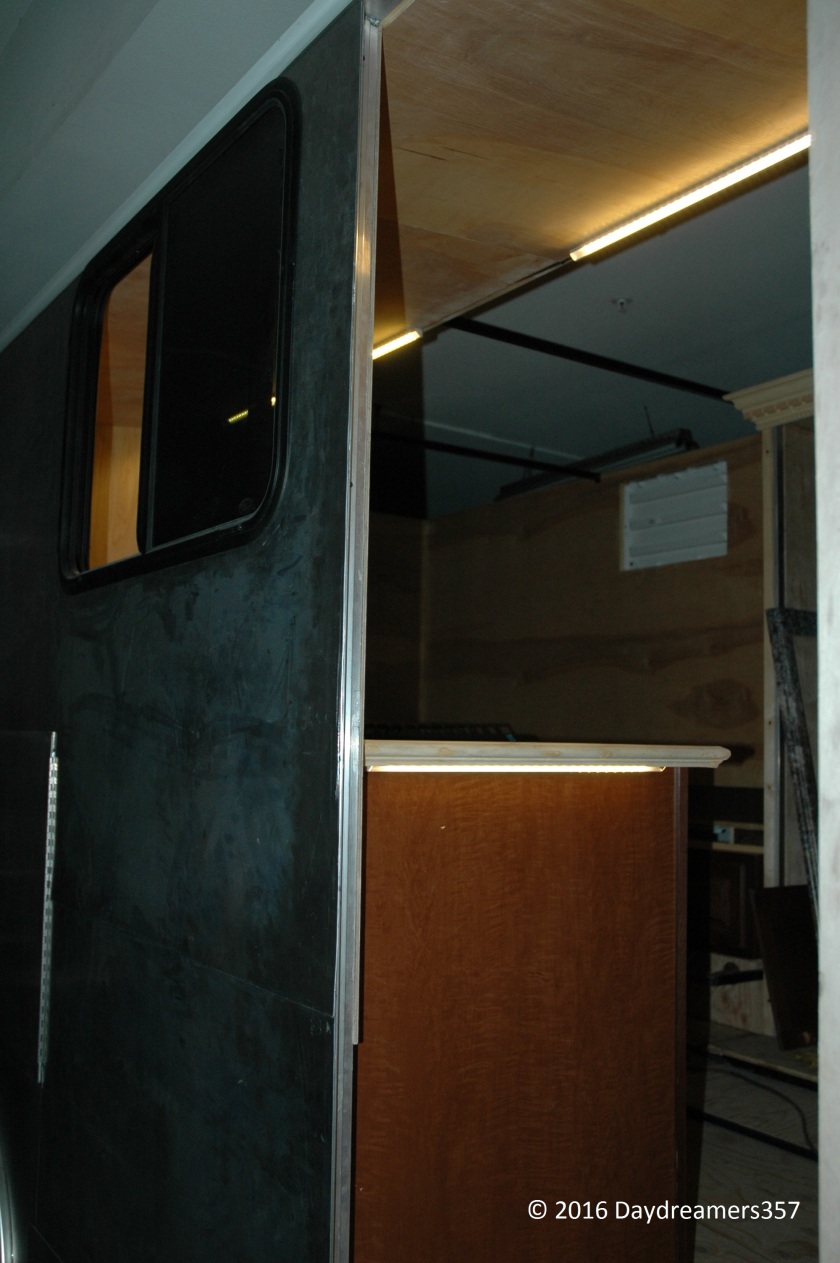
The street side slide-out has its own light bar with an oyster shell cover to soften the effect since the area is small. I don’t want any harsh light overhead while I am enjoying dinner or working on my computer. The dinette will be doubled as a working desk. The 45 degree lighting angle will help to keep the light out of the direct field of view vision.
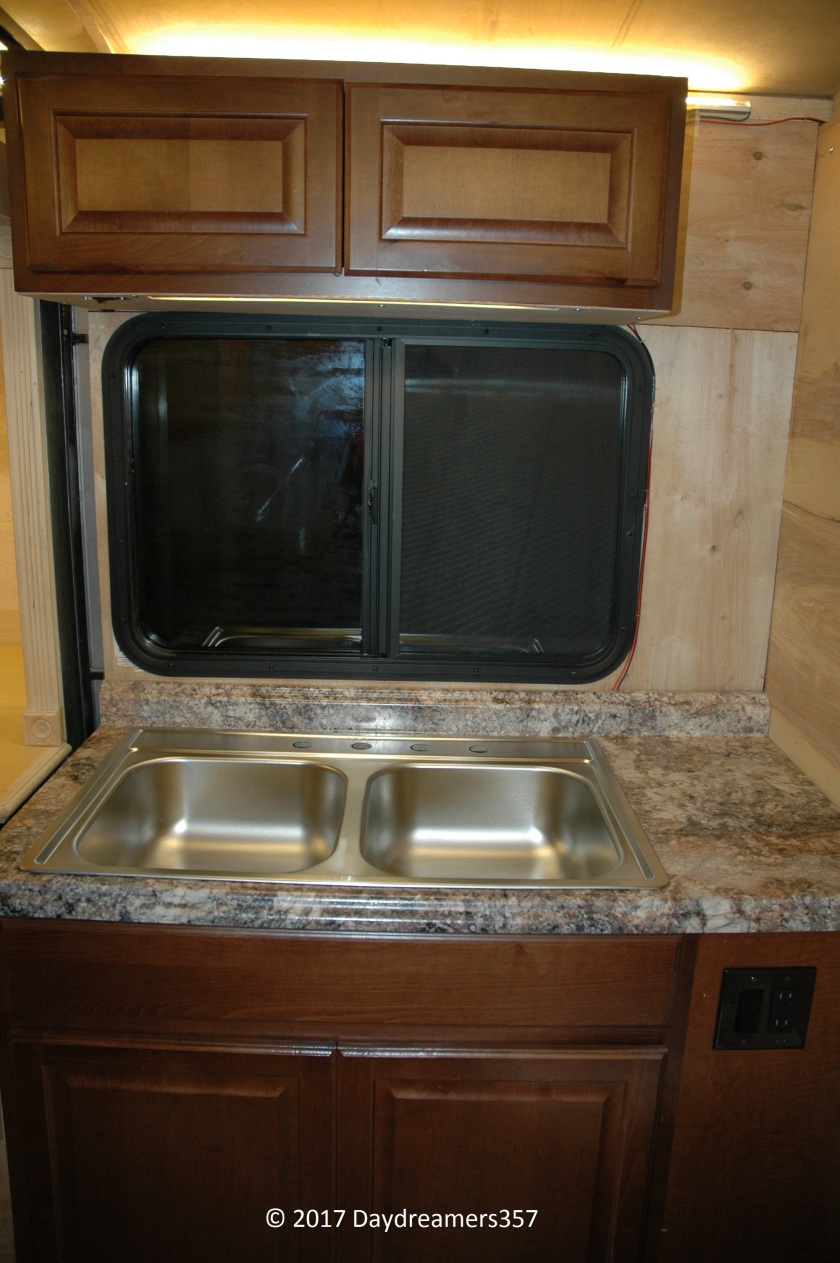
The kitchen sink has its own light bar directly overhead embedded into the base of the overhead cabinet so no direct light shining to your eyes yet the sink will be fully illuminated.
I plan to have two rows of indirect mood lighting on each side of the ceiling medallion, running the length of the RV at the middle of the roof. Each set will point outward to the side walls of the RV. When on, the entire interior of the RV will be illuminated with a pleasant light color of your choice. The ceiling medallion is still in-work so no picture yet.
Diamond in the Rough
Here she is. A blank canvas ready for furnishing and painting.
Exterior Views
Street side front. The switch panel contains the slide-out switch for extending and retracting the slide-out.Street side rear.Curb side front nose with slide-out switch panel.Rear View
Curb side slide-out
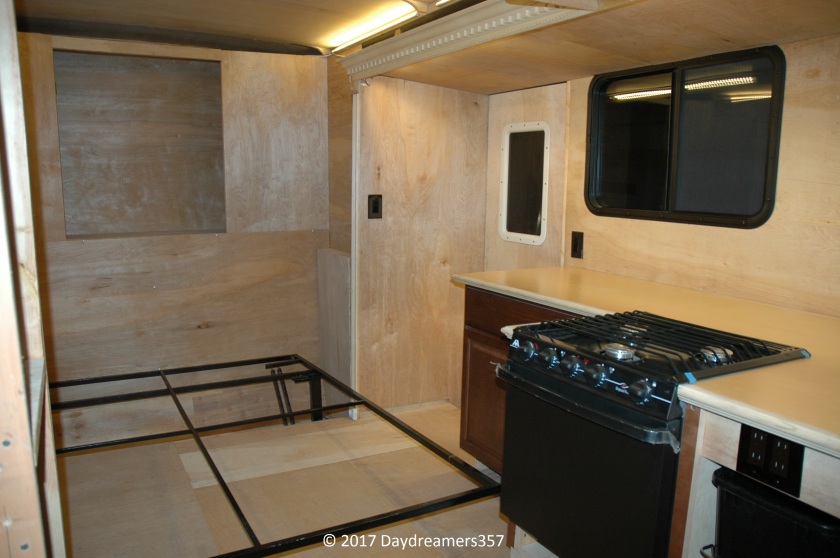
Interior Views
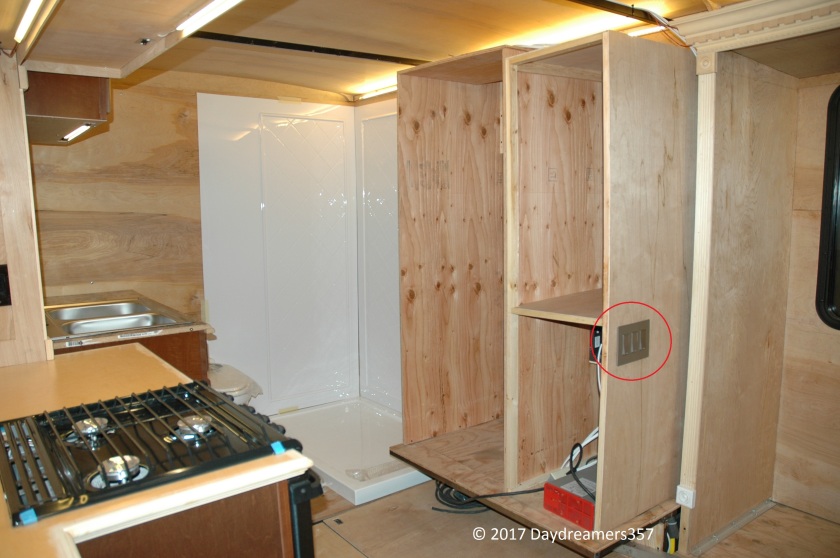
Plenty of full size counter space yet you don’t feel claustrophobic due to the slide-out expansion from both sides.The cabinets are equipped with wire racks for storage efficiency. There’s even a 13 Gallon pull-out trash bin strategically placed right next to the kitchen sink.The kitchen area provides a very ample and efficient space for cooking with all appliances within reach. There will be a built-in box to totally hide the toilet from view. The toilet box will have a vent in the back wall so no sight or smell to bother you.Future home of a luxurious shower stallKitchen sink with its own overhead light and switch. In the lower right, there’s a 120 VAC outlet and a light switch to turn on the ceiling lights in the bath area.
Ceiling Lighting
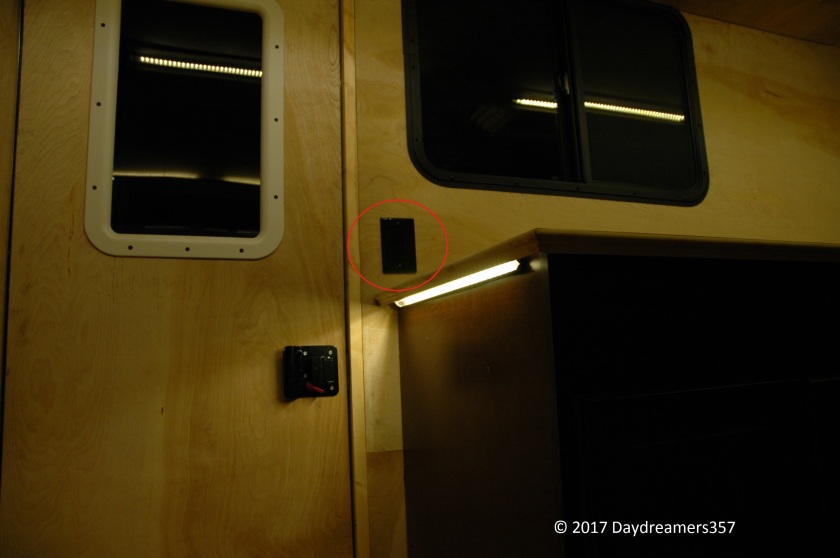
There are four sets of ceiling lights, each consists of a pair of light bars mounted on each side of the ceiling. The light switch at the kitchen sink controls the area in the rear. The next three sets are controlled by the switches at the electrical/battery storage box. Each ceiling light bar is 1 Meter long projecting light at 45 degree angle to the ceiling. See how nicely they illuminate the interior of the RV without any hash light directly at your eyes? All the lights have their own switches so that you can control the amount of light desired and to control your energy consumption in case you are boon docking.
Red circle shows the switches to control the ceiling lights. Above the electrical/battery storage box is the quick access closet for frequently used clothing items.
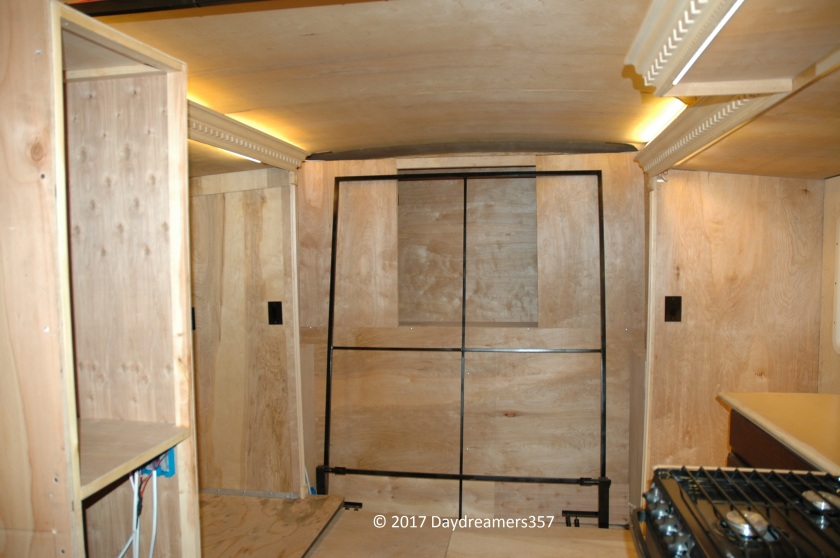
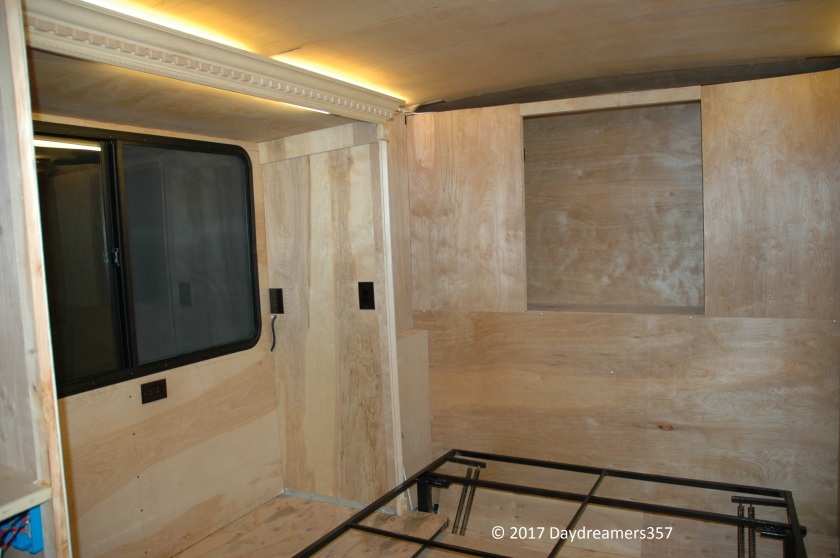
Looking toward the front
Looking toward the front with the bed flipped up. Behind the bed is the access door for the nose cone closet. The entire nose cone is used as a long-term clothing storage since you will have to flip the bed down to get access to it. As calculated, the nose cone closet provides about 32 cubic foot of storage. There’s a LED light inside the nose cone to illuminate the interior of this closet
When the bed is in the down position, there will still be enough room to walk around it.
Ob·ses·sion
an idea or thought that continually preoccupies or intrudes on a person’s mind
It’s been a long journey. It started out as a hobby to satisfy my itch for traveling and to ease myself into retirement. However, I’ve found out that I could not stop working! I’ve approached this project with the same work ethics and mental discipline as I have always been in my previous employment. Along the way, I’ve learned the values of failures as opportunities for improvements and the continuous mental capacity to learn new skills. The project has been quite a challenge in terms of design complexity and the physical demands it would take to fabricate the first article. Unlike many projects that I’ve done in my previous employment, the one luxury that this project has is TIME. Without a hard deadline, every design aspect, no matter how small, was hashed out in details for an appropriate solution as evident in the final outcomes. These design details took time. However, years of working for an aircraft manufacturing company has taught me well on how to deal with complex designs. Patience and focus have always yielded the desired solutions. I am quite happy with the compactness of this design, although, I think I have far exceeded the design weight goal of 3,000 lbs. Some last minute changes in frame structure, addition of new furniture and cabinets, bigger wheels, and some large appliances may have helped pushed the design past the weight goal. Did I forget to mention that this baby will have a nine cubic foot dual-mode propane/electric refrigerator? At the last estimate, I think my baby is already at 3,800 lbs. and counting! Ouch! Drop that donut, girl.
Dometic 9 CF dual mode refrigerator ready for installation. My fur kid decided to help modelling it. Normally, she’s very camera shy. For some unknown reason, she’s decided to “model” for the photo shoot.
As you can see, I am almost done with this design. I intend to complete it shortly so that I can scale back on the working schedule to prepare for the running season again. There will be one or may be two more blog updates where you can see the final design all decked out with fine furniture, appliances, and all LED lighting. As far as electrical design goes, the design is centered around two modes:
Full hook-up or generator power so that you can use the available 120 VAC electric to run air conditioning and electric heating together with all appliances, or,
The 12 VDC battery mode whereas an inverter will provide 120 VAC for small appliances. The refrigerator is a dual mode running on either propane or electric. All lightings are LED and run on 12 VDC battery. There is a provision for an extra propane gas valve at the base of the refrigerator. This extra gas port is reserved for a catalytic gas heater, furnace, or both. I am leaning toward just a catalytic heater. I haven’t thought about solar panels and the RV does not have the space for a generator. A generator will require frequent accesses for refuel and maintenance. I don’t want to stuff the generator into a spot where it would be exceedingly difficult to service. For now, the generator will have to be in the tow vehicle. As far as solar goes, the electrical design can easily accommodate the solar option. The solar panels themselves will require some planning. I will work on that later if I feel like I need to have one.
So what’s with the “Obsession”? Well now, as you’ve known, I have missed out on a deal for a tow vehicle. As a result, this project was conceived. However, I’ve been thinking about designing my own tow vehicle using a commercial truck chassis. Uh oh, here we go again. I can envision the reaction from my wife. As tolerant as she is, I may have pushed past the boundary with this one…but I can’t get it out of my mind. If you are curious about the design of the tow vehicle, please go back and look at my first post on the Yellowstone project: Building the Frame Part I. I’ve envisioned that it would be something that will be used for sightseeing and exploring the primitive campgrounds and will allow you to overnight for a couple of days, if necessary. I have a design concept on paper and I have been looking at the commercial truck chassis available. Although I like the chassis offerings from Ford, Toyota, Mercedes, GM, etc., I haven’t been able to find a suitable 4 x 4 commercial truck chassis. I guess “4 x 4” and “commercial” normally don’t go together. May be I will call up the Big Three or the Big Five and see if they will work with me. What’s the worst that can happen? It’s not like I haven’t gotten hung up on the phone many times before!
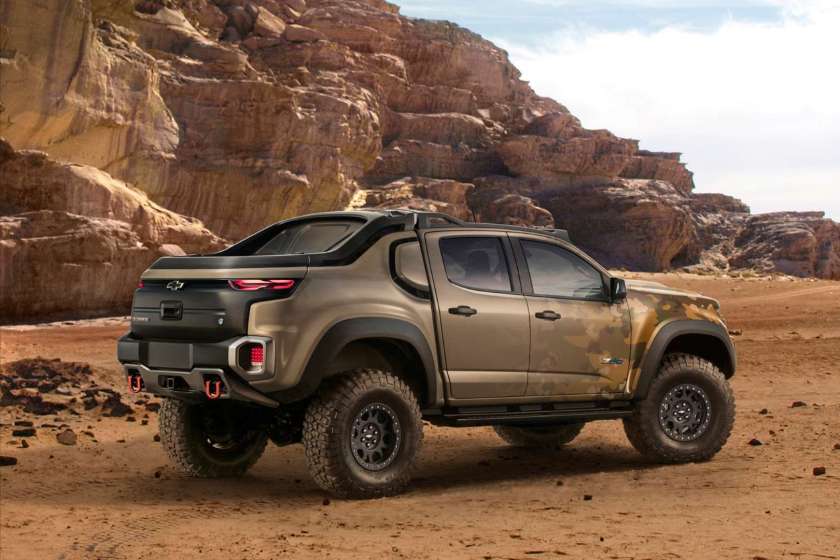
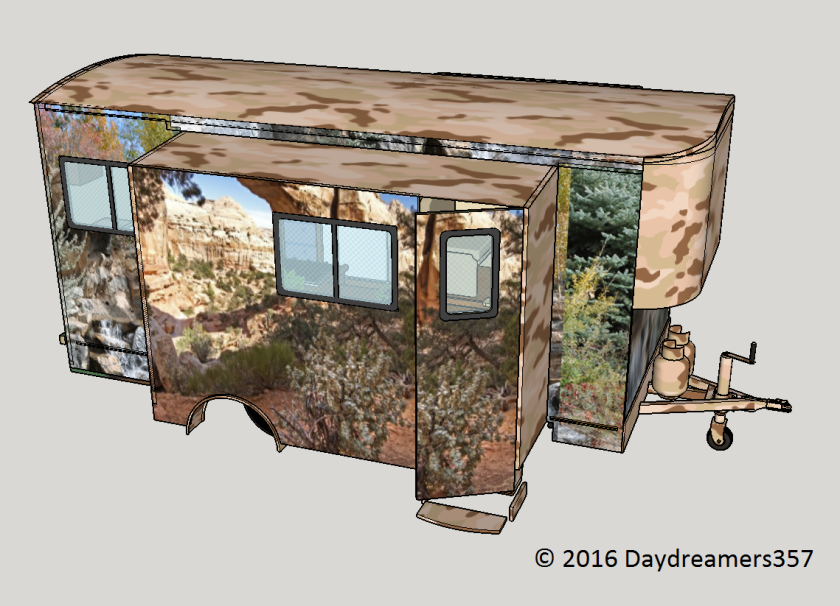
Well, if “4 x 4” and “commercial” don’t mix, the military is certainly not shy about it, I can surely envision this bad boy as my tow vehicle! It’s not exactly what I have in mind, but the aggressive design philosophies are inspiring. I can just see a camo color scheme on my little RV to match with it. Right now, I just hope I don’t have to join the Army to drive it:
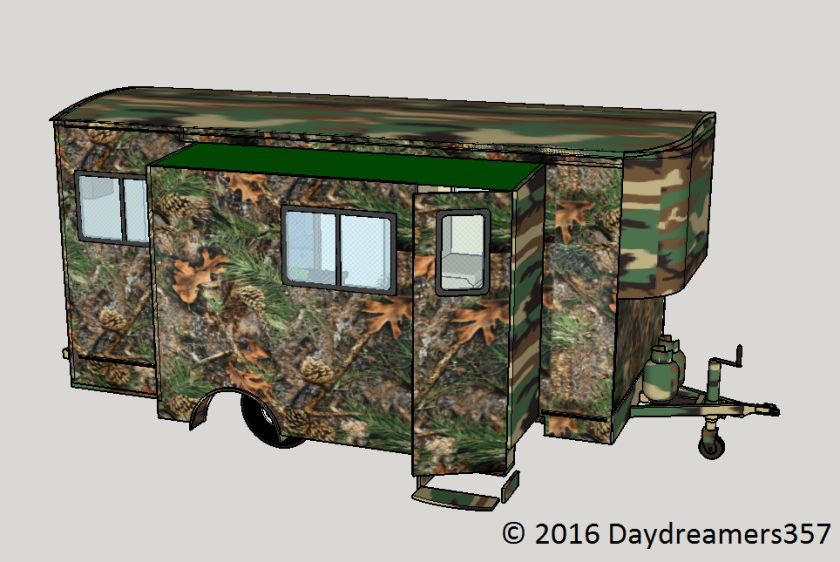
Motor Trend’s Picture of the ZH2. I’ll bet that it already has 120 VAC and 4 x 4 drive system so there will be no need for a genset.I can so see dressing her up in a desert camo paint scheme! A Desert Fox. How appropriate for the Sonoran namesake! Can you imagine the fun of this combo? My baby comes with Aluminum wheels and 16″ radial tires. She sports a 5,200 lbs. Torsional axel and having a 9 inch ground clearance at the lowest point, so she’s ready to rock and roll.How about this Emerald forest theme? The possibilities are endless. With the overall dimensions of just 19 feet long and 7 feet wide, she’s athletically lean and mean to go anywhere and the camo skin will allow you to mingle with wild life up close and personal. Although, you will just have to remember where you’ve parked her. She will be very hard to spot among the pine trees.
Con·ops
Concept of operations – …describing the characteristics of a proposed system from the viewpoint of an individual who will use that system.
The other day a friend of mine who is still in the rat race came over for a visit. He was quite taken by the design, however, he was puzzled and asked “Why a tiny travel trailer?”. I took the opportunity to explain to him the concept of a retired person being the middle of nowhere, you can press a couple buttons, then presto, a luxury home to stay in for few days! When you’re ready to move on, just press the buttons again to pack up and head to the next exciting destination. He was deep in thought for a moment then spoke excitedly: “I can totally see having this at my employer’s parking lot for five days then tow it home on Friday night for the weekend. They have a large parking lot that practically empty most of the times.”. You see, my friend commutes up to two hours one-way to his place of employment and over the years, it has really taken a toll on him. Hmm, how many other uses can this Tiny Home have?
It’s been quite a lengthy post. Due to the compressed working timeline, I won’t be able to do incremental updates. The next post will be the final design looks. Check back to see how polished she will look in the end. You won’t be disappointed. Only the finest materials and furnishing will be used. In the mean time, I am making preparation for the next project while finishing her up – Designing a tow vehicle. If you have a favorite chassis to recommend, please do so. I would really appreciate if you would share your reasons for the recommendation so that I can better understand your view.
See you next post.
Postscript
Options, options, options,..
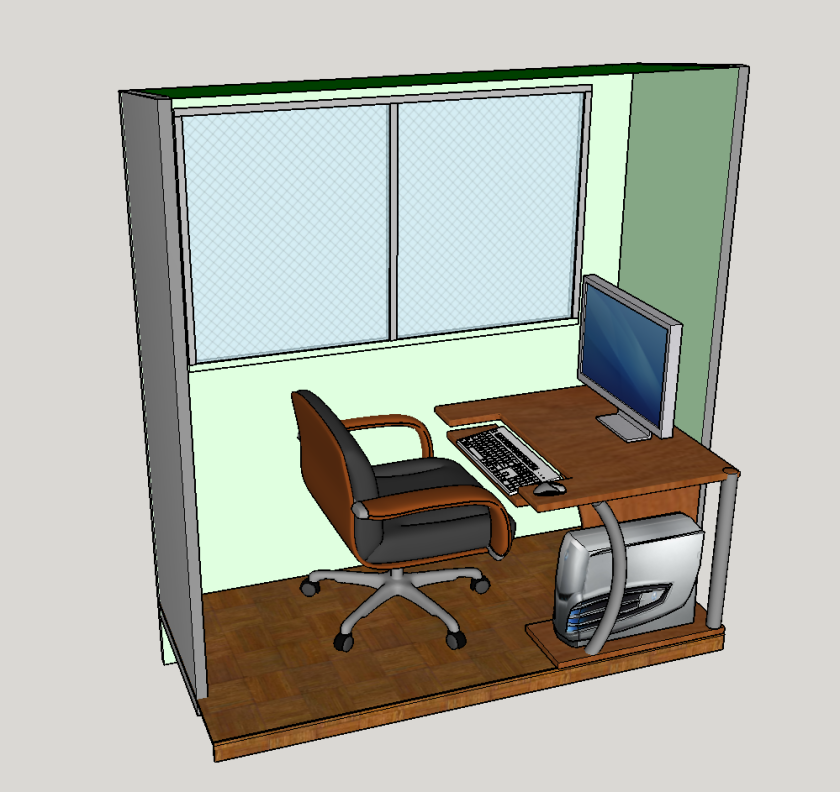
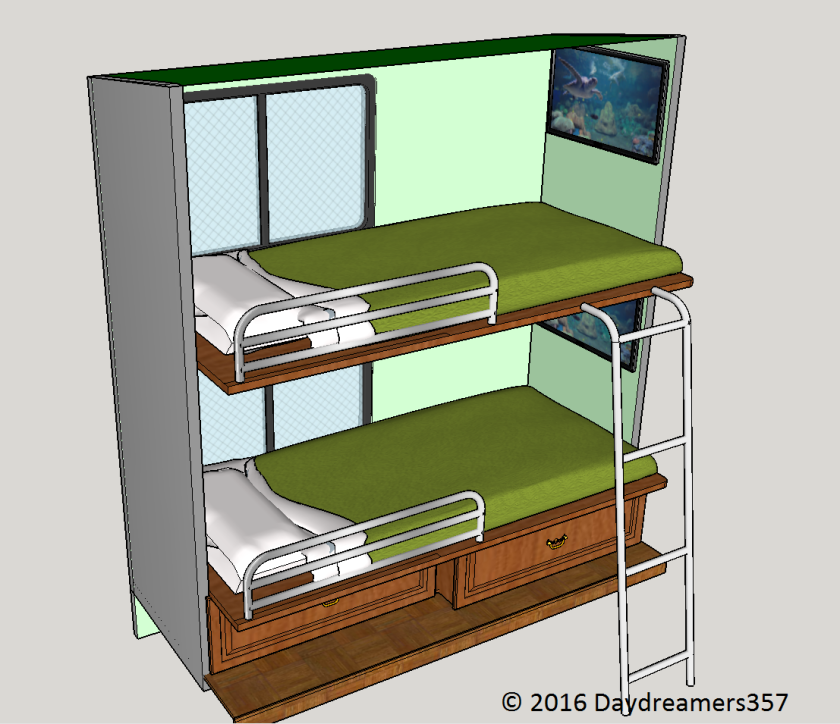
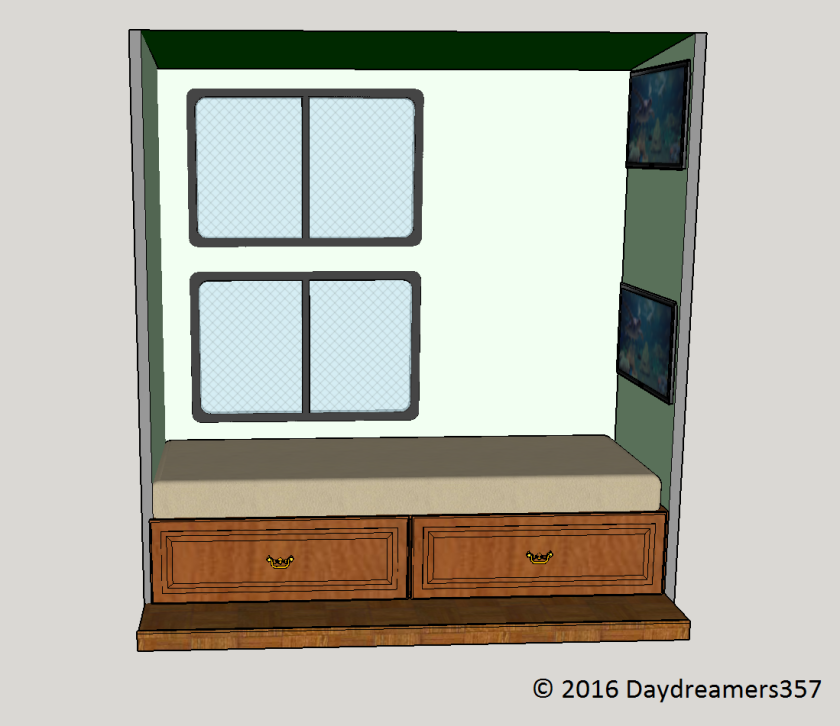
Since most of our travelling will consist of just the two of us, the dinette seems under utilized. I am thinking of other uses for the street side slide-out space. Here are some of the considerations:
Computer hut for working while camping?Bunk beds for grandkids someday? The beds are about 35″ x 70″ kind of odd size for standard bunk beds but very workable for small kids or teens that are under 5’6″ with a little leg room to spare. The space below the bottom bunk bed can be used for storage. The side rails can be made removable so that you can stack the two bunk bed frame one on top of the other to convert the bunk beds into a day bed for additional seating during the day.Converting to a day bed for day use. Let the creative juice flow! Each bunk bed will have its own window which will provide plenty of ventilation so the kids won’t feel so claustrophobic as they drift off to dream land in their cozy cocoons.
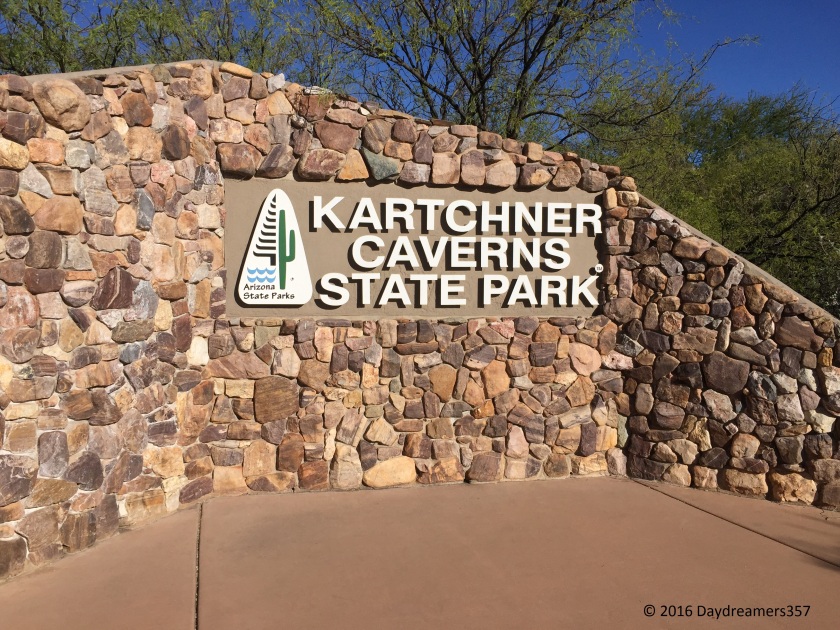
Once a year, usually around beginning of Spring, I would make a long road trip. It seems like after a long Winter hibernation, even us humans have the urge to venture out to celebrate nature’s renewal. This year, I’ve had a chance to visit Arizona’s best kept secret: The Kartchner Caverns.
No camera was allowed so no picture of the cave itself. However, you can get general of information from the Arizona State Park site. Reservation is required and can be made online:
Normally, I am not a fan of caves. However, this is an extraordinary cave for the fact that it is “live” and the people who have discovered it took extraordinary measures to preserve it near-pristine condition. To enter the cave for the tour, you will have to go through a doubly-sealed steel door entrance so that the inside cave environment is completely isolated from the outside. The cave was discovered in 1974 by two amateur cavers, Randy Turfs and Gary Tenen. They kept it as a secret until 1988 when the cave was announced to the public after protective measures were well established to protect it. Thanks to their foresight, we now have an opportunity to view the cave as it has been for millions of years.
Aside from the cave itself, the park also has RV camping sites. All sites are full service with hook ups. I didn’t use the RV site during my visit so I can’t tell you how good or bad they are. However, the desert theme landscape of the Discovery Center and the hiking trail are quite beautiful:
A lot has happened since the last time I updated the blog. I’ve built the street side slide-out as planned. The work was pretty much straight forward since it is fairly similar to the curbside slide-out. After the completion of the street side slide-out, I took the completed trailer even without windows out for a spin. The windows are custom ordered so they do take a while to arrive.
With the outside trailer completed, once the windows are installed, I can concentrate on the inside of the trailer. I ordered tons of materials and equipment to furnish the trailer. The equipment selection process is lengthy and laborious. Just to decide which equipment (i.e. water heater, furnace, water pumps, etc.) took quite a bit of time. When I tried to order them, I ran into problem from a certain web site which advise the items I need. When I placed the order, the credit card was promptly debited but the items weren’t delivered. Instead, I’ve gotten an email telling me that the most expensive item is either not available or back ordered. I will need to order similar item which are available at different price! Trying to get refund wasn’t easy. After a while, I’ve developed a “black” list of these sites. Never again! I will vote with my dollars!
I recently had my heart broken
A friend of mine had a very well maintained diesel truck that was for sale for a very reasonable price. I had all but sure that the truck will be mine. My friend did not advertise the truck for sale so no need for me to hurry. The truck will be perfect to tow my 6,000 plus lbs. trailer. Heh, heh, life will be good! I had imagined a life of us together. Travelling the back roads of the beautiful U.S. We will be spending time gazing at the stars on the moonless nights in the middle of the desert without a soul within miles. Birds will be singing to celebrate glorious mornings while we are sipping our favorite coffee watching the sun rises from the horizon. Then out of the blue, I was informed that the truck has been sold to someone else!
What’s just happened?
Like a jilted lover, I meekly took stock of the situation. How could I miss all the signs? Did I not paying enough attention to her? Did I take too long to tell her of my intention? What am I to do now? I could go on and look for another heavy duty truck. My momma always says there’s plenty of fish in the ocean. Or, could it be done I wondered…built another RV specifically for a full size SUV as a tow vehicle? When it comes to automobile toys, boys always be boys. I am gonna built another super light weight RV so that I can use my SUV to tow it with. She will have to be very lean and athletic looking. She’ll be the envy of all other RVs! I’ll show ’em!
So, I started with a blank sheet of paper
First of, she will have to shed 3,000 plus lbs. so that her dry weight is less than 3,000 lbs maximum. She will be thinner and shorter in both length and height. So the overall specifications look like this:
Sleeping Capacity 2 – 4
Overall Length 19’ 11”
Exterior Width 7’
Exterior Height 9’ 7”
Interior Height 6’ 5 “
Dry Weight < 3,000 lbs
Fresh Water Cap. 40 Gal.
Grey Water Cap. 39 Gal.
Black Water Cap. 17 Gal.
A/C 13, 500 BTU
As small as she will be, one thing is absolutely certain: She will be designed to be more like a tiny home with all the comfort of a home.
Honey, do I look fat to you?
“Of course not, honey!” I shot off without hesitation.
“You are lying!”
Hmm…wrong answer again! If your spouse or girl friend has ever asked you this question, you know you are in trouble. I have hypothesized that there will never be a correct and appropriate answer to this question. For as long as I can remember, I have never successfully answered this question. If I hesitate a bit or answer too fast, I will be accused of lying or not caring. The closest to success was one time a female co-worker of mine asked me a similar question. Without hesitation, I replied:
“Fat? Just so you know, the other day Justin Bieber asked me if you are available. I hated to do it to him, but I had to gently tell him that you are way out of his league. So no, off course you are not fat.”
That really put a smile on her face. She offered me a cupcake claiming that she doesn’t really need it. Score! But as I walked away from her cubicle with the spoil, I was thinking I may have been duped. She really didn’t want the cupcake, she just wanted me to “earn” it. That’s another one of my hypothesis. Women will entice and train men just like training their puppies. We will be unwittingly enticed into doing whatever they want without ever realizing that we are being told to do so. Now let me digress back to the issue of trailer weight. Well, if your trailer is heavy, you will be brutal.
“Off course, you are fat! Girl, you need to loose some serious weight before I can take you to places.” So, how do you shed 3,000 plus lbs. on the design?
Streamline the overall dimensions for SUV towing by reducing the over all dimensions of the trailer. The new design will have a box of 7 feet wide and about 16 feet long. I wanted to reduce the width of the trailer so that I don’t need the extension mirrors on the SUV. One less item (actually two extension mirrors) to care about. However, with only 7 feet wide to work with, the floor plan is extremely challenging to design.
Reduce frame weight by eliminate basement storage. This is quite painful but necessary to reduce the overall height. It is nescessary that the trailer does not project too far above the SUV in order to improve stability. Additionally, making the trailer frame as a single box design to spread the weight along the frame. Typical trailers have a very rigid frame consisting to either heavy I-beams or heavy gauge tubes. With a rigid frame built using these rigid beams, the rest of the trailer is built on top of the frame. This is fine and dandy, but if you’re gonna lose some serious weight, you will have to start with a lighter frame. As any first year engineering student will attest, instead of using one heavy duty I-beam, one can substitute the I-beam with a ladder (struss) design by using a lighter tube for the basic frame then run a parallel lighter tube on top of the frame forming a box. This approach is very conducive to trailer frame design. In the previous design, this approach is used to provide basement storage. In this design, the box is squatted down to only a few inches. Just enough to provide space for running electrical wires and gas hoses.
Even with the draconian mandate to lose weight, there are a few things that I won’t give up:
Full size resident shower stall
Regular Queen Bed
Electric Refrigerator
Full size toilet
With these specifications defined, off to the computer modelling shop I went.
This is what has been keeping me busy for the last few weeks.
Exterior Views
Curb Side ViewStreet Side ViewTop View
Interior Views
Murphy Bed and Booth Dinette Close-up
Cooking Island
Full Bath
The Disappearing Toilet
I have a secret love affair!
Perhaps with a much lighter design and an extremely small foot print, this trailer will allow me to explore even the remotest areas while retaining a comfort of a Tiny Home. Years ago when I was still a young teenager, I have camped all over the Sonoran desert in Arizona. Back then, camping meant tent camping. Out of those experiences, I’ve developed a deep love for the desert. The desert is like a beautiful but firm fairy. Her best appearance is at dusk. You will be enchanted by the most spectacular desert skies at sunset. However, if you are patient and quiet, look deep around you and even at your under foot. The desert fairy will reveal to you a host of her inhabitants. Reptiles, insects, birds, and mammals all coming out when the sun is no longer in command of the hour. Look but don’t touch. Some of her inhabitants can be quite deadly.
PBS recently re-ran a film about the Sonoran desert – Desert Dreams: Celebrating Five Seasons in the Sonoran Desert.
This is not your ordinary wild life film. It is an artistic visual treat not to be missed. The review can only be described as: “mesmerizing”, “stunning”, “powerful”, “incredible”, “spectacular”, etc. Keep in mind that I don’t get paid to endorse this film. Consider it my extremely condensed “movie” review.
Epilogue
When I first start this project, I’ve always known that the design will evolve as I’ve gained more experience. In my past experience working for my employers, the first built unit was always referred as T-1 or Test Unit #1. T-1 article provides engineers with invaluable knowledge on what’s working well and what needed to be improved upon. I don’t want this post to be the conclusion of the Yellowstone Project but rather a temporary pause. I plan to complete the new design then go back and continue to furnish the current design.
The new design is a whole new different approach with the emphasis in light weight while giving up on some functionalities. Starting with the next post, I will provide a much shorter but condensed progress of the new design. See you soon with the new design adventure.
There are something growing and I’ve been watching them closely. My next task is to build the slide-outs, but occasionally, I’ve been distracted. Spring is around the corner and I can’t wait. I can already feel the stir of nature as Spring is approaching. I have certain tasks to do but I am too anxious to do them. Remember how the slide-outs will be built?
“The gigantic slide-outs. Each slide-out runs almost the entire length of the trailer body. The slide-out will be made entirely out of Aluminum. When installed and in the extended position, they will balance at the edge of the trailer wall with half of the slide-out extending beyond the side wall and the other half stays inside the body acting as counter weight. This is where the design departs from the norm. Each slide-out is a whole body section by itself. The two slide-outs are nesting into each other. When extended, each one will balance half way at the edge of the opposing side walls.”
I have done all the calculations and modeling. But…what if the design fails? The whole design is based on one single nesting slide-out concept. If it doesn’t work, the entire RV will be a ginormous thousand-pound paper weight and I don’t need a paper weight. I am no longer an office worker!
I often found myself deep in thoughts in our little backyard garden. Oh no, what will the neighbors think? Have I become Auguste Rodin’s “The Thinker” sculpture in my own backyard? Well, sort of. This is what I’ve been watching while I was contemplating about how to build the slide-outs.
They were just a couple of tiny eggs in a nest about the size of a ping pong ball blowing in the wind. It’s been very windy lately, and every day, I’d often check on them. They are growing fast. I had to be very still in order not to disturb mom. If I could, upon completion of the slide-outs, I will put a couple pictures of these babies onto the slide-outs. The parallel is incredible. From a tiny concept born a big idea which will take flight someday.
Curb Side Slide-out Modeling
The slide-outs are actually whole body sections which nest into each other. They are heavy because they will bear the loads for all necessary furniture and occupants. Each slide-out will have to move transversely from the main body. They will be supported by two slide-out tubes driven synchronously by a single motor.
Here’s a sequence of computer model screen shots to explain the design concept for the Curbside slide-out.
The Curb Side slide-out is supported by a slide-out support frame acting like a tray which attached to the two slide-out tubes. As the tubes move in and out, the tray will move with them. The support frame will also be the attach point for the entrance steps and will bear the load of the steps and the occupant. This approach will allow the slide-out bodies to be built separately using different material other than steel, i.e. Aluminum for weight saving.
Perspective View from RearSide View
The Curb Side slide-out frame will be built separately and will be mounted onto the slide-out support frame.
Street Side Slide-out Modeling
Similarly, the Street Side slide-out will have its own slide-out support frame and two slide-out tubes.
The Street Side slide-out will also be built separately and will also be mounted onto the slide-out support frame.
Side View from StreetPerspective Street View from Rear
Slide-out Furnishing
Upon completion of the slide-outs, each slide-out will have little more than 100 living square feet. There are quite a bit of basement storage underneath the slide-outs. The floor plan layout is as follow:
The floorplan layout adheres to a rigid philosophy:
Retain the use of the most necessary facilities even when the RV is in a fully retracted mode. Meaning, the bedroom and the bathroom will be fully functional at all times.
In order to do so, each piece of furniture has to be accurately modeled into the CAD software. So, here’s the planned furnishing for the Curb Side slide-out
Curb Side Slide-out Furnishing
Here’s the planned furnishing for the Street Side Slide-out. The bed will be able to accommodate a standard Queen-size mattress of 60”W x 80”L and there is still room to walk around it. The sofa is a folding type with removable seat cushions.
Street Side Slide-out Furnishing
The million-dollar question is:
Can the Slide-outs be retracted without interfering with each other?
Fortunately, with the advances of Computer Aided Design (CAD) software, the answer is a resounding Yes!
Retracted Curb Side ViewRetracted Street Side View
Look carefully at the placement of the cooking island. This would not be possible without today’s computing powers available to ordinary folks like me.
The Calvary is Coming
With the amount of work planned, it is impossible to do them all by myself. It is time to call upon the posse. These young hired guns were willing to do the work just for burgers and fries! Psst, it helps if you are related to them.
Various frames for the slide-outs were fabricated by different guys. I am keeping my fingers crossed when they are finally assembled together.
This young and good looking guy is an expert in welding. He also has a precision of an engineering scientist to match with his welding skills.
As I watch the Curb Side slide-out slowly extending with a couple guys still standing on it. I can’t help but overcome with emotion. It’s been a long journey just to get to this point.
The shear size of the Curb Side slide-out dwarfs the trailer body itself.
The weight of the slide-out and its contents are nicely supported as planned
They worked until dust. We are on a tight schedule for final assembly.
So what’s happened to our little friends? I found myself rooting for them. They seem too tiny and fragile. I am rooting for their jest of life. I am rooting for new adventures not knowing what the future may hold. Everyday, I would check on them. They have been practicing flying. Take flight young ones, for we shall never fear the unknown, because the unknown is life itself.
I had a hot date on my Valentine’s day. She’s hypnotically beautiful. She’s very athletic and she likes to play rough! In fact, my wife even likes her.
No silly goose! We are not the swinger type. It’s the LA Marathon on Valentine’s Day this year. Once a year, I try to do at least one marathon and the LA Marathon is my only choice for now because I like its course. It goes from the Dodger Stadium to the Santa Monica Pier. I pay a small fee to join the LA Roadrunners. It’s the best money that I have ever spent. For the pittance amount, the club provides training from around September through February or March whenever the LA Marathon will happen. The training fee includes training materials, running coaches for the group, parking during group runs and the LA Marathon admittance fee. All they ask in return is for you to wake up early and be at the Santa Monica pier at 6:45 AM every Saturday and run with your group of choice. What a deal! Did I forget to mention that you have to do “homeworks” by running during weekdays, too?
No, I don’t get paid for pitching the LA Marathon or the Roadrunners club. The reason I brought it up is because this project is fairly similar to the marathon. It really takes such monumental endurance to tackle a project this size by yourself. As you recall in the earlier post of my sense of overwhelming and despair? I knew how big this project may be, but I have way underestimated the scope of the tasks involved. There are times when I’ve taken a look at the next tasks and wondered if it’s worth it to continue.
Building the Roof
Remember this frame plan? In the next frame building phase, I needed to build the upper half of the frame and it was easy enough. Then, I needed to build the roof and the nose cone. This is where a major decision has to be made. Originally, I wanted a roof and a nose cone which will be made out of fiberglass. Each piece will fit into its allotted section as a single unit.
I have talked to a number of local fiberglass making shops regarding fabricating a one-off roof and nose cone articles. Some of the quotes I’ve gotten were prohibitively high. I haven’t given up yet, but I needed an alternative design to proceed, so here’s what I’ve come up with. The roof and the nose cone will be made out of Aluminum sheets. They will not look as sleek as those that are made from fiberglass, but they will work just as well.
So off I went to make the roof and nose cone items.
Here’s the frame for the roof. It’s a one piece frame with a channel in the middle for heating and cooling ducts.
The roof was fully insulated with Styrofoam insulation. I planned to spray expanding Styrofoam liquid to fill in the gap.
Finally, sections of Aluminum sheets were used to fully cover the top. The roof looked rigid and water tight but heavier than I would like it to be. It took a team of seven young guys to lift the roof over the frame structure so that I can weld it in.
I had to make a platform for the guys to stand on in order to lift the roof onto the frame. Unfortunately, I was also doing the heavy lifting so no picture was taken of the roof installation.
Fabricating the Nose Cone
Next up is the substitute nose cone. So, here is the plan for making the nose cone out of Aluminum sheets.
Internally, the nose cone has a rectangular metal frame that acts as its skeleton. I expected a lot of stress from wind velocity so I’ve planned for the worst.
It took quite a bit of effort to fabricate this nose cone due to the sheer size. The overall dimension is 72” x 102”. Although the nose cone looked acceptable, when I do find the right fiberglass supplier, I may replace it with the fiberglass nose cone to get the right looks. Or may be not.
This is what the substitute nose cone looked like when installed onto the frame.
Now back to my Valentine’s hot date. She was waiting for me somewhere at a distance. The lady of sport. So beautiful, so desirable, yet so…painful to reach for her. Here I was somewhere at the 25th mile. My body racked with pain. My mind could no longer think logically. Breathing was heavy and shallow. Pulse rate was in the 150 plus. Sexy as hell you would think. Oh no, far from it. I was on the verge of dying from pain. This is when your training kicked in and guided you. It commands you to take another step and then yet another step despite everything else in your body begged for mercy. My date played rough!
Finally, seconds away from her open arms. As if her appearance wasn’t dramatic enough, she was all shrouded in the mystical coastal fog of a glorious morning.
A kiss on the cheek in the form of a cheap looking medal and we parted ways. I promised to come back and see her next year. I told you, I had a hot date for Valentine’s!
Next post, I will have to tackle the most challenging part of the design: The gigantic slide-outs. Each slide-out runs almost the entire length of the trailer body. The slide-out will be made entirely out of Aluminum. When installed and in the extended position, they will balance at the edge of the trailer wall with half of the slide-out extending beyond the side wall and the other half stays inside the body acting as counter weight. This is where the design departs from the norm. Each slide-out is a whole body section by itself. The two slide-outs are nesting into each other. When extended, each one will balance half way at the edge of the opposing side walls. I am anxious to get started, but for now, I will have sit out for a couple days and wait for my body to heal and the pain to subside.